Last Updated: July 23, 2015
WordPress Business Directory Manage Options General shows you how to set up Data Collection, Permalinks Settings, reCAPTCHA Settings and more.
Latest News: I have added another link to the menu.
This post shows you the many different settings found under the General tab. This plugin has many different configurations and settings to organize before you begin. I suggest that you spend some time understanding all the different settings This will allow you to set up a great Business Directory.
WordPress Business Directory Plugin Tutorials
- Install and Activate
- Manage Options General
- Manage Options Listings
- Manage Options Email
- Manage Options Payment
- Manage Options Image
- Form Fields
- Add New Fields
- Manage Fees
WordPress Business Directory Manage Options General Steps
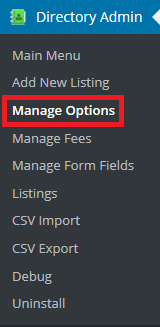
Step 1 ) Go to Directory Admin -> Manage Options to start setting up the plugin. See image below.

Step 2 ) Go to Directory Admin -> Manage Options -> General to start setting the following options.

Data Collection:
- Allow BD to anonymously collect information about your installed plugins, themes and WP version?
Permalinks Settings:
- Directory Listings Slug
- Categories Slug
- Tags Slug
- Remove listing ID from directory URLs?
reCAPTCHA Settings:
- Need API keys for reCAPTCHA? Get them here.
- Use reCAPTCHA for contact forms
- Use reCAPTCHA for listing submits
- Use reCAPTCHA for listing comments?
- reCAPTCHA Public Key
- reCAPTCHA Private Key
Terms and Conditions:
- Display and require user agreement to Terms and Conditions
- Terms and Conditions
Directory Display Options:
- Show the “Submit listing” button.
- Show “Search listings”.
- Show the “View Listings” button.
- Show the “Directory” button.
Directory Search:
- Display search form when displaying search results?
- Quick search fields
- Enable high performance searches?
Miscellaneous Settings:
- Enable AJAX compatibility mode?
Click on the following URL Manage Options Listings to continue with the set up.
I hope this tutorial helps you.
If you have any questions please let me know. I will be updating this post from time to time.
Enjoy