The following WP Express Checkout Advanced Settings tutorial shows you how to set up price display settings and more.
Last Updated: April 3, 2025
Latest News: Updated the documentation.
This tutorial shows you how to customize the following plugin settings.
- Price Display Settings
- Terms and Conditions
There are a few settings to configure, but this area is slowly growing. WP Express Checkout is slowly becoming a popular plugin and developers continue to add more features based on user request.
What You Need:
WP Express Checkout Advanced Settings
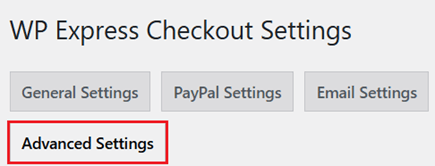
Step 1 ) Go to WP Express Checkout -> Settings -> Advanced Settings tab as illustrated in the following image to start configuring the advanced settings.
Price Display Settings
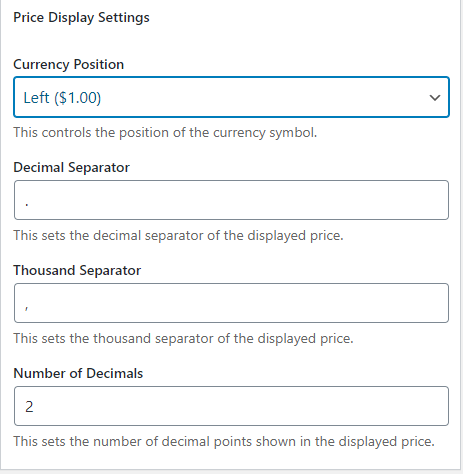
Step 2 ) The following image Price Display Settings allows you to set up the following options.
Price Display Settings
- Currency Position
- Decimal Separator
- Thousand Separator
- Number of Decimals = Note: This setting only supports price amount up to 2 decimal places (which is standard for a price value).
Terms and Conditions
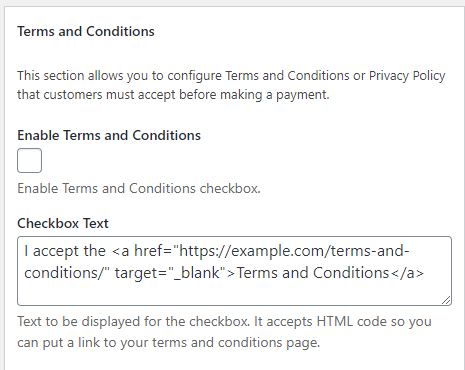
Step 3 ) The following image Terms and Conditions allows you to set up the following fields.
Terms and Conditions
- Enable Terms and Conditions
- Checkbox Text = You can see an example of the text you can add to your site including some HTML tags.
Download Link Expiry
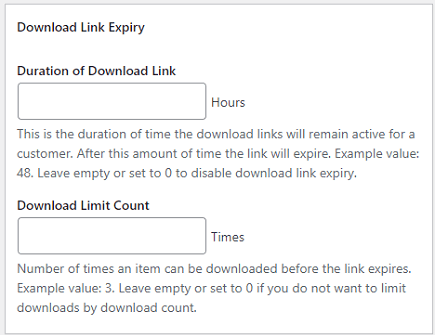
Step 4 ) The following image Download Link Expiry allows you to set up the following fields.
Download Link Expiry
- Duration of Download Link
- Download Limit Count
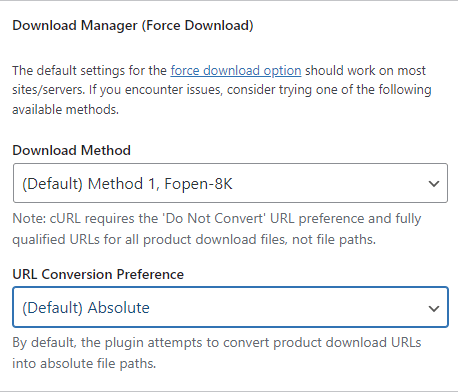
Download Manager (Force Download)
Step 5 ) The following image Download Manager (Force Download) allows you to set up the following options.
Download Manager (Force Download) Options
- Download Method
- (Default) Method 1, Fopen-8K
- Method 2, Fopen-1M
- Method 3, Readfile-1M-SessionWriteClose
- Method 4, cURL
- Method 5, Mod X-Sendfile
- URL Conversion Preference
- (Default) Absolute
- Do not convert
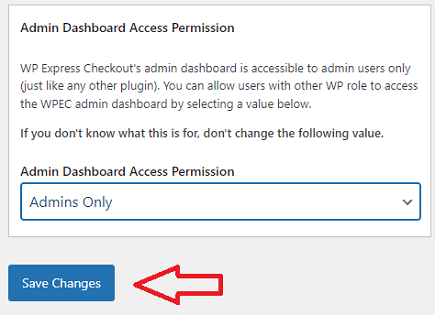
Admin Dashboard Access Permission
Step 6 ) The following image Admin Dashboard Access Permission allows you to set up the following option.
Admin Dashboard Access Permission
- Admin Dashboard Access Permission
- Admins Only
- Admins, Editors
- Admins, Editors, Authors
- Finally when you are happy with your settings click on Save Changes button.
==============================
That is all you need to do to set up the advanced settings in the plugin.
I will be updating this post from time to time. So keep coming back for more.
Enjoy.
WP Express Checkout Plugin Tutorial List:
Were are WP Express details stored in WordPress database?
Like to be able to do a query as for reporting
Hi Thom, the product data goes to the wp_posts table (as a custom post type). Orders go to the wp_posts table as another custom post type. The settings go to the ‘ppdg-settings’ in the options table.
I hope this helps you.
Regards.