WordPress Speed Booster Pack CSS Optimizations post provides a list of features that manages the css optimizations in the site.
Last Updated: June 9, 2022
Latest News: Updated the documentation.
Optimizing the css, critical css, inline and more allows you to further improve the speed of your site. However this can be very tricky and you need to make sure you do some testing before you finalize these optimizations.
Some of these features will not work well in your site. It is up to you to find out which ones will and which ones won’t work well in your site. Make sure you test thoroughly each feature you enable before finalizing your settings and going live.
Note: These steps require thorough testing.
What you need:
- Speed Booster Pack
- Speed Booster Pack Documentation = (Important: Please read this documentation before you enable any of the options in the plugin.)
Speed Booster Pack Tutorials
- Speed Booster Pack Plugin
- General
- Caching
- CDN And Proxy
- CSS Optimizations
- Assets
- Special
- Optimize Site Steps
Note: Most of the notes are copied from the plugin’s settings documentation.
WordPress Speed Booster Pack CSS Optimizations
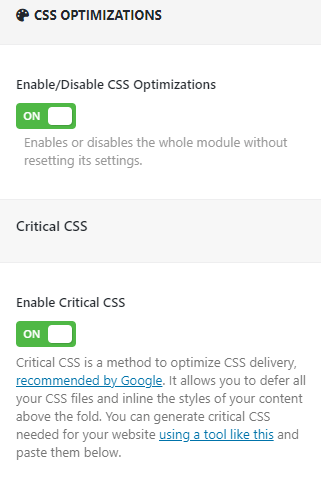
Step 1 ) The following image CSS Optimizations allows you to enable the following features.
CSS Optimizations
- Enable/Disable CSS Optimizations = Enables or disables the whole module without resetting its settings.
Critical CSS
- Enable Critical CSS = Critical CSS is a method to optimize CSS delivery, recommended by Google. It allows you to defer all your CSS files and inline the styles of your content above the fold. You can generate critical CSS needed for your website using a tool like this and paste them below.
Default Critical CSS
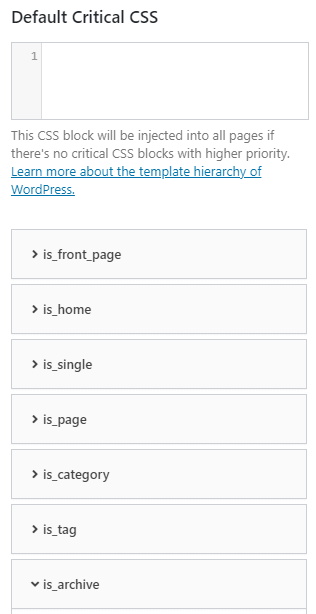
Step 2 ) The following image Default Critical CSS allows you to enable the following features.
Default Critical CSS
- Default Critical CSS = This CSS block will be injected into all pages if there’s no critical CSS blocks with higher priority. Learn more about the template hierarchy of WordPress.
- is_front_page = This CSS block will be injected into the front page of your website. Learn more about is_front_page().
- is_home = This CSS block will be injected into the blog homepage of your website. Learn more about is_home().
- is_single = This CSS block will be injected into all single posts. Learn more about is_single().
- is_page = This CSS block will be injected into all static pages. Learn more about is_page().
- is_category = This CSS block will be injected into all category archive pages. Learn more about is_category().
- is_tag = This CSS block will be injected into all tag archive pages. Learn more about is_tag().
- is_archive = This CSS block will be injected into all archive pages. Learn more about is_archive().

Remove critical CSS after onload
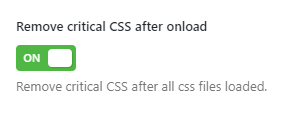
Step 3 ) The following image Remove critical CSS after onload allows you to enable the following features.
Remove critical CSS after onload
- Remove critical CSS after onload = Remove critical CSS when the onload event fires on browser. Enable this only if you’re having styling issues when the pages finish loading.
Inline & Minify CSS
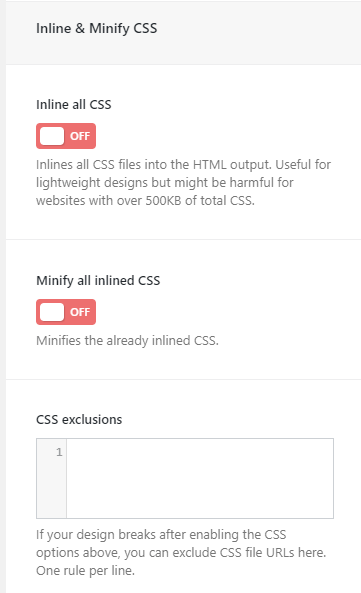
Step 4 ) The following image Inline & Minify CSS allows you to enable the following features.
Inline & Minify CSS
- Inline all CSS = Inlines all CSS files into the HTML output. Useful for lightweight designs but might be harmful for websites with over 500KB of total CSS.
- Minify all inlined CSS = Minifies the already inlined CSS.
- CSS exclusions = If your design breaks after enabling the CSS options above, you can exclude CSS file URLs here. One rule per line.

=======================================
I will be updating this tutorial from time to time. Make sure you come back for the latest updates.
If you have any questions please let me know.
Enjoy.

