WordPress Simple Membership Advanced Settings shows you how to setup features in the advanced settings and check add-ons settings.
Last Updated: February 7, 2025
Latest News: Updated the documentation.
Simple Membership plugin continues to grow and the developers continue to add more functionality. Some added features have been added to the Advanced Settings tab. Some of the other tab functions have been moved to this tab. This publication will show you how to configure the advanced options for managing your membership site. As these settings are advanced, you should pay more attention when activating these options. Be sure to check the settings before saving the changes.
The following settings will show you how to Enable Expired Account Login, Membership Renewal URL and more.
What You Need:
Simple Membership Settings Tutorials List:
- General Settings
- Email Settings
- Tools
- Advanced Settings
- Blacklisting & Whitelisting
- Addons Settings
WordPress Simple Membership Advanced Settings
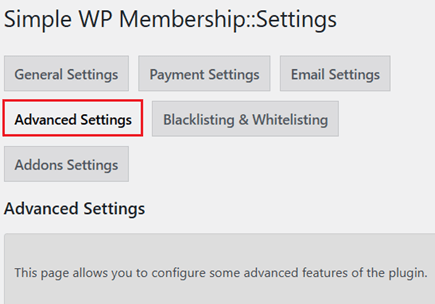
Step 1 ) Go to WP Membership -> Settings -> Advanced Settings as illustrated in the following image to set up the following options.
Advanced Settings Options
- Advanced Settings
- Create Member Accounts for New WP Users
- Terms and Conditions
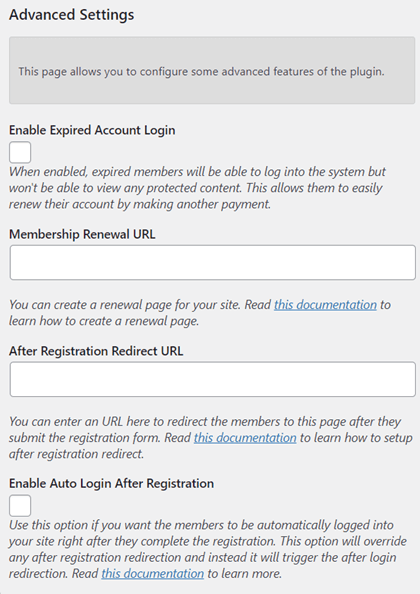
Advanced Settings Options Part 1
Step 2 ) The following image Advanced Settings Options Part 1 allows you to select from the following options.
Advanced Settings Options Part 1
- Enable Expired Account Login = Note: If you want your members to receive a notification, you can enable the Notify User feature for the member in question. It is located in WP Membership -> Members -> Edit Members.
- Membership Renewal URL = You can create a renewal page for your site. Read this documentation to learn how to create a renewal page.
- After Registration Redirect URL = You can enter an URL here to redirect the members to this page after they submit the registration form. Read this documentation to learn how to setup after registration redirect.
- Enable Auto Login After Registration = Use this option if you want the members to be automatically logged into your site right after they complete the registration. This option will override any after registration redirection and instead it will trigger the after login redirection. Read this documentation to learn more.
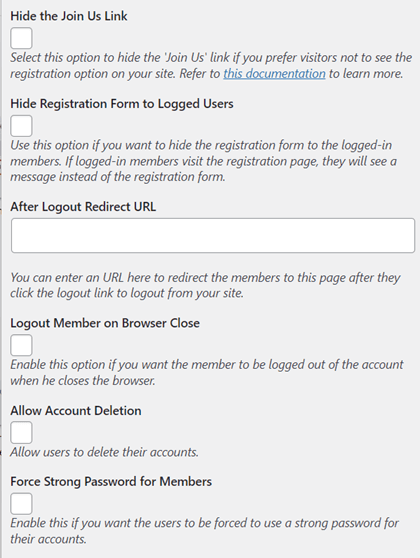
Advanced Settings Options Part 2
Step 3 ) The following image Advanced Settings Options Part 2 allows you to select from the following options.
Advanced Settings Options Part 2
- Hide the Join Us Link = Note: Refer to the following documentation for more information.
- Hide Registration Form to Logged Users = Note: Use this option if you want to hide the registration form to the logged-in members. If logged-in members visit the registration page, they will see a message instead of the registration form. Check Step 3-a ) below for more information..
- After Logout Redirect URL
- Logout Member on Browser Close = (Note: Enable this option if you want the member to be logged out of the account when he closes the browser. Check the following URL automatically-logout-members-browser-closure-force-member-logout for more information.)
- Allow Account Deletion = Check Step 3-b ) below for more information.
- Force Strong Password for Members = (Note: This feature makes sure your members enter a strong password when registering as a member.)
Hide Registration Form to Logged Users
Step 3-a ) When you enable Hide Registration Form to Logged Users, the member will see a message instead of the normal registration form.
The following message is what the member will see when they visit the registration page.
You are already logged in. You don’t need to create another account. So the registration form is hidden.
Allow Account Deletion
Step 3-b ) When you enable Allow Account Deletion, the member will be able to delete their account when they view their profile. The Delete Account link can be found underneath the Submit button in the profile page. See image below.
(Note: If it is a PayPal subscription account, the member has to also delete the subscription from their PayPal account. For Stripe subscriptions, it deletes their Stripe subscription when they click on the Delete Account button. The following forum post has more information. )

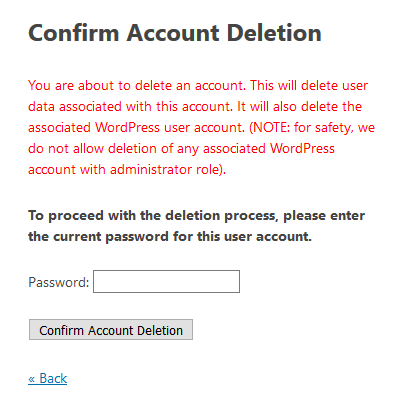
Step 3-b-1 ) When they click on Delete Account link mentioned above, they will see the following message as illustrated in the image below. They then enter their password and click on Confirm Account Deletion button. Once they click on the button, they will be automatically logged out from their account. They will not be able to log back in again and their WP User account will also be deleted.
Confirm Account Deletion
You are about to delete an account. This will delete user data associated with this account. It will also delete the associated WordPress user account. (NOTE: for safety, we do not allow deletion of any associated WordPress account with administrator role).
To proceed with the deletion process, please enter the current password for this user account.
Troubleshooting Account Deletion Feature
Steps to carry out:
- Enable Allow account Deletion feature and log out.
- Then log in as a member using a different browser and view the profile.
- Click on “Delete Account” link.
- Read the warning message that appears and enter the account password. Click on Confirm Account Deletion button. This will log you out from the site.
- Then log into your site as admin again and check to see if the member’s account and corresponding WP User account has been deleted.
Note: If the account is not deleted, then there might be a conflict somewhere in your site. If that is the case, try the following troubleshooting steps test-for-plugin-and-theme-conflict-before-posting-an-issue-or-a-bug.
Advanced Settings Options Part 3
Step 4 ) The following image Advanced Settings Options Part 3 allows you to select from the following options.
Advanced Settings Options Part 3
- Auto Delete Pending Account = Check Step 4-a ) below for more information.
- Admin Dashboard Access Permission = Check Step 4-b ) and Step 4-c ) below for more information.
- Force WP User Synchronization = (Note: This feature makes sure that when users log out of the WP user system, they will also be logged out of the simple membership system. When they log into the WP User system, they will also be logged into the simple membership system. It also matches the cookie duration of the SWPM users to the WP user. Click on the following forum post to learn more.)
- Payment Notification Forward URL
- Activate New Form and Validation Interface
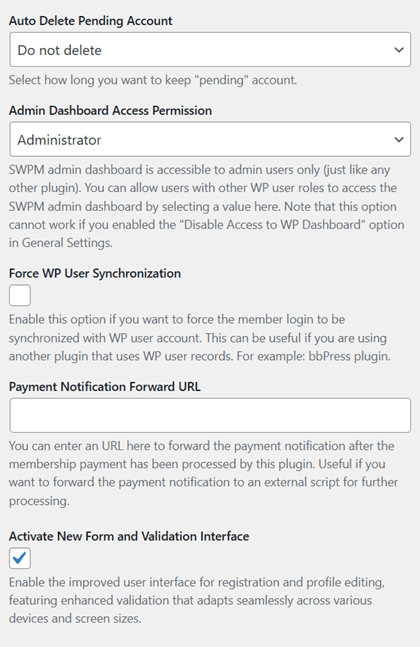
Auto Delete Pending Account
Step 4-a ) The following image Auto Delete Pending Account allows you to select from the following options.
Auto Delete Pending Account Options
- Do not delete
- Older than 1 month
- Older than 2 months

Admin Dashboard Access Permission
Step 4-b ) The following image Admin Dashboard Access Permission allows you to select from the following options. This allows you to control who can view and manage the plugin as well as the Admin user account.
(Note: If you are setting this option to a different user level other than Admin, you must make sure you have not enabled any of the following features Hide Adminbar, Show Adminbar to Admin, Disable Access to WP Dashboard under Settings. The following documentation wordpress-simple-membership-hide-adminbar can help you further.)
Admin Levels
- Admin
- Editor
- Author
- Contributor

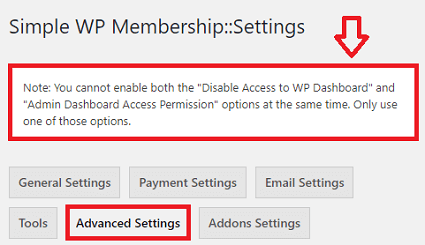
Step 4-c ) The following image displays a notice letting you know that both options cannot be enabled at the same time. This message is displayed at the top of the Advanced Settings admin page.
Note: You cannot enable both the “Disable Access to WP Dashboard” and “Admin Dashboard Access Permission” options at the same time. Only use one of those options.
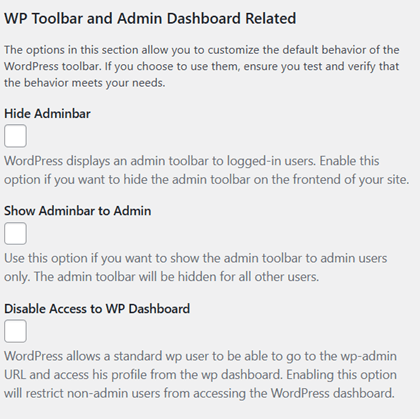
WP Toolbar and Admin Dashboard Related
Step 5 ) The following image allows you to enable and set up the following options.
WP Toolbar and Admin Dashboard Related Options
- Hide Adminbar = Note: Please check the following documentation hide adminbar to learn how to hide the adminbar from your members.
- Show Adminbar to Admin
- Disable Access to WP Dashboard = Note: When this feature is enabled, you will not be able to make changes to Admin Dashboard Access Permission feature mentioned in Step 4 ) above.
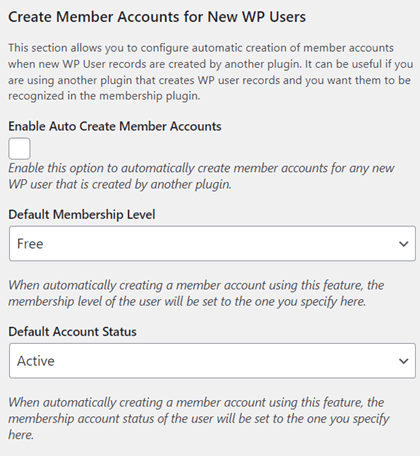
Create Member Accounts for New WP Users
Step 6 ) The following image Create Member Accounts for New WP Users allows you to select from the following options.
Create Member Accounts
- Enable Auto Create Member Accounts
- Default Membership Level
- Default Account Status
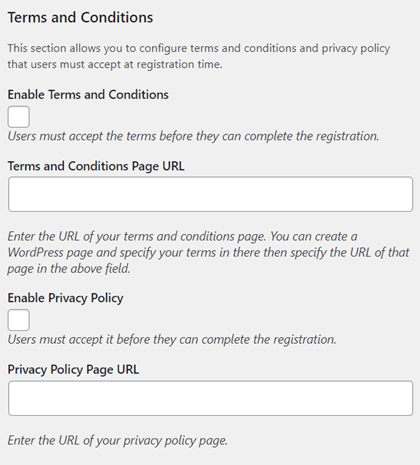
Terms and Conditions
Step 7 ) The following image Terms and Conditions allows you to enable the following options.
Terms and Conditions
- Enable Terms and Conditions
- Terms and Conditions Page URL
- Enable Privacy Policy
- Enable Privacy Policy Page URL
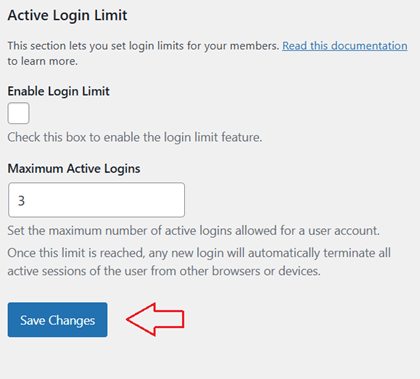
Active Login Limit
Step 8 ) The following image Active Login Limit allows you to enable the following options.
Note: Please check the following documentation configuring-active-login-limit to learn more about it.
Active Login Limit
- Enable Login Limit
- Maximum Active Logins
- Click on Save Changes button when you have completed setting up the Advanced Settings.
Troubleshooting
Q1 Logout Member on Browser Close is checked but when closing the Safari browser on a Mac it does not log out the user. How do I fix this issue?
Answer: That feature is something that simply relies on the cookie to have an expiry value of 0. Some browsers that won’t respect that cookie value won’t work for this feature. This is not something that we can do anything about from our plugin’s side. Different browser’s have their own set of rules in terms of how they accept some of the cookie expiry values. Check the following forum post to learn more.
===============
Q2 I have set the option to allow new free members to automatically log in after registration, but I get the following error message in the subject: Auto login nonce verification check failed!
Answer: This error message might be caused by not entering a URL in the following field After Login Redirection Page for the free membership level when the following addon After Login Redirection addon is enabled. Check the following link forum post to learn more.
================================
If you have any questions please let me know.
Enjoy.
Simple Membership Plugin Tutorial List: