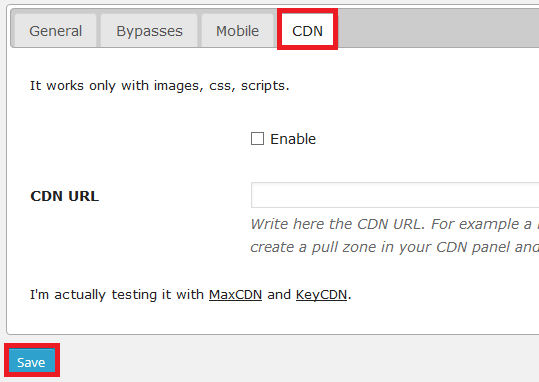
Hyper Cache CDN lets you activate the CDN part of the plugin. This is important nowadays as more website use CDN functionality.
Last Updated: August 29, 2021
Latest News: Updated the documentation.
Hyper Cache has now moved towards a new area in caching, CDN “Content Deliver Network”. This is an area that more and more websites, large and medium size businesses are moving towards and setting up.
A content delivery network or content distribution network (CDN) is a large distributed system of servers deployed in multiple data centers across the Internet. The goal of a CDN is to serve content to end-users with high availability and high performance. (Quoted from Wikipedia)
What You Need:
Hyper Cache Tutorials:
- General Settings
- Bypasses Settings
- Mobile Settings
- Advanced Settings
- CDN
- Personal Settings
- Troubleshooting
Hyper Cache CDN
Step 1 ) Go to Settings -> Hyper Cache -> CDN tab to set up the following options. See image below.
CDN Settings
- Enable CDN
- Enter CDN URL
- Click on Save button

==========================
Click on the following URL Personal Settings.
I will be updating this tutorial from time to time so keep coming back for the latest. If you have any questions please let me know.
Enjoy.