WordPress WPForms Lite Plugin Settings post helps you set up the plugins basic settings, email, validations, integrations and more.
Last Updated: March 24, 2025
Latest News: Updated the changelog in the document.

WPForms Lite plugin allows you to drag and drop fields into a form, which helps you to create forms very easily.
For some the simple action of dragging the field into a position makes their job easier when creating forms. The other very important factor is that it has already built templates for you to use. This simplifies the process of creating different contact forms for your site.
There are extra templates and addons available in the Pro version. I highly recommend you to upgrade to the pro version if you require more functionality, different contact forms and more flexibility.
WPForms Lite 1.9.4.2 Changelog
- Fixed: Fatal error when trying to delete the plugin.
- Fixed: Character encoding issues in Email notifications when viewed on some Apple devices.
Note: These tutorials are based on changelog 1.9.0.4.
What you need:
- WPForms Lite plugin
- WPForms Features & Addons (Note: This is an affiliated link. I get a small commission if you purchase any product including the plugins pro version.)
WPForms Lite Plugin Tutorials:
WordPress WPForms Lite Plugin Settings
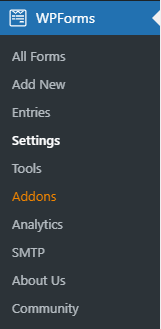
Step 1 ) The following image WPForms Admin Menu shows you the admin menu list when you log into your website. Here you have the option to add, create and set up the following.
WPForms Menu List:
- All Forms
- Add new
- Entries
- Settings
- Tools
- Addons
- Analytics
- SMTP
- About Us
- Community
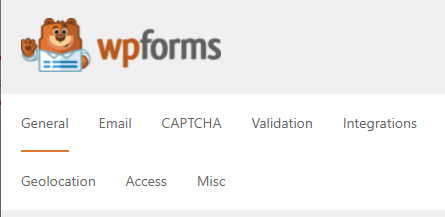
Step 2 ) Go to WPForms -> Settings tab to start configuring the settings as illustrated in the image below. The following is a list of settings for you to manage and make changes too.
WPForms Settings
- General
- CAPTCHA
- Validation
- Integrations
- Geolocation
- Access
- Misc
Step 3 ) The General tab allows you to enable the following options.
License
- License Key
General
- Include Form Styling
- Load Assets Globally
GDPR
- GDPR Enhancements
- Click on Save Settings button when you complete the settings.
Email Settings
Step 4 ) The Email tab allows you to manage the following options.
Email Settings Part 1
- Optimize Email Sending
- Template
- HTML Template
- Plain text
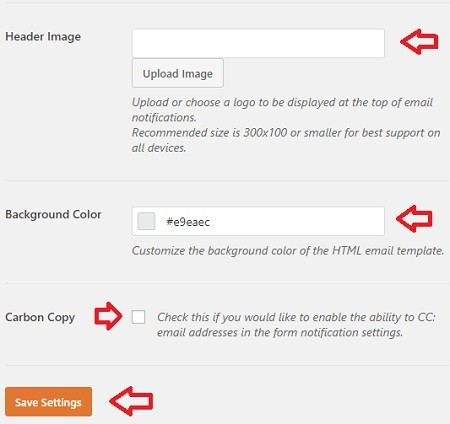
Step 4-a ) The following image allows you to set up the following options.
Email Settings Part 2
- Header Image
- Background Color
- Carbon Copy
- Click on Save Settings button when you complete the settings.
CAPTCHA Settings
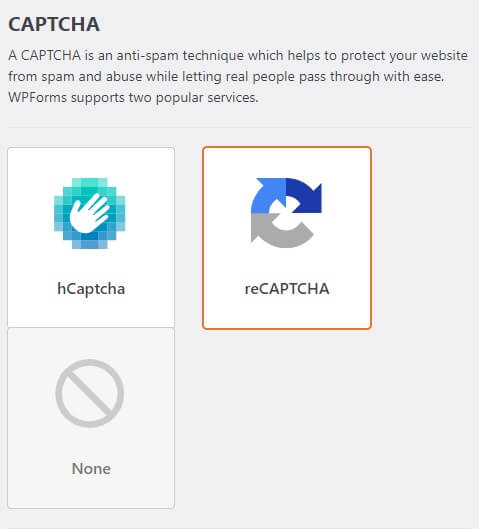
Step 5 ) The following image CAPTCHA allows you to enable captcha in your forms. Once you activate CAPTCHA a new option box will be displayed when you create a new form or edit a form. You can configure the following options.
Note: Visit the following URL Visit reCAPTCHA to learn more about reCAPTCHA.
CAPTCHA Settings
- hCaptcha Settings:
- Site Key
- Secret key
- Fail Message
- No-Conflict Mode
- Preview
- Click on Save Settings button when you complete the settings.
- reCAPTCHA Settings:
- Type
- Checkbox reCAPTCHA v2
- Invisible reCAPTCHA v2
- reCAPTCHA v3
- Site Key
- Secret key
- Fail Message
- No-Conflict Mode
- Preview
- Click on Save Settings button when you complete the settings.
- Type
Validation
Step 6 ) The Validation tab allows you to edit the messages displayed for each field.
Validation Messages
- Required
- Website URL
- Email Suggestion
- Email Restricted
- Number
- Number Positive
- Confirm Value
- Input Mask Incomplete
- Checkbox Selection Limit
- Character Limit
- Word Limit
- Click on Save Settings button when you complete the settings.
Integrations
Step 7 ) The Integrations tab displays a list of integrations addons available for your site.
Integrations Addons List
- Constant Contact
- ActiveCampaign
- Aweber
- Campaign Monitor
- Drip
- GetResponse
- MailChimp
- Salesforce
- Sendinblue
- Zapier
Geolocation and Access
Step 8 ) Geolocation and Access are premium products.
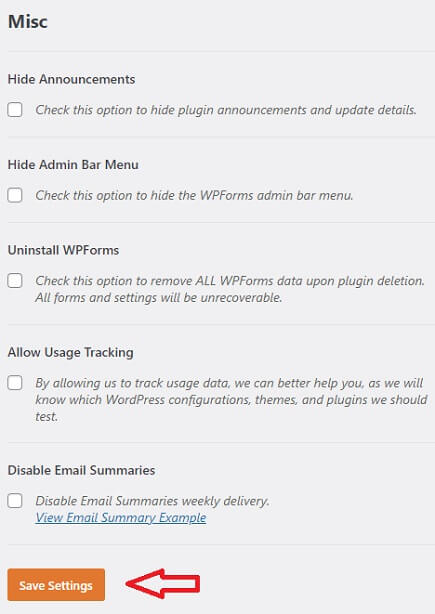
Misc
Step 9 ) The Misc tab allows you to enable the following options.
Misc Settings
- Hide Announcements
- Hide Admin Bar Menu
- Uninstall WPForms
- Allow Usage Tracking
- Disable Email Summaries
- Click on Save Settings button when you complete the settings.
==============================
That’s how simple it is to configure the settings in the plugin.
Click on the following link Create Simple Form to complete the next tutorial.
If you have any questions please let me know.
Enjoy.
thanks for providing step by step guide, can you provide me some name of WordPress plugins for database uploading.
Hi, are you looking for a plugin to upload a database to your site or an addon to upload a database for this plugin?
can u tell me how to apply custom validation for number
Hi, can you provide an example or more information of what you are trying to achieve.
Thank you