WordPress WPForms Lite Plugin Create Simple Form post helps you set up a simple form using the template already provided when you install the plugin.
Last Updated: January 4, 2021
Latest News: I have made some changes to the information below.
In this tutorial you will learn how to add a standard form to your website with a few clicks and in a few minutes of your time. WPForms Lite plugin is fast and easy to manage.
In another tutorial you will learn how to manage the fields, add extra more complex fields and much more.
What you need:
- WPForms Lite plugin
- WPForms Features & Addons (Note: This is an affiliated link. I get a small commission if you purchase any product including the plugins pro version.)
WPForms Lite Plugin Tutorials:
- Settings
- Create Simple Form
- Fields
- Form Settings
- Tools
- Troubleshooting
WordPress WPForms Lite Plugin Create Simple Form
Step 1 ) Go to WPForms -> Add New tab to start creating your forms. The following images displays the form menu. The form menu allows you to work with the following options.
WPForms Form Menu List:
- Setup
- Fields
- Settings
- Marketing
- Payments

Step 2 ) Go to WPForms -> Add New -> Setup tab to start creating your form. The following image displays the following options for you to set up.
WPForms New Form Setup:
- Form Name = Enter the name of the form you are creating.
- You can click on the blank form link to start a blank form.
Templates
- Blank Form
- Simple Contact Form
- Newsletter Signup Form
- Suggestion Form
Unlock Forms (Paid version)
- Request A Quote Form
- Donation Form
- Billing / Order Form

Step 3 ) For this tutorial I selected Simple Contact Form. The following image displays the form template default fields added. This is also how the form will look in your website once you completed all the settings.
From here you can drag and move a field, edit, add a new field and delete a field.
Simple Contact Form Template Fields:
- Name = First name and Last name.
- Comment or Message
- Submit button

Standard Fields
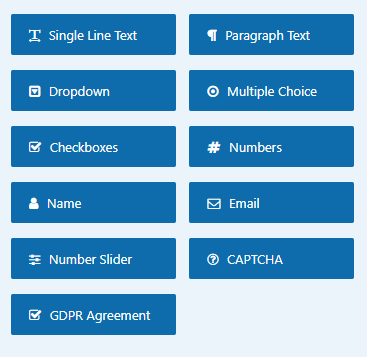
Step 4 ) The following image Standard Fields displays all the fields available with the free version. You can add as many fields as you like to your form. For this tutorial no extra fields are added only the default template fields are used in the form.
Standard Fields:
- Single Line Text
- Dropdown
- Multiple Choice
- Name
- Paragraph Text
- Checkboxes
- Numbers
- Number Slider
- Captcha = Note: This field must be completed in the settings.
- GDPR Agreement = Note: This field must be activated in the settings.
Step 5 ) Go to WPForms -> Add New -> Settings tab to finalize the form settings before you save and display the form in your website or blog.
You have the following options to set up.
From Settings:
- General
- Notifications
- Confirmation
Note: I will be adding more information about the above settings in another tutorial.
Embed a Form
Step 6 ) Once you have completed all of the above you are now ready to add your form to your website. The following image lets you EMBED and Save the form created.

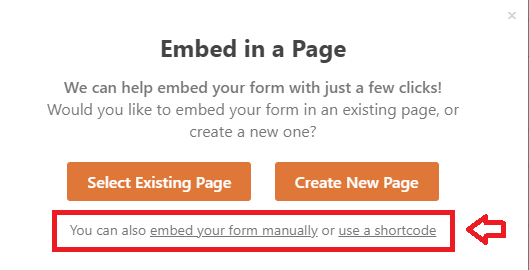
Step 7 ) When you click on EMBED button above the following window is displayed. This windows allows you to carry out the following options.
Embed in a Page options:
- Select Existing Page
- Create New Page
- embed your form manually
- use a shortcode
Step 8 ) Go to WPForms -> All Forms to view all the forms created.
The following image Forms Overview displays all the forms created. While viewing the forms if you move the mouse over the form name you will see a menu displayed underneath the name. This menu allows you to carry out the following task.
- Edit
- Entries
- Preview
- Duplicate
- Delete
You can also view the shortcode for each form created and also the date.

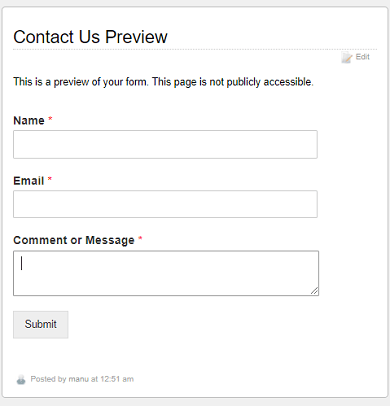
Step 8-a ) The following image is a preview of the form created for this tutorial.
Note: Your form preview will be different.
===========================
That is how simple it is to create and add a standard form to your website using WPForms plugin.
Click on the following link Fields to complete the next tutorial.
If you have any questions please let me know.
Enjoy.