WordPress WPForms Lite Plugin Fields post helps you manage and set up each field in your forms and more.
Last Updated: January 4, 2021
Latest News: I have updated the details below.
In this tutorial you will learn how to add fields, edit and manage the fields and move the fields in your forms. There are some fields that are only available in the Pro version. These fields are more advanced than your regular fields and at the same time provide extra options for you to create fancy forms.
If you need the extra fields then you will need to purchase the pro version.
What you need:
- WPForms Lite plugin
- WPForms Features & Addons (Note: This is an affiliated link. I get a small commission if you purchase any product including the plugins pro version.)
WPForms Lite Plugin Tutorials:
WordPress WPForms Lite Plugin Fields
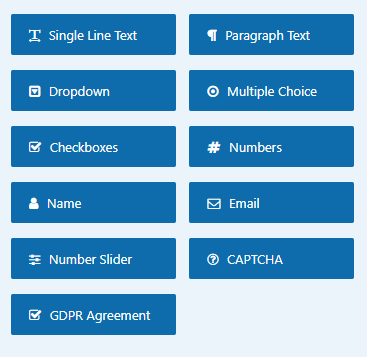
Step 1 ) The following image Standard Fields displays the fields available with the free version.
Standard Fields:
- Single Line Text
- Dropdown
- Multiple Choice
- Name
- Paragraph Text
- Checkboxes
- Numbers
- Number Slider
- Captcha = Note: This field must be completed in the settings.
- GDPR Agreement = Note: This field must be activated in the settings.
Step 2 ) The following image shows you the field name Name from above. The field Name is split into two fields First and Last. This is set up this way when you select First Last format in step 3 ) below. There are 3 different formats you can choose from for your forms Name field.
Name Field Formats
- Simple = One field
- First Last = Two fields
- First Middle Last = Three fields
When you bring your mouse over the field you will see a message displayed and an X icon. If you click on the X icon, it will allow you to delete the field. If you click and hold down your mouse button on the message Click to edit. Drag to reorder, you will be able to move the field any where in the form. This method of drag and drop allows you to redesign the form and change the order of the fields in a very simple way.

You can now duplicate a field. When you bring your mouser over a field you will see the following icons appear and a message Duplicate Field when you move your mouse over the duplicate icon. See image below.

Step 3 ) The following image Field Options shows you the field options that allow you to set up every time you add a field or edit a field.
Field Options:
- Name (ID #0) = This is the id given to the field.
- Label = This is the name given to the field added and will be displayed on the form.
- Format = The current format for the field selected is First Last name. There are other options you can select for the Text field. Each different unique field that you add to a form will have different formats for you to select and some will not provide the Format option.
- Description = In some forms for some fields you might choose to provide a description for that field. This will provide some information for the visitors when filling out the field.
- Required = This lets the visitor know that they must fill out this field before the form is submitted or else they will see an error message displayed. This option also adds a red * next to the field label name.
- Enable Email Confirmation = When editing the e-mail field.
Note: Each field has a question “?” next to it. This provides more information about the option you are editing.

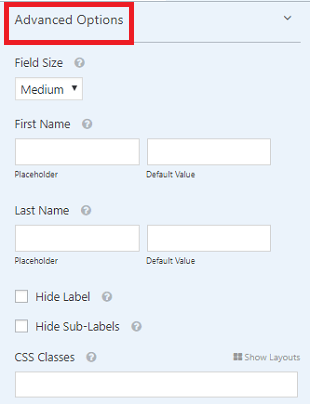
Advanced Options
Step 4 ) The following image Advanced Options shows you the advanced settings for each field. Depending on the field you add and or edit different advanced options will be displayed for you to set up.
Advanced Options:
- Field Size = This lets you decide how big the field is going to be.
- First Name = You can add a Placeholder value that will be displayed in the field. You can also add a Default Value.
- Last Name = The same settings apply for this field as the field above.
- Hide Label = This allows you to hide the label from displaying on the form.
- Hide Sub-Labels = This allows you to hide sub labels from displaying on the form. This advanced option is displayed because the field being edited requires it.
- CSS Classes = This allows you to assign a custom class for the field.
Note: Each field has a ? next to it. This further explains what this fields is all about.
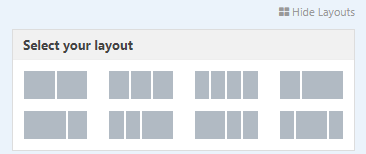
Step 4-a ) The following image Select your layout allows you to select the layout for your forms. This is very handy because there are times that you might want to create a two or more columns contact form.
Fancy Fields
Step 5 ) The following list Fancy Fields displays all the fields available with the Pro version. You can add as many fields as you like to your form.
Fancy Fields:
- Phone
- Address
- Date / Time
- Website / URL
- File Upload
- Password
- Page Break
- Section Divider
- Hidden Field
- HTML
- Rating
- Custom Captcha
- Signature
- Likert Scale
- Net Promoter Score
Payment Fields
Step 6 ) The following list Payment Fields displays more fields available with the Pro version. You can add as many fields as you like to your form.
Payment Fields:
- Single Item
- Multiple Items
- Checkbox Items
- Dropdown Items
- Total
=========================================
That is how simple it is to edit and add extra fields to a form.
Click on the following link Tools to complete the next tutorial.
If you have any questions please let me know.
Enjoy.
When I added a hidden field it has a cog that keeps turning and i cant remove it, this populates a visible field in the form
Hi Ronnie, would you be able to send me a screen capture with your issue via my contact form? Does this only happen when you add a hidden field or does it happen when you add any field?
This is so helpful! Thank you! By chance, do you know how to decrease the space between each row on the form. It’s so big on my form.
Hi Jo, I am glad it helped you in some way.
You might want to send me via my contact form your website link. I will need to take a look and report back.
Regards