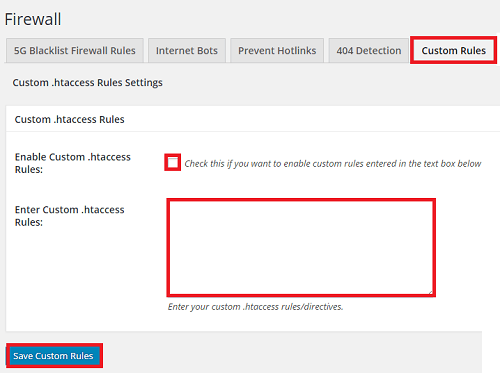
All In One Security Custom Rules helps you customize any rule that writes to the .htaccess file. This customization will not get deleted when you update the plugin in the future.
Last Updated: November 6, 2023
Latest News: Updated the documentation.
AIOS plugin has some very powerful Firewall security features that when activated are written in your .htaccess file. However in some cases due to the complexity of sites and servers, some firewall rules might cause issues. Even though they cause issues, you might still want to activate these rules because you want to add that extra security to your site. For this reason the developers decided to develop the Custom Rules feature.
The Custom Rules feature allows you to activate the rules that are causing issues in your site. All you have to do is edit these rules and copy and paste the edited rules into this tab. Once that is done, you need to deactivate the original rule. What this means is that all firewall rules should now work in most environments without any conflicts as long as you use the custom rules tab. This flexibility makes AIOS a very powerful and flexible security plugin.
Note: This feature can only be used if your site is hosted in an apache or similar web server.
What you need:
- All In One WP Security And Firewall
- FTP program. I recommend Filezilla which is free. (Some might use cPanel File Manager or you can use wp-file-manager plugin.)
All In One Security Custom Rules
Please read the warning below before you carry out this steps. This warning is posted in the plugins Custom Rules feature for your own protection.
Warning: Only use this feature if you know what you are doing. Incorrect .htaccess rules or directives can break or prevent access to your site. It is your responsibility to ensure that you are entering the correct code!
If you break your site you will need to access your server via FTP or cPanel “If you use an Apache Server” and edit your .htaccess file and delete the changes you made.
Step 1 ) Click on WP Security -> Firewall -> Custom Rules to activate and configure the following security settings.
- Enable Custom .htaccess Rules
- Enter Custom .htaccess Rules
- Click on Save Custom Rules button once you have completed your customization.

Increase Upload Limit
Note: Even though this post talks about increasing the upload limit in the site, these instructions can be used with any firewall rule you wish to customize.
Step 2 ) The following steps shows you how to increasing the 10 MB upload default limit set up when you enable Enable Basic Firewall Protection:. This is located in WP Security -> Firewall -> Basic Firewall Rules.
Once you have enable the above mentioned rule, ftp into your site and download the .htaccess file locally to your computer or laptop. Open up the file for editing with a plain text editor like notepad in Windows 10 and locate the following entry, as illustrated below.
This is what you will copy and paste into the Enter Custom .htaccess Rules as illustrated above in the image.
#AIOWPS_BASIC_HTACCESS_RULES_START
<Files .htaccess>
order allow,deny
deny from all
</Files>
ServerSignature Off
LimitRequestBody 10240000
<Files wp-config.php>
order allow,deny
deny from all
</Files>
#AIOWPS_BASIC_HTACCESS_RULES_END
Some of you might want to increase the limit or even reduce the limit. That is entirely up to you. In the settings above you can see the following entry LimitRequestBody 10240000. This is the value that you will change. Be careful with the value you enter. Test to make sure it works and does not produce any error messages.
Once you have copied and pasted the modified rule, save the settings. Once that is done, make sure you disable Enable Basic Firewall Protection: feature. This will make sure that every time you update the plugin, this custom rule will not be deleted.
Other Server Settings
Note: In some cases the above might not work for you depending on how your server is set up or what limitations your Host has set in place.
Please read the following instructions. (Quoted by James Huff in the forum)
- If you can edit or override the system php.ini file, increase the maximum file and post sizes. For example, upload_max_filesize = 10000M ; and post_max_size = 10000M ;
- If you cannot edit or override the system php.ini file, add php_value upload_max_filesize 10000M and php_value post_max_size = 10000M to your .htaccess file.
- If neither of these work, it’s time to ask your hosting provider to increase the maximum file and post sizes on your account. Keep in mind that most decent hosting providers allow this, and If your hosting provider won’t accommodate you, perhaps it’s time to find a new hosting provider.
=============================
I hope the above helps you understand how to work with Custom Rules.
Click on the following link Allow Unlock Request to continue configuring the plugins settings.
If you have any questions please let me know. I will be updating this post from time to time. So keep coming back for the latest.
Enjoy.
All In One Security (AIOS) Plugin Tutorial List