WordPress Simple Membership Levels Settings post shows you how to add different membership levels for your registering members to choose from.
Last Updated: April 7, 2025
Latest News: Updated the documentation.
Having a membership site is important but it is also equally important to have in place the correct membership levels. You want to allow your registering members to choose the correct membership level based on their requirements. For example: You might choose to have free and paid membership levels in your site. Once you have decided on the different membership levels you need, then you will need to work out what content needs to be protected using the corresponding membership levels created. The following link Apply Content Protection can help you.
The membership level list below is an example of a typical scenario used in many membership sites. However, in some cases you might only allow free membership registration in your site. Click on the following link simple-membership-registration-form-shortcode-generator to learn how to only allow free membership registration in your site.
Members Level Example:
- Free
- Bronze = $25
- Silver = $45
- Gold = $75
What You Need:
WordPress Simple Membership Levels Settings
Step 1 ) Go to WP Membership -> Membership Levels to start adding your membership levels, protecting your categories, protecting your posts and pages and more. See the following image.
Membership Levels Options
- Membership Levels
- Add Level
- Manage Content Protection
- Category Protection
- Post and Page Protection
Step 2 ) Go to WP Membership -> Membership Levels -> Add Level to start adding your membership levels as illustrated in the image below.
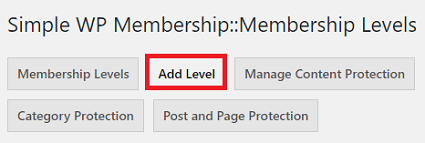
Step 3 ) Once you click on Add Level tab as illustrated above you can begin to set up the following options.
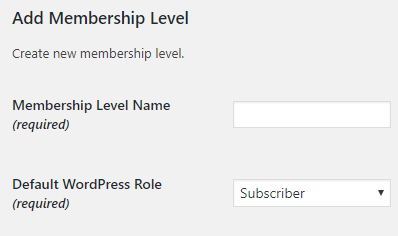
Add Membership Level
- Membership Level Name (required)
- Default WordPress Role (required) Note: Check information in Step 3-a ) below.
Note: In some situations you might want to allow your members to update their membership level for free. To learn more about how to achieve this, please click on the following URL manual-button-to-allow-updating-changing-membership-level.
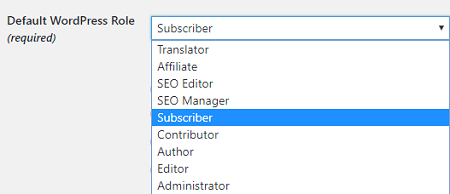
Step 3-a ) The following image shows the User Roles available in this site. It is important that you pay attention when assigning a WordPress user role to a membership level. Especially if the other plugins in your site have added new user roles. In the following image you can see the default WordPress user roles and other user roles added by other plugins.
WordPress Default User Roles
- Subscriber
- Contributor
- Author
- Editor
- Administrator
User Roles Added By Other Plugins
Note: In your site you might have other user roles or none, only WordPress default.
- Translator
- Affiliate
- SEO Editor
- SEO Manager
Access Duration (required)
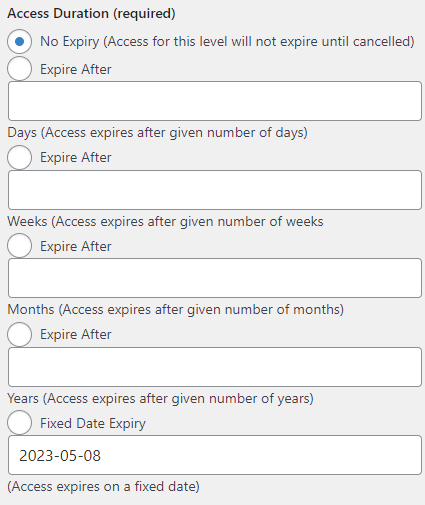
Step 4 ) The following image Access Duration (required) allows you to set up the following options.
Access Duration (required) Options
- No Expiry (Access for this level will not expire until cancelled)
- Expire After Days (Access expires after given number of days)
- Expire After Weeks (Access expires after given number of weeks
- Expire After Months (Access expires after given number of weeks
- Expire After Years (Access expires after given number of weeks
- Fixed Date Expiry (Access expires on a fixed date)
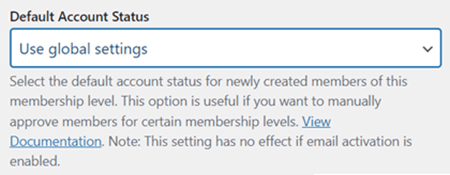
Default Account Status
Step 5 ) The following image Default Account Status allows you to set up the following options.
Note: To learn more about account status functionality, refer to the following tutorial wordpress-simple-membership-add-members-manually.
Default Account Status Options
- Default Account Status = Select the default account status for newly created members of this membership level. This option is useful if you want to manually approve members for certain membership levels. View Documentation. Note: This setting has no effect if email activation is enabled.
Email Activation Options
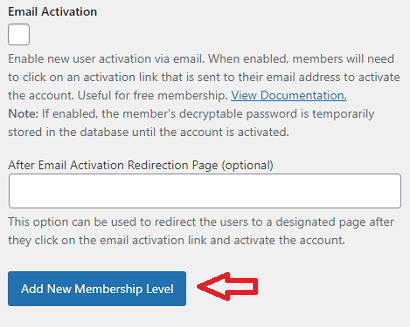
Step 6 ) The following image Email Activation Options allows you to set up the following options.
Email Activation Options
- Email Activation = If you enable this feature, your members signing up for a free membership level will need to click on an activation link that is sent to their email address to activate the account.
- After Email Activation Redirection Page (optional)
- Click on Add New Membership Level button when you are finish with the settings.
Membership Access Duration Information
Note: It is important to select the correct duration period for your members. For more information, check the following documentation adding-membership-access-levels-site.
If you specify a duration value in the membership level then, simple membership will set the account to “unsubscribed” when someone cancels. So the user will still have access until the duration time is over. If the recurring payment keeps coming every 30 days (assuming you have a 30 days recurring payment setup) then they will keep getting access for another 30 days.
If you select No Expiry (Access for this level will not expire until cancelled). The moment the member cancels the account their account will be set to expired. They will not have access to the protected content anymore.
Membership Access Duration Important Note
Important Note: It is a good idea to offer 1 or 2 extra days by setting the access duration value to something like 31 or 32 days for a 30 day month or 32 or 33 for a 31 day month. Because of the way PayPal’s IPN works, the plugin can’t offer hourly granularity. Giving access for an extra day is really nothing but it offers the customer full satisfaction.
Please be aware that the subscription payment process varies for different payment gateways. It is not feasible for us to develop a universally uniform subscription payment system that works seamlessly across all payment gateways without introducing extensive implementation within our plugin. As we aim to maintain a lightweight plugin, we avoid such heavy modifications. You can read more about it from the following forum post.
It is a standard business practice, especially in banking, to measure time using a 30 day “business month.” That is why the closing dates for credit cards and bank statements tend to drift by 1 to 3 days. Even Microsoft Excel, via the DAYS360 function, measures a “business year” as twelve, 30 day months. You can read more about it from the following forum post.
=====================================
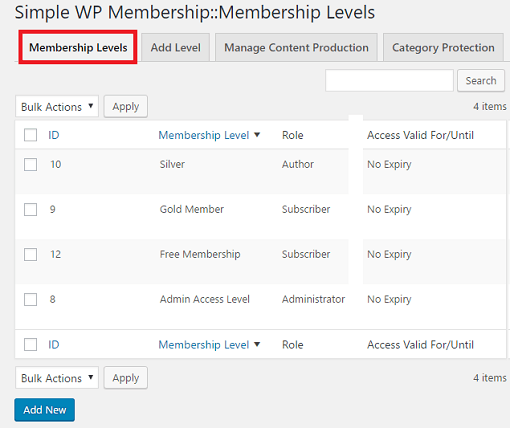
Step 7 ) In the following image you can see an example of the different membership levels added. Each membership level has the following information included.
Membership Levels Information
- ID
- Membership Level
- Role
- Access Valid For/Until
For example, membership level Silver has an ID of 10 with an Author Role and No Expiry. This is very important information to take note of when adding membership buttons like, Free, Subscription and or Upgrade.
FAQ
Q1 How do I add a membership level using select or radio buttons in the registration form?
Solution: This plugin does not function in that manner. Please read the following reply how-to-display-membership-levels-using-select-or-radio-btn-on-regist-page by one of the developers.
============
Q2 How do I set up different renewal pages based on membership levels?
Solution: You can read the following forum post for a solution provided by Ant Wilcock.
============
Q3 How do I stop the number of members from joining who belong to certain member level id?
Solution: You can read the following forum post for a solution provided by mikecrf121.
============
Q4 Is there a way to list all post and pages per membership level?
Solution: At present the only way to achieve this is by using the “category” protection option:
https://simple-membership-plugin.com/use-category-protection-membership-site/. You can list all the posts from that category. For example: you can have “category-1” that will have all the posts for “membership level 1”. So you can try to organize things using the category. Check the following link forum post to learn more.
============
Q5 For membership expiration date, can we put an hour in that field?
Answer: No. Check the following link forum post to learn more.
============
Q6 How does the plugin behave in terms of a membership level with a “Duration type” expiry?
Answer: The plugin tries to identify the current expiry date of the member then it sets the start date to that value so it can receive the “additional” time that has just been paid for. So if a member currently has an expiry of 2nd Feb 2022 it means that he is already paid up to that time. So if makes another payment today for 1 year, he will need to be given an additional year at the end of the current expiry. Check the following link forum post to learn more.
============
Q7 How does SWPM update a user status?
Answer: There is a daily cronjob that checks and deactivates accounts. Check the following link forum post to learn more.
============
Q8 Can a member belong to multiple membership level?
Answer 1: SWPM does not support multiple membership levels per user. However, you can allow pages/posts to be accessible to multiple membership levels. Check the following link forum post to learn more.
Answer 2: However, multiple membership levels are supported by the eMember product. WordPress eMember Membership Plugin (Note: This is an affiliated link. I get a small commission if you purchase this product.)
============
Q9 Is there a way I can set an expiry to be a specific day and month of each year?
Answer 1: Our plugin currently is not set up to achieve that, however the following might work for you.
#1) Every year when you create the membership level for the year, you will also create a temporary membership level (to assign users who pay for renewal before expiry for the following year). For this example, let’s call this temporary membership level “Already renewed for next year”. Give this temporary level access to current year’s content.
#2) The renewal button can be connected to that following year’s temporary level that you create in step 1. So anyone renewing before expiry will get assigned to this “Already renewed for next year” level.
#3) At the start of the next year, when you create the new membership level for that year, you can do the following to switch all the members who have already renewed to this new year’s membership.
Go to the “Members” menu then the “Bulk Operations” tab. Use the “Bulk Change Membership Level” feature to assign the “Already renewed for next year” members to the new year’s membership.
Check the following link forum post to learn more.
==================================
That is how simple it is to setup different membership levels for your members site.
If you have any questions please let me know.
Enjoy.
Simple Membership Plugin Tutorial List: