WP Simple Membership Add Members Manually shows you how to add new members to your site manually.
Last Updated: March 30, 2025
Latest News: Updated the documentation.
There are times when you might have a list of members you wish to add to your site manually. The following instructions shows you how to add new members to your site manually without having to register the members via the registration form. These instructions are simple for anyone to follow.
Note: When you create an account manually from the admin end and later you want the user to pay for a subscription, make sure the user logs into his/her account then pay for the subscription using the subscription button created inside the plugin.
If you want you can also import members from a CSV file. Click on the following URL simple-membership-bulk-import-member-data-csv-file to learn more.
What You Need:
WP Simple Membership Plugin Add Members Manually
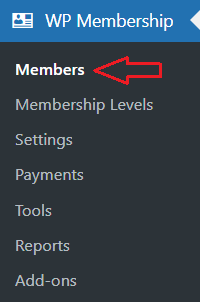
Step 1 ) Go to WP Membership -> Members to start adding new members manually and it also allows you to manage members already added. See image below.
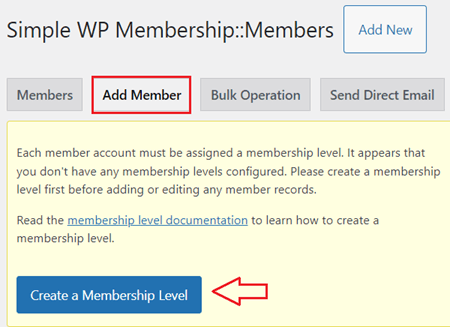
Step 1-a ) Note if you see the following message illustrated in the image below, it means that you have not yet created a membership level. Click the following button Create a Membership Level.
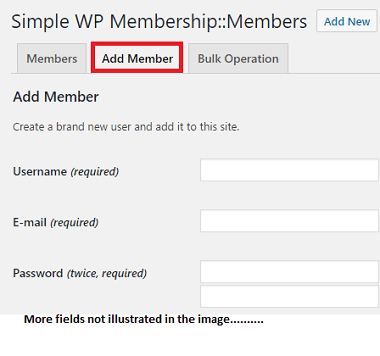
Step 2 ) The following image Add Members shows you the fields available for you to fill out when adding new members to your site.
Important: Minimum requirement: Username, E-mail and Password are required fields. You also need to enter the membership level for the member to be added manually.
Members Fields
- Username (required) = Note: The username cannot have spaces between names. For example: Bob Smith will produce an error message. You need to enter Bob-Smith. This is a minimum requirement for this field. Check the following forum post to learn more.
- E-mail (required)
- Password (twice, required) = Hint: The password should be at least seven characters long. To make it stronger, use upper and lower case letters, numbers and symbols like ! ” ? $ % ^ & ).
- Account Status = Refer to Step 2-a ) below.
- Membership Level = This will show all membership levels currently available in your site. These are the membership levels you have created. Note: You might want to read more about adding membership levels to your site.
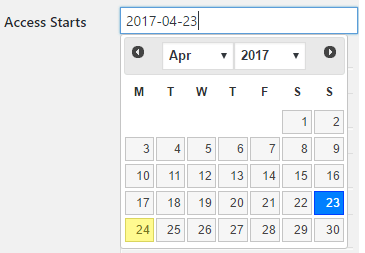
- Access Starts = This will show you a calendar. Refer to Step 2-b ) below.
- 2017-04-23
- First Name
- Last Name
- Gender
- Phone = Note: On a blank new WP Install (without any other plugins), the phone number is not a default field. Therefore our plugin will not add the phone number field from members into WP Users account.
- Street
- City
- State
- Zipcode
- Country
- Company
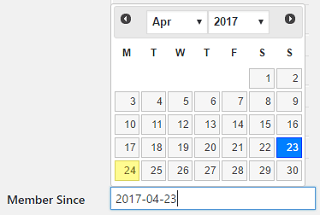
- Member Since = This will show you a calendar. Refer to Step 2-c ) below.
- Click on Add New Member button when you complete filling out the fields for your member.
The following two fields are displayed once the member logs into your site.
- Last Accessed Date 0000-00-00 00:00:00 = This value gets updated when this member logs into your site.
- Last Accessed From IP ::1 = This value gets updated when this member logs into your site.
Note: If you are using the Form Builder add-on and you add extra fields they will appear below the following header Custom Fields.
Account status
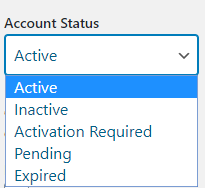
Step 2-a ) The following image Account Status allows you to select the status for the current account. There are five different status available for the membership account.
Membership Account Status
- Active
- Inactive = Note: There is no “Rejected registration” action when you change the member to inactive. The admin simply uses the feature mentioned in Step 4 ) below to send an email telling the user whatever they want to say when they change the account status to “Inactive”.
- Activation Required
- Pending = Note: Setting the account to Pending allows you to manually approve the members. Check the following URL manually-approve-members-membership-site to learn more.
- Expired = Note: If you want to manually activate a member’s account that has expired, read the following documentation manually-activating-expired-members-account. It explains how to do it correctly.
Access Starts
Step 2-b ) The following image Access Starts allows you to select the date the membership will begin for the new member. The calendar makes it very easy to add a start date for your member.
Member Since
Step 2-c ) The following image Member Since allows you to set up the period the person has been a member of your site.
=======================
Sending Email Notification To The Member
You can optionally send a notification email to the member after you manually add the member via the admin dashboard.
Step 3 ) Go to WP Membership -> Settings -> Email Settings admin menu of the plugin. Then enable the following option:
Send Email to Member When Added via Admin Dashboard
=======================
Viewing And Editing Members
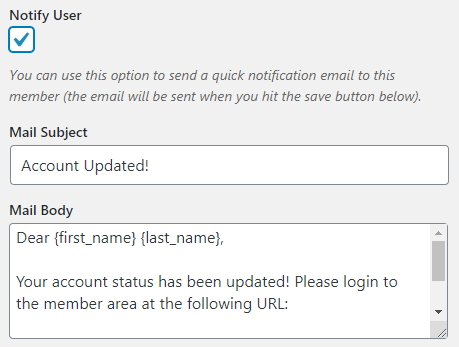
Step 4 ) When you view and edit a member there is an option available that allows you to notify the member of any changes you make to their account. The following image displays the different fields you can edit for the member you are editing. These fields are only revealed when you check Notify User.
FAQ – Editing Members
Q1 I want to change the account status to active for more than one member. How do I send a default quick message text to all the members?
Answer: Go to WP Membership -> Settings -> Email Settings and look for the following settings.
Email Settings (Bulk Account Activate Notification)
This email will be sent to your members when you use the bulk account activate and notify action. You cannot use email merge tags in this email. You can only use generic text.
Once you edit the message in the email settings above, go to Members tab. Select the number of members you wish to set the status to active and select from the drop down menu Set Status To Active and Notify.
Note: The purpose of the “quick notification message” is to compose a message right there and send it. That option will also remember the last message you sent using that feature. So customize/compose the message right there and send the message. The next time you edit a profile and want to send another quick message, it will remember the last one you sent.
Click the following link forum post to learn more.
=======================
When Members Are Added Manually
When members are added manually to your membership site they are also added to WP Users. It is important to keep this in mind, it will help you understand when you enable other features of the plugin.
WP Users
Note: On a blank new WP Install (without any other plugins), our plugin will create a WP User record with the minimum required info. For example: The phone number is not a default field. Therefore our plugin will not add the phone number field from members into WP Users account.
For example: If you decide to enable hide Adminbar in the Settings, you will also need to know what role is assigned to each member added.
=======================
The following is an example of adding two members to your site and assigning two different User roles.
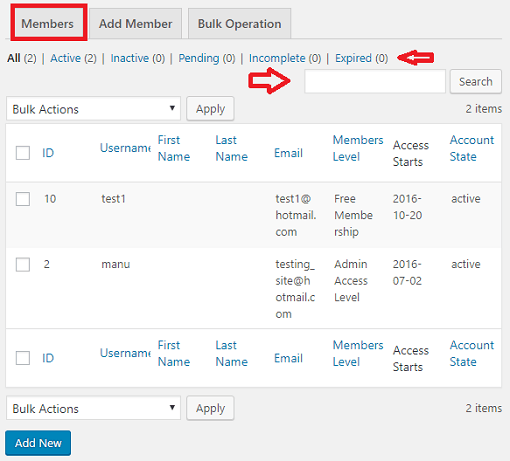
Step 5 ) The following image Members displays two members added to the website and set as active.
Members Added
- test1 = this member belongs to Free Membership level.
- manu = this member belongs to Admin Access Level.
=======================
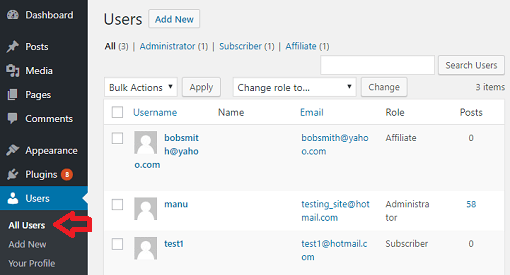
Step 6 ) The following image Users -> All Users displays the 2 members also added in Users in WP admin panel.
Users Added
- manu = this user has an Administrator role.
- test1 = this user has a Subscriber role.
=======================
Step 7 ) The following describes what happens every time you add members to the website and assigned one of the following membership levels.
- Free Membership Level = these members are assigned to the Subscriber user role in the site.
- Admin Access Level = these members are assigned to the Administrator user role in the site.
Note: In your case you might have multiple membership levels and assigned different User roles to each membership level.
FAQ
Q1 I have the Simple Membership plugin setup and working perfectly with protected pages. Everything is working as it should except for one issue. I want to manually approve free members after they register. I have default account setting to ‘Pending’ however when a user verifies their email the account is automatically approved and they can view members content.
Answer: = Make sure you have not enabled Email Activation for the Free membership level in question.
Troubleshooting Tips
Q1 I received the following error message invalid username when I typed in the name. How do I fix this issue?
Solution: Check to make sure the user name does not have any spaces in between two names. For example, Bob Smith would produce this error message. In this case you would type bob-smith and that would work.
==============
Q2 I received an error message when adding a members name. How do I fix this issue?
Solution: Check the following documentation setting-utf-8-formatting-for-your-paypal-ipn-messages.
==============
Q3 After I fill in the fields on the admin side and hit save, no new member is created. How do I fix this issue?
Solution: Make sure all the following fields have values when you are trying to manually add a member entry:
– Username
– E-mail
– Password
– Membership Level
Check the following link forum post to learn more.
===================================
That is all you need to do to add new members to your site manually.
Click on the following URL Make Site Semi Private to continue with the settings.
If you have any questions please let me know.
Enjoy.
Simple Membership Plugin Tutorial List:
Manuel,
I installed Simple Membership Plugin; the plug was working ok. However, recently a member needed to reset his password. Since, I didn’t recall testing that functionality; I created an account and and after logging-in ( I don’t recall logging-out); on a different machine I reset the password. However, when I tried to login with the new password; I am getting this “password empty or invalid”. I am stumped.
Hi Sam, try the following. Make sure you clear the browser cache. If you are using a cache plugin in your site, make sure you clear the cache as well.
Regards
Manuel,
Thank you for response. That is what I was suspecting earlier. But I am getting the same result even with a different browsers on a different machine. I will check if the host company does cache. I really liked this plugin when it works.
Thank you,
Sam
Hi Sam, let me know what your host says. If they say they don’t use any caching system, then try the following.
Carry out the same test you mentioned in your previous reply above. But this time make sure you are logged out from the site in either browser. Another words pretend that you are a member visiting the site and decides to reset the password. After the password has been reset and confirmed, make sure you clear your browser cache. Then carry out a login test with the new password. Let me know what happens.
One more question, are you currently using CDN services?
Regards
Manuel,
Thank you, I followed your direction to the teeth and it is working perfect. As you said, it is a cache. No, I don’t use CDN services. This is a small site that I help build for a group in need of communal place to help each other in time communal events like funeral, weeding, etc. I have a different day job and have some extra time on my hand, which I tried to spend it working on something beside my day job–building sites for right now!
FYI: I did kept the site as inactive until I did this.
Thank you,
Hi Sam, I am glad to hear that you solved your issue. Well done.
Let me know if you need more help. Enjoy the plugin.
Kind regards
Manuel,
After clearing the cache per your instruction it is working perfect; as it was meant to be.
Thank you,
Sam