Fast Secure Contact Form Style Formatting shows you how to format different areas of your contact form and much more.
Last Updated: February 26, 2017
Latest News: I have fixed a broken link.
I will be adding more different styling methods to help you customize your contact form. At the moment you only see a few settings but stay tuned for more to come. Eventually there will be a large list that will cover all aspects of the contact form.
The post below shows you how to understand each field in your contact form using the tools in your browser. If you want to learn more about what each field does then click on the following URL Customize DIV Formatting and to understand more about CSS click on the following URL Custom CSS Style Formatting.
Fast Secure Contact Form Style Formatting
Step 1 ) Go to Settings -> FS Contact Form -> Styles tab to edit the form style format. See images below.
The Styles tab allows you to customize the style from various areas of the contact form. The image below displays a default form which is created when you install and activate the plugin for the first time. In this example I have added a border around the form so that you can see the full diameter of the contact form. Notice that once you enable the border around the form the following Title is also added Contact Form.

Step 2 ) The following image shows you the width in an easy to follow layout. This is using Inspect Element in Firefox. You can use any browser to inspect the elements.
Layout Width:
- 555 x 593 = which means 555 Width times 593 Height
- Form Fieldset Box:border:1px solid black; width:99%; max-width:550px; padding:10px; (Click on the following URL Styles to learn more)
- The green color represents the padding:10px
- The id = “fscf_form_fieldset1” = 1 represents form 1

Box Model
Step 3 ) The following image illustrates the Box Model which helps you understand the actual sizes better.
How does it compute. You get the following size 555 px from above. This figure is measured from the following. Look at the code above and carry out the following sum = 533px blue color width + (10px x 2 green color padding) + (1px x 2 yellow color border)

Step 3-1 ) In the following image I have zoomed in so that you can see the yellow 1 px border and also the 10 px green padding..

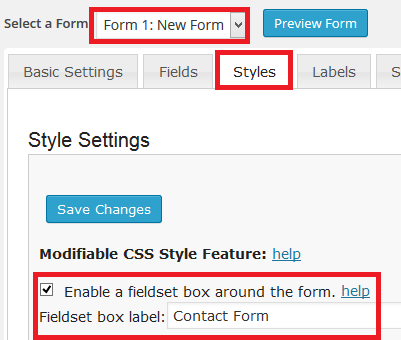
Step 4 ) The following image Select a Form shows you which form you are currently working on and the following options to edit.
- Form 1: New Form
- Styles tab
- The following option is enabled. Enable a fieldset box around the form. = Fieldset box label: Contact Form
Alignment DIVs
Step 5 ) Sometimes you might want your labels to appear next to the fields. The following Alignment DIVs: allows you to select whether to inline the labels or not.
Select which option you want from the following two options and click on save.
Alignment DIVs:
- Reset the alignment styles to labels on top (default, recommended)
- Reset the alignment styles to labels on left (sometimes less compatible)
Step 6 ) The following is a list of fields that allow you to customize the form. The following field Form Fieldset Box: is the field you need to edit under Styles tab.
- Form DIV:
- Left Box DIV:
- Right Box DIV:
- Clear DIV:
- Field Left DIV:
- Field Follow DIV:
- Field Pre-Follow DIV:
- Input labels alignment DIV:
- Input fields alignment DIV:
- Small CAPTCHA DIV:
- Large CAPTCHA DIV:
- CAPTCHA image alignment:
- CAPTCHA reload image alignment:
- Submit DIV:
- Form Fieldset Box: border:1px solid black; width:99%; max-width:550px; padding:10px; (This is the field you need to edit and add your customize changes. I have added the code so you understand what I mean.)
This should give you an insight on how to customize your contact form. Of course you really have to play around with the settings until you get what you want.
Click on the following link Fast Secure Contact Form Center Style to complete the next tutorial.
If you have any questions please let me know.
Enjoy.
Hi
Thanks for taking the time to do this – very helpful. The one thing I need and did not see here was how to get the form to display in-line instead of stacked vertically. Is this possible?
Thanks again
Hi Brad, thank you for your question. Yes you are correct I should have added that information. If you go to Plugins -> FS Contact Form -> Styles, you will see the following option Reset the alignment styles to labels on left (sometimes less compatible). Make sure you check this box and it will align the labels to the left if that is what you mean.
Regards