Fast Secure Contact Form Customize DIV Formatting shows you how to format a standard form through the Style tab much more.
Last Updated: January 12, 2019
Latest News: I have updated the information below.
The plugin controls the form design using different HTML DIV containers and applying custom CSS code. In this post you are going to learn what part of a standard form each DIV container controls. You will notice how flexible this plugin is once you become familiarize with the style functionality. In all this plugin gives you much control over each form you develop for your site.
Note: It does require a basic understanding of CSS and HTML. This would help you even more. If you need to know, you can check the following URL W3Schools. This site has all you need to know and even practical exercises.
Fast Secure Contact Form Customize DIV Formatting
Step 1 ) Go to Settings -> FS Contact Form -> Styles tab to edit the form style format.
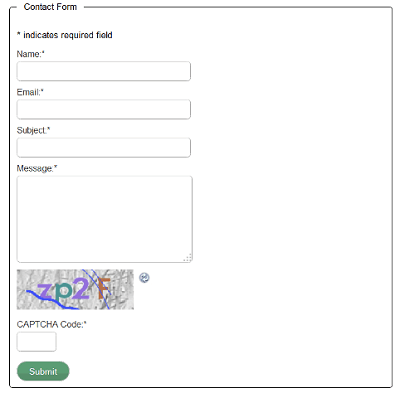
The Styles tab allows you to customize the style in different areas of the contact form. The image below displays a standard default form which is created when you install and activate the plugin for the first time. In this example a border has been added around the form to allow you to see the full contact form width.
Note: When you add a border around the form the following Title is also added Contact Form. in you have added an entry in Fieldset box label:
The following list shows you all the DIV containers you can customize to make changes to the design of the the form by adding HTML and CSS. Each DIV container controls an area of the form. All the fields in the list below with red added, controls a standard form.
- Form DIV: (Field used for standard form.)
- Left Box DIV:
- Right Box DIV:
- Clear DIV: (Field used for standard form.)
- Field Left DIV: (Field used for standard form.)
- Field Follow DIV:
- Field Pre-Follow DIV:
- Input labels alignment DIV: (Field used for standard form.)
- Input fields alignment DIV:
- Small CAPTCHA DIV:
- Large CAPTCHA DIV: (Field used for standard form.)
- CAPTCHA image alignment: (Field used for standard form.)
- CAPTCHA reload image alignment: (Field used for standard form.)
- Submit DIV: (Field used for standard form.)
- Form Fieldset Box: (Optional but used for this tutorial)
Standard Form Fields Display
The following image shows you a standard from. This form has no added fields and no customize formatting. You can also see the right side of the form is wide and empty. This might look ugly to some. But remember a border was added for display purpose. If the border is removed then the form will look better and it will give you the impression that is much narrower. However the form width is still the same. In this case you can either reduce the width of the form or you might want to center the form. If you want to learn to how to center the form please read the following tutorial Fast Secure Contact Form Center Style.

==============================
Form DIV Settings
Step 2 ) The following image Form DIV: shows you the form area it controls. It controls the over all width of the form.
Form DIV default settings
- Form DIV: width:99%; max-width:555px;

The following HTML source code in blue is controlled by the above field.
<div id=”FSContact1″ style=”width:99%; max-width:555px;”>
<form id=”fscf_form1″ action=”http://localhost/wordpress/contact-form-test/#FSContact1″ method=”post”>
<fieldset id=”fscf_form_fieldset1″ style=”border:1px solid black; width:99%; max-width:550px; padding:10px;”>
<input name=”fscf_submitted” value=”0″ type=”hidden”>
<input name=”fs_postonce_1″ value=”ec65333ff1274e2ed1ed4e9816b04741,1476146337″ type=”hidden”>
<input name=”si_contact_action” value=”send” type=”hidden”>
<input name=”form_id” value=”1″ type=”hidden”>
<input name=”mailto_id” value=”1″ type=”hidden”>
</form>
</div>
==============================
Field Left DIV Settings
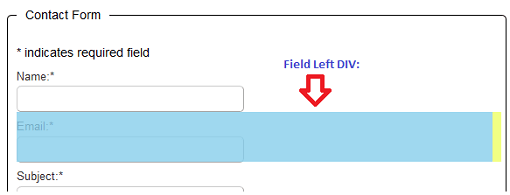
Step 3 ) The following image Field Left DIV: shows you the form area it controls. It controls the over all width of the fields in the form. In the following image you can see the width and the margin in yellow on the right hand side. The overall width allowed is controlled by the following code max-width:550px;.
Field Left DIV default settings
- Field Left DIV: clear:left; float:left; width:99%; max-width:550px; margin-right:10px;
The reason why I am sharing this with you is so you know that max-width controls the maximum width allowed in a field in the form. The blue color below illustrates this. And you can see that the actual field is much smaller in length set at 250px. The following two fields cover the text area fields above in the standard from.
Go to Style of labels, field inputs, buttons, and text: to edit these fields.
- Input text fields: text-align:left; margin:0; width:99%; max-width:250px; = this settings controls the text box for Name, Email and Subject.
- Input textarea fields: text-align:left; margin:0; width:99%; max-width:250px; height:120px; = this settings controls the Message text box.

The following HTML source code in blue is controlled by the above field.
<div id=”fscf_div_clear1_1″ style=”clear:both;”>
<div id=”fscf_div_field1_1″ style=”clear:left; float:left; width:99%; max-width:550px; margin-right:10px;”>
<div style=”text-align:left; padding-top:5px;”>
<label style=”text-align:left;” for=”fscf_email1″>
Email:
<span style=”text-align:left;”>*</span>
</label>
</div>
<div style=”text-align:left;”>
<input id=”fscf_email1″ style=”text-align:left; margin:0; width:99%; max-width:250px;” name=”email” value=”” type=”text”>
</div>
</div>
</div>
==============================
CATPCHA Settings
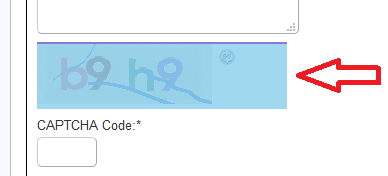
Step 4 ) In the form above the large CAPTCHA is used. The large CAPTCHA image is controlled by the following fields.
CAPTCHA default settings
- Large CAPTCHA DIV: width:250px; height:65px; padding-top:2px;
- CAPTCHA image alignment: border-style:none; margin:0; padding:0px; padding-right:5px; float:left;

The following HTML source code in blue is controlled by the above field.
<div id=”fscf_captcha_image_div1″ style=”width:250px; height:65px; padding-top:2px;”>
<img id=”fscf_captcha_image1″ style=”border-style:none; margin:0; padding:0px; padding-right:5px; float:left;” src=”http://localhost/wordpress/wp-content/plugins/si-contact-form/captcha/securimage_show.php?prefix=U9nKlUTdhBXCmEb1″ alt=”CAPTCHA Image” title=”CAPTCHA Image” width=”175″>
<input id=”fscf_captcha_prefix1″ name=”fscf_captcha_prefix1″ value=”U9nKlUTdhBXCmEb1″ type=”hidden”>
<div id=”fscf_captcha_refresh1″>
<a href=”#” rel=”nofollow” title=”Refresh Image” onclick=”fscf_captcha_refresh(‘1′,’/wordpress/wp-content/plugins/si-contact-form/captcha’,’http://localhost/wordpress/wp-content/plugins/si-contact-form/captcha/securimage_show.php?prefix=’); return false;”>
<img src=”http://localhost/wordpress/wp-content/plugins/si-contact-form/captcha/images/refresh.png” alt=”Refresh Image” style=”border-style:none; margin:0; padding:0px; vertical-align:bottom;” onclick=”this.blur();” width=”22″>
</a>
</div>
</div>
==============================
CAPTCHA reload image alignment Settings
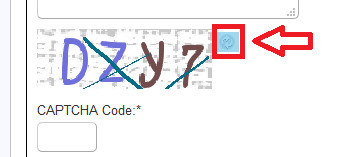
Step 5 ) The following image CAPTCHA reload image alignment: shows you the form area it controls. It controls the positioning of the small reload captcha button.
CAPTCHA reload image alignment default settings
- CAPTCHA reload image alignment: border-style:none; margin:0; padding:0px; vertical-align:bottom;
CAPTCHA reload image alignment default settings
- CAPTCHA reload image alignment: border-style:none; margin:0; padding:0px; vertical-align:bottom;

==============================
Step 6 ) The following image Input labels alignment DIV: shows you the form area it controls. It controls the positioning of the CAPTCHA Code:* text.
Input labels alignment DIV default settings
- Input labels alignment DIV: text-align:left; padding-top:5px;

The following HTML source code in blue is controlled by the above field.
<div id=”fscf_captcha_field1″ style=”text-align:left; padding-top:5px;”>
<label style=”text-align:left;” for=”fscf_captcha_code1″>
CAPTCHA Code:
<span style=”text-align:left;”>*</span>
</label>
</div>
==============================
Input text field CAPTCHA Settings
Step 7 ) Go to Style of labels, field inputs, buttons, and text: to edit this field.
The following image Input text field CAPTCHA: shows you the field you need to edit under Styles tab as mentioned above and add your customize code.
Input text field CAPTCH default settings
- Input text field CAPTCH: text-align:left; margin:0; width:50px;

The following HTML source code in blue is controlled by the above field.
<div style=”text-align:left;”>
<input id=”fscf_captcha_code1″ style=”text-align:left; margin:0; width:50px;” value=”” autocomplete=”off” name=”captcha_code” type=”text”>
</div>
==============================
Submit DIV Settings
Step 8 ) The following image Submit DIV: shows you the field you need to edit under Styles tab as mentioned above and add your customize code.
Submit DIV: text-align:left default settings
- Submit DIV: text-align:left; clear:both; padding-top:15px;

The following HTML source code in blue is controlled by the above field.
<div id=”fscf_submit_div1″ style=”text-align:left; clear:both; padding-top:15px;”>
<input id=”fscf_submit1″ style=”cursor:pointer; margin:0;” value=”Submit” onclick=”this.disabled=true; this.value=’Submitting…’; this.form.submit();” type=”submit”>
</div>
==============================
Form Fieldset Box Settings
Step 9 ) The following list Form Fieldset Box: shows you the field you need to edit under Styles tab as mentioned above and add your customize code. This controls the line around your form as illustrated in the first image about in Step 1 ).
- Form Fieldset Box: border:1px solid black; width:99%; max-width:550px; padding:10px;
The following HTML source code in blue is controlled by the above field.
<fieldset id=”fscf_form_fieldset1″ style=”border:1px solid black; width:99%; max-width:550px; padding:10px;”></fieldset>
==============================
The above instructions provides a clear understanding on how to customize the fields in a standard default form. This method applies to all your forms. Play around with the DIV containers settings until you get your desired design.
Note: The extra DIV containers not included in this tutorial are for certain fields when added in a form.
Click on the following link Custom CSS Style Formatting to learn how to troubleshoot some of the most common issues.
If you have any questions please let me know.
Enjoy.
I would like to change the button as shown on https://www.w3schools.com/css/tryit.asp?filename=trycss_buttons_basic but Fast Secure Contact form keeps inserting the Microsoft button.
Anything that can be done so I can use one of the link buttons?
Hi Kirk, please refer to the following
http://www.fastsecurecontactform.com/submit-button-imageto change the submit button. Let me know if you need more help.Kind regards
I added
background:url(https://practicebuilderpublishing.com/wp-content/uploads/2017/06/Enter-to-Win-5a.png) no-repeat; width:50px; height:24px; padding:0px 0 4px 0; border:none; text-indent: -1000em; cursor:pointer;
No change noted.
Hi Kirk, can you share your contact form URL? I would like to take a look.
Thank you
I finally found where to input the code from that documentation, however it seems the image area is pre-set and I can only see the top left corner of my input button image.
Where can I change that area to allow the full image to show.
PS – I love this plugin, and I think I gave it a five star rating on WordPress, and I have contributed a couple of time to Mike’s development, but I get confused about where to input things. Sometimes it seems like they are spread out in too many places, but I am not sure about that.
Anyhoo, that is my problem now. I know css, but I can’t find where to make changes to the submit button. Maybe different changes are in different places?
Thanks,
Kirk Ward
Hi Kirk, that is good to know that you have finally found where to input the code.