WordPress Simple Membership MailChimp Integration Setup shows you how to integrate MailChimp Add-on with the plugin.
Last Updated: March 24, 2023
Latest News: Updated the documentation to reflect changes made in MailChimp site.
In this tutorial you will learn how to integrate WordPress Simple Membership plugin with MailChimp. You will learn how to automatically sign up members to a MailChimp audience and a group. These steps are very easy to follow. Please note that the settings might change if MailChimp updates their procedures.
Addon changelog 1.9.4
- Updated the addon to work with the latest version of the main Simple Membership plugin.
What You Need:
WordPress Simple Membership MailChimp Integration Setup
Step 1 ) Download and install Simple Membership MailChimp Integration addon mentioned above.
Note: Click on the following URL How To Install WordPress Plugins to learn how to install a plugin or addon.
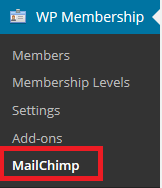
Step 2 ) Go to WP Membership -> MailChimp to set up the add-on. See image below.
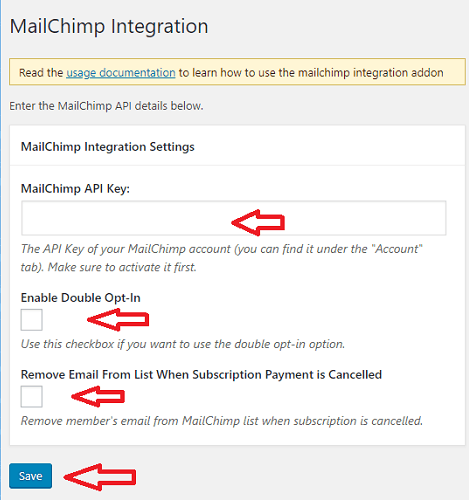
Step 3 ) The following image MailChimp Integration allows you to enable and setup the following options.
MailChimp Integration Options
- MailChimp API Key: = Note: See Step 3-a ), Step 3-b ) and Step 3-c ) below to learn how to create a new API key.
- Enable Double Opt-In
- Remove Email From List When Subscription Payment is Cancelled
- Click on Save button once you have completed the settings.
Important: Make sure the API Key is correct and activated in your MailChimp account.
Create new API key
The following images shows you how to create a new API key from your MailChimp account. The following link https://mailchimp.com/help/about-api-keys/ provides more information about API keys from the MailChimp website.
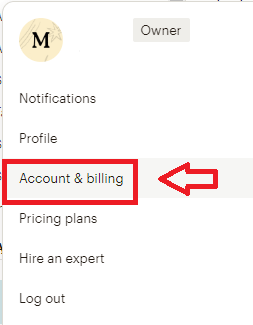
Step 3-a ) First go to Account & billing as illustrated in the image below.
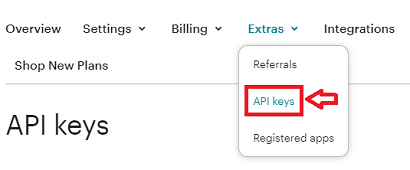
Step 3-b ) Second go to Extras -> API keys as illustrated in the image below.
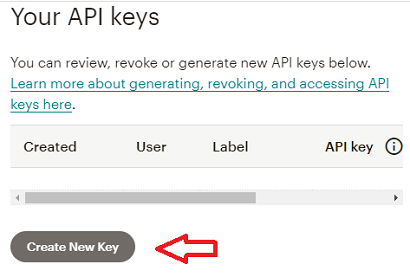
Step 3-c ) Third click on Create New Key button as illustrated in the image below.
Audience
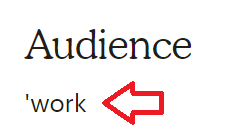
Step 4 ) The following image Audience shows you the MailChimp audience name ‘work used for this example.
Note: I added a single quote to the name on purpose. If I don’t add the correct name ‘work to the MailChimp List Name mentioned in Step 5-a ) below the subscribers won’t be added.
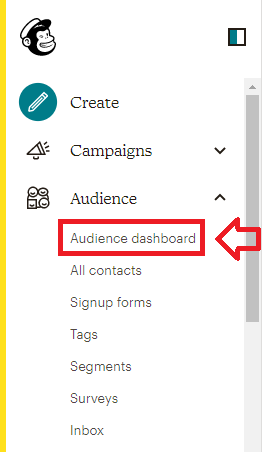
Step 4-a ) If you want to create some groups for your MailChimp subscribers go to Audience -> Audience dashboard as illustrated in the image below.
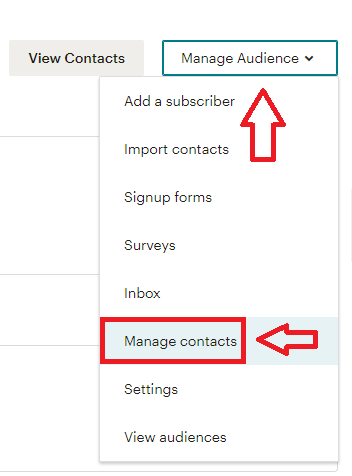
Step 4-b ) Then go to Manage Audience -> Manage contacts as illustrated in the image below.
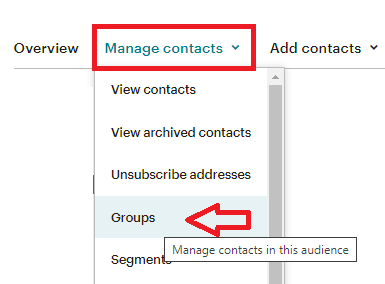
Step 4-c ) Then go to Manage contacts -> Groups as illustrated in the image below.
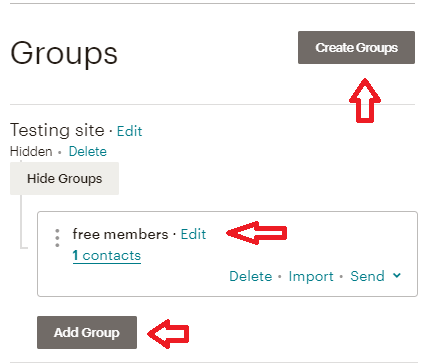
Step 4-d ) Click on Create Groups button as illustrated below to start creating your groups. In this example I created a group name Testing site and added a sub group name free members. Pay attention to these names because they will be added to smp settings in Step 5-a ) below.
Note: You can see 1 contact added to the group free members illustrated in the image below.
Membership Level ID
I added the following step because I am using the Free Level membership level in this example.
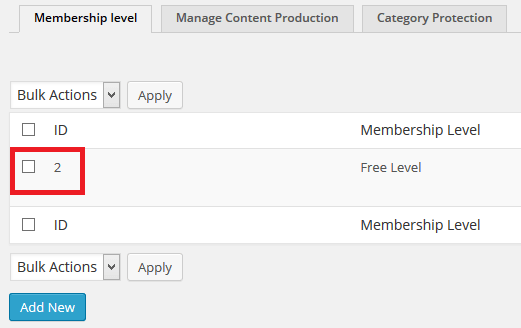
Step 5 ) The following image Membership level shows you the membership level ID 2. (Remember your ID might be a different number)
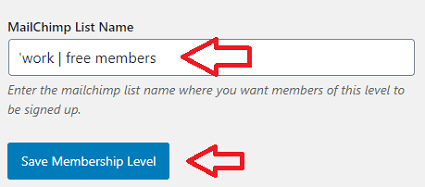
Step 5-a ) The following image MailChimp List Name shows you the MailChimp Audience and Group name (formerly MailChimp List Name) added to the membership level ID 2. The following link introducing-your-new-audience-dashboard has more information about the changes.
For this example I added the audience name = work and the group name = free members. Remember to click on Save Membership Level button once you complete your settings. If I only wanted the member to subscribe to my MailChimp audience name, I would only enter work in the field below.
Note: In your site these names will be different. Make sure there are no spaces between audience name and group name. For example: ‘work|free members.
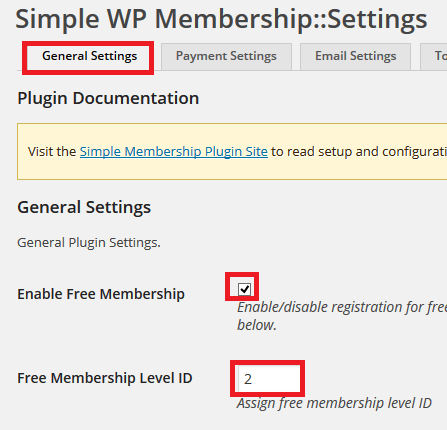
Step 6 ) The following image General Settings allows you to set up the following options.
General Settings Options
- Enable Free Membership Level
- Free Membership Level ID I entered membership ID 2. (Remember your ID might be a different number)
Test MailChimp Subscriptions
Step 7 ) The following steps will help you test to make sure the subscribers are added to the MailChimp list.
- Subscribed to the Free Membership Level from your website with a non registered account.
- Go to the email account from the subscriber above. See if you have received the confirmation email. If you have then click and confirm the subscription.
- Go back to MailChimp and see if the subscriber has been added to the List. If the member has been added then you are successful. If not then go back to the top and make sure you followed all the steps.
FAQ
Q1 How can I assign members registering in my site to different farms?
Answer: Lets call a membership level “Farm A” and another level “Farm B” and another one “Farm C”. Now, you can create three different payment buttons within our plugin (one for each of those 3 membership levels). The payment buttons all charge the same amount but having different payment buttons for the different levels will allow the plugin to identify which level a user should go to. Let’s say the visitors now goes to your “Join Us” page and they see the 3 different farm options. They can pick the one they want to join and pay for that level. After the payment, they will be allowed to register (create an account) for the level they paid for. They will be added to the MailChimp list for the level accordingly (so if someone joined “Farm A” then they will get added to the MailChimp List for “Farm A”). Check the following forum post for more information.
=====================
Troubleshooting MailChimp Integration
Q1 I want my Mailchimp Integration to respond to a manual membership level change. How do I achieve this?
Solution: Mailchimp list signup doesn’t work based on the account status at this stage. What you can do is use an additional level to achieve what you are after. When you are manually setting their level to “active”, also change their membership level to a NEW level. You can create as many levels as you want to so you can create a new level with the same permission but when someone is in this level, you know that they have gotten the manual approval.
Q2 I am receiving issues with the current Mailchimp API. How do I fix these issues?
Solution: Please check the following forum post for some tips that might help you.
===============================
Remember this example is using the free level setup. You might be implementing a paid level setup. The steps shown above are the same for whatever level you decide to integrate with a MailChimp list.
Click on the following URL After Login Redirect add-on to continue.
If you have any questions please let me know.
Enjoy.
Simple Membership Plugin Tutorial List: