Fast Secure Contact Form Basic Settings post helps you set up the plugins basic settings for your forms and more.
Last Updated: January 15, 2019
Latest Update: I repaired a broken link.
This tutorial keeps getting updated based on the latest version. If nothing new is added then there won’t be any changes only the changelog will be updated.
Latest News: I have fixed a broken link.
Hint: Nearly all entries have a help link to help you understand how to configure that field, entry, label etc.
Fast Secure Contact Form Basic Settings Setup
Step 1 ) Lets begin by looking at one of the excellent improvements over the old version. The following image shows you the new version using tabs. It is better organized and easy to follow.
The following image shows you the following tabs.
- Select a form option drop down menu. (Preview Form button)
- Basic Settings
- Fields
- Styles
- Labels
- Security
- Advanced
- Meeting
- Tools
- Newsletter

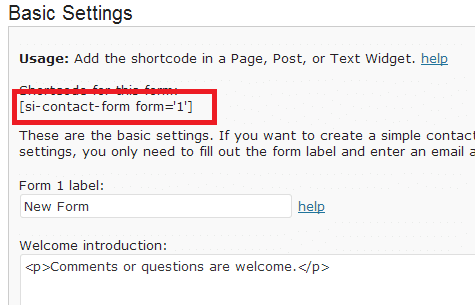
Step 2 ) Go to Settings -> FS Contact Form -> Basic Settings tab to change some of the basic settings. It shows you the shortcode for the current form you are creating which is Form 1. This is the shortcode you will be adding to your contact us page or a post.
Other changes you can make.
- Form 1 label:
- Welcome introduction:

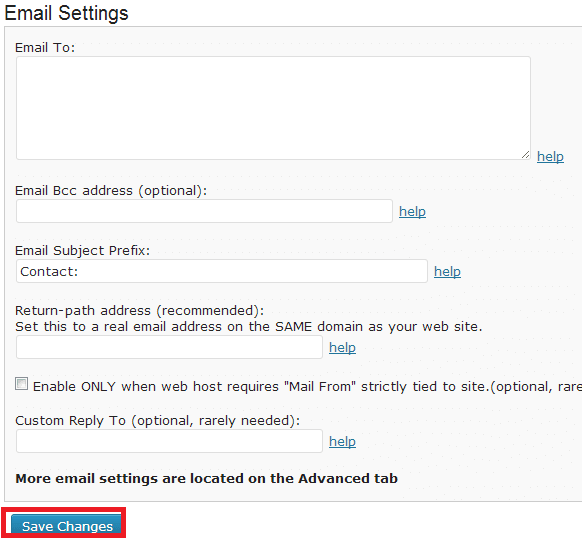
Step 3 ) The following image Email Settings allow you to edit and adjust the following settings. Make sure you enable all recommended features.
- Email To:
- Email Bcc address (optional):
- Email Subject Prefix: = (If you don’t want to receive the e-mail prefix, simply delete the text from this entry.)
- Return-path address (recommended):
- Enable when web host requires “Mail From” strictly tied to site. (recommended, see FAQ) help)
- Custom Reply To (optional, rarely needed):
- Once you finish setting up this area make sure you click on Save Changes button.

Click on the following link Fields to complete the next tutorial.
If you have any questions please let me know.
Enjoy.
Fast Secure Contact Form Plugin List:
Do you know where to delete an added field? I don’t find a “delete field” button…
Thx for a hint!
Hi Thorsten Albrecht, thank you for your question. When you add a new field, you will see a button next the the field on the right hand side that says Show Details. Click on that button for the new field and at the bottom you will see the Delete Field button. Remember this can only be done to the new fields created. The form adds a few fields when you are creating a form, those fields cannot be deleted only the added fields.
I hope this helps you.
Kind regards
Thanks, the delete button is completely wrong transleted in German… (date field instead of delete field) I should have tried the button first…
Thorsten, thanks for your help and effort. Just installed the FS Contact Form plugin, am happy with the appearance, but the text font for each field label is , not (my preference). How can I change the font?
Hi David, thank you for your comment. Can you elaborate further what you mean by “but the text font for each field label is , not (my preference)”.
Thank you
Hello …
This is a really nice plugin. I am just wondering on how can I let people to contact separate departments, using a radio button within the same form.
any one got a clue?
Hi the portal, thank you for your question. Can you provide an example of what you are trying to achieve with the form?
Thank you
2 questions.
1) I would like to have the state list out the 50 states in drop down format. Is there a way to do that? (searching thru the forums should be made, easier)
2) I saw on another post you had stated that the for the phone number mask, you should add \d{3}-\d{3}-\d{4}/ to the validation regex field. After saving, I entered in the field, but the phone number does not format to be that way. I able still able to add a () or – between numbers. Is there no way to mask the input to be a certain way ? for instance XXX-XXX-XXXX?
Hi Aziz, thank you for your question. For question one go to number 14 in the menu. For question 2 try the following regex
If you have any more question let me know.
Regards
Webmaster,
That format /\d{3}-\d{3}-\d{4}/ still does not work for me. The field still shows up as blank.
http://test.classiccityk9grooming.com/
Hi Aziz, I just carried out a test and it works for me. You might have a plugin or your theme might be conflicting with the form and or the regex code. Please reply through my contact form if you need more help.
Hello, I’m working on a long contact forms like this:
http://www.cpiapavia.gov.it/iscrizione-online/iscrizione-online-mortara/iscrizione-cpia-italiano-l2-mortara/I need to print all the forms received but it’s too long to put on one page? Is it possible to save some paper space by placing some fields on the same line (like “Nome Cognome” or “Via Numero civico”)?
I also need to add, on the email received, some text under all the fields. Is it possibile to add?
Hi Dario, when you say trying to print the forms you received is that on your browser? Or are you trying to print the form from your e-mail client? In regards to your other question, what text are you trying to add underneath the fields?
Hi
How can I get two fields on the same line? Eg Date, Time?
Hi, please check the following URL. Let me know if this helps you.
https://mbrsolution.com/wordpress/fast-secure-contact-form-two-columns-layout.php