Fast Secure Contact Form Fields tutorial shows you how to add new fields and configure each field individually plus more.
Last Updated: March 23, 2017
Latest News: I have reworded some text.
Fast Secure Contact Form Fields Setup
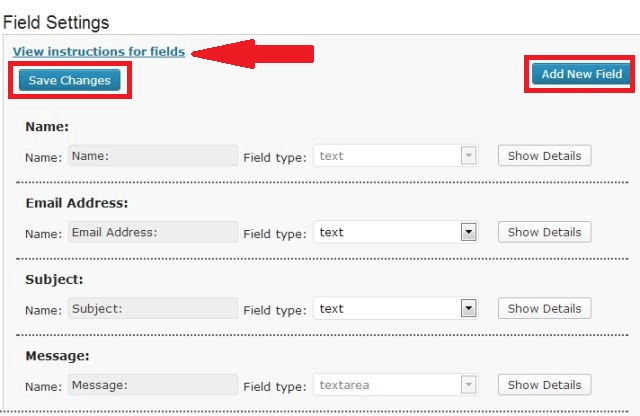
Step 1 ) Go to Settings -> FS Contact Form -> Fields tab to view the current fields added to your form. If you want to add some more fields click on Add New Field button and remember to always click on Save Changes once you have completed the settings on the Fields tab.
If this is your first time using the plugin then I suggest that you click on View instructions for fields link to read some more. See image below.
Hint: To learn more about Adding New Fields click on the following URL Fast Secure Contact Form Adding Fields
(Please note, the URL above will show you how to delete new added fields.)

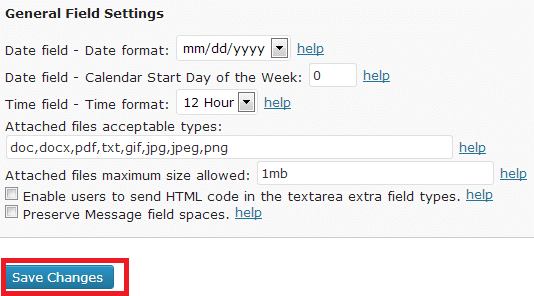
Step 2 ) The following image General Field Settings is very straight forward. It allows you to select and or set up the following fields.
- Date field – Date format:
- Date field – Calendar Start Day of the Week:
- Time field – Time format:
- Attached files acceptable types:
- Attached files maximum size allowed:
- Enable users to send HTML code in the textarea extra field types.
- Preserve Message field spaces.
Note:Attachments are only supported when using the “WordPress” mail function. This is located under Advanced -> Advanced Email Settings -> Send Email Function:
I suggest that you play around with these settings on a testing environment to make sure that you are happy with your options.

Click on the following link Styles to complete the next tutorial.
If you have any questions please let me know.
Enjoy.
I do not see a “delete field” button anywhere. Please provide a screenshot or instructions to locate where that button is located. Thanks.
Hi David, thank you for your question. On step number 3 you will see a Hint note. If you click on that URL it will take you to another tutorial. This tutorial will show you where the Delete button is located. I will add some more information to make this more clear.
Thank you for reporting this.
Regards
I am using Defalut Name field( First Name, Last Name), i would like to set different error messages for First name and Last Name. By default, it displays same error messages for both the fields.
Is there any solution to display two different message (“Your first name is required” and “Your last name is required”) ?
Thanks!
Hi, thank you for your question. At present you can only change the default error message under the following Plugins -> Fast Secure Contact Form -> Labels -> Error Message Settings -> “Your last name is required” to something different. If you wanted to add a different error message per field then you might consider adding a validation regex code and add a regex fail message. These are the only options available as far as I know.
Regards