WP eStore Custom Shopping Cart Grid Display shows you how to display a custom shopping cart using all items for a category in a grid like style.
Last Updated: June 5, 2023
Latest News: Updated the information below.
These instructions are very simple and straight forward. In this example a Twitter service is created to buy clicks for a site. You can create any type of service or sell any product using this method. There are many different templates, buttons, shortcodes you can use. In this tutorial you will achieve the following:
What you will achieve.
- Create a Grid Display of the products belonging to a category.
- Clicking on a product button, it will take you to a landing or product page.
- In the landing or product page you can have a Buy Now button or an Add To Cart button.
What You Need:
- WordPress eStore (Note: This is an affiliated link = I get a small commission if you make a purchase.)
- Extra Shortcode addon
Custom Shopping Cart Grid Tutorials
- WP eStore Custom Shopping Cart Grid Display
- WP eStore Shopping Cart Custom CSS
WP eStore Custom Shopping Cart Grid Display Steps
Step 1 ) Go to WP eStore -> Add/Edit Products and create your new products illustrated in the image below.
- For this tutorial, three twitter products will be created.

Step 1-a ) The following image allows you to add Product Description and a product Thumbnail Image URL. There are other fields you can fill in if you want for your product or services.

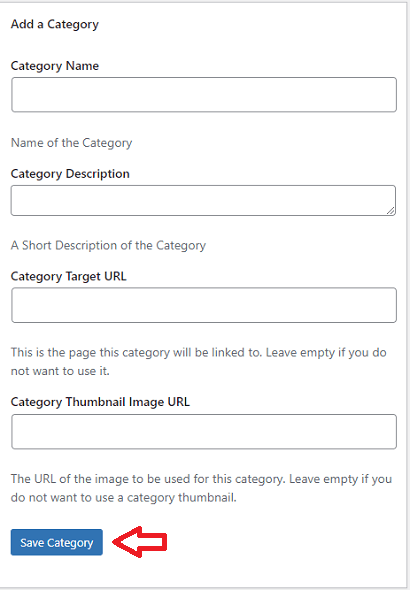
Step 1-b ) The following image allows you to Add a Category if you don’t already have one.
Note: For this tutorial a twitter category is added.
Step 1-c ) The following image shows you the category twitter created above checked and the custom button “Read more” added to Button Image URL.

Step 1-d ) The following image allows you to click on Save Product button or Delete Product link.
Note: Remember to save your product once you have completed the setup.

Step 2 ) Type the following shortcode as illustrated in the image below to a post or page to display the shopping cart.
- id = 1 this is the category id number. Note: All the products belonging to this category ID will be displayed.
- show_price = 0 this will stop the price from showing on the item.
- style = 5 this is the template we are using.
[ wp_eStore_category_products_fancy id=2 show_price=0 style=5]
Note: The following URL Stylish Product Display Options For WP eStore has more templates for you to choose.

Step 3 ) The following image shows you the final results. Now you have the product displayed in a grid format using the settings above. There is an image displayed of a product, the title is displayed, the description is displayed and a custom button “Read more”.
Note: The Read more button will take you to the landing or product page.

Step 4 ) In your landing or product page add the custom Buy Now button or Add To Cart button.
The following link can help you find a shortcode that might suit your needs.
https://www.tipsandtricks-hq.com/ecommerce/wp-estore-shortcodes-and-functions-reference-460
==================================
I hope the tutorial above helps you to create your custom products grid display.
You have completed Part 1 WP eStore Custom Shopping Cart Grid Display. Click on the following URL WP eStore Shopping Cart Custom CSS to complete the second part.
Click on the following URL Troubleshooting to continue.
I will be updating this post from time to time. So keep coming back for more. If you have any questions please let me know.
Enjoy.
WordPress eStore Plugin Tutorial List: