Fast Secure Contact Form Two Columns Layout will show you how to add two columns to your contact form.
Last Updated: January 12, 2019
Latest Update: I have changed a link.
This tutorial shows you one method of setting up a two columns contact form layout in your website or blog using Fast Secure Contact Form. There are other ways to achieve this, however I thought of sharing my idea.
Please make sure that you test it thoroughly before you publish your form. Also test the form display on different resolution and check the form on your mobile devices like smart phone or tablet if you have any.
Important: This layout is not set up as a responsive layout. Please visit the following URL Responsive Grid System tutorial which will guide you and help you to convert this two column layout into a responsive layout.
I used position: relative instead of position: absolute. The reason is because on the contact form admin panel when I viewed the form it was all messed up. Using the relative method allowed me to view it better on the admin area. Of course the most important part is to make sure that it is viewed correctly when viewing the form from your website front end.
Note: To implement this method your best option is to hide the labels. Each field that you add has an option to hide the label and add the field name to Default:. This will display the name inside the text box even if you hide the label.
Fast Secure Contact Form Two Columns Layout Setup
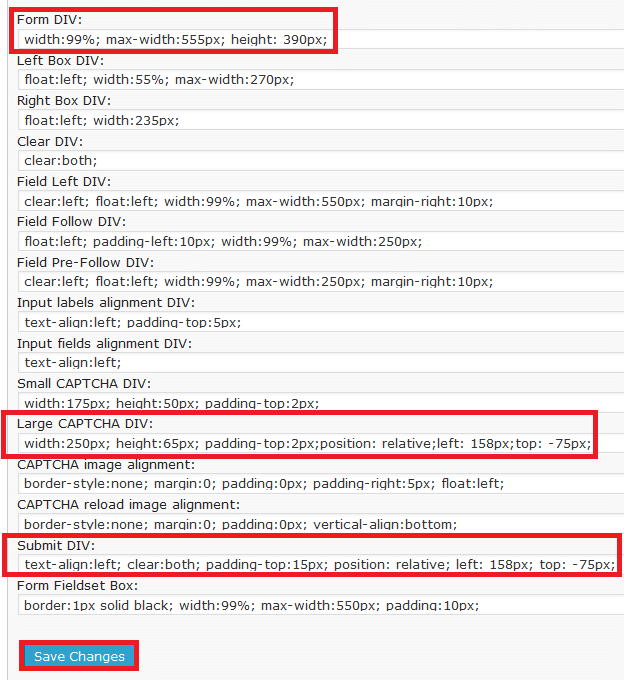
Step 1 ) Go to Settings -> FS Contact Form -> Styles to edit the following fields.
- Form DIV = I added the height: 390px (This is optional)
- Large CAPTCHA Div (You might be using the Small CAPTCHA Div display)
- Submit DIV
- Click on Save Changes once you have completed editing your form

Step 2 ) The following image shows you the Input text field CAPTCHA you need to edit.
Here you will add the following
- position: relative; left: 158px; top: -75px; (Remember that in your website these settings will be different)

Step 3 ) Go to Settings -> FS Contact Form -> Fields to edit the contact form fields Name, Email, Subject and Message. All the fields have an Input CSS setting you need to change. See image below.

For the Name field you need to add the following Input CSS code.
- position: relative; top: -0px; left: 0px;
For the Email field you need to add the following Input CSS code.
- position: relative; top: -40px; left: 158px;
For the Subject field you need to add the following Input CSS code.
- position: relative; top: -40px; left: 0px;
For the Message field you need to add the following Input CSS code.
- height: 120px; margin: 0; max-width: 250px; text-align: left; width: 99%; position: relative; left: 158px; top: -78px;
Form Custom CSS Code
Step 4 ) The following code is to be included as a custom code. This code controls the CAPTCHA Code Label. I am using Suffusion theme for this tutorial, it has an area in the theme settings that allows me to add custom code. In your case you might have to use a plugin or edit the child theme css file.
Please Note: The id field is fsct_captcha_field2 which is added automatically by the plugin. The following field2 refers to the contact form id in this case it is the contact form 2.
(Remember your contact form might have a different id number)
The following css code might not work for various reasons. One reason might be because this tutorial is using the following feature.
Select the method of delivering the form style: Internal Style Sheet CSS (Default, edit below)
If it does not work then you need to add the css code below to the following feature Input labels alignment DIV: under Styles tab.
Custom code to include:
#fscf_captcha_field2{
padding-top: 5px;
text-align: left;
position: relative;
left: 158px;
top: -75px;
}
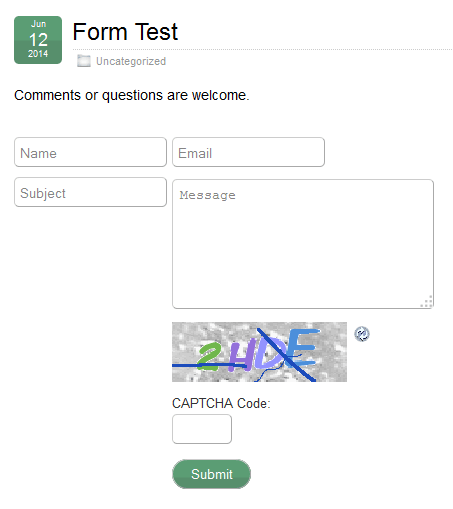
Step 5 ) The following image Form Test shows you the two columns added by the above code. Notice the labels name inside the text box.

I hope this helps you achieve a two column contact form layout on your website or blog.
Note: This is one way of achieving two columns layout, there are other ways you can achieve this if you are good with HTML and CSS. These instructions are simple and easy to follow.
With this method you can achieve other different layouts i.e. three columns, four columns, align the fields differently and more.
Click on the following link Country List to continue with the next tutorial.
I will be updating this tutorial from time to time so keep coming back to view the latest.
If you have any questions please let me know.
Enjoy
WordPress Fast Secure Contact Form Plugin List:
Great tutorial. Just one issue I’ve been having. After changing to the 2 column layout, the error messages from the form validation do not line up with the input fields, they get positioned like it would be in single column. Any ideas on how to fix this?
Hi Jeff, thank you for your question. Can you send me a message through my contact form with your contact form URL so that I can check it.
Thank you