WordPress Total Security Plugin tutorial will show you how to check the security of your website core files, folder permissions and much more.
Last Updated: April 28, 2017
Latest News: I have added another link to the menu and another image.
Running a safe and secure WordPress website or blog is extremely important. This is something that many overlook and don’t follow up. When your website is vulnerable and unsecured, a few things can happen. One you will get hacked, two your site will drop from the search engine search, three Google and other search engines will penalize your site and put it in the black list sort of speak. Then you have to spend time cleaning and removing any spam code and restore your site to pristine conditions. Once all that is done and you are 100% sure that your site is clean, then you can contact Google to let them know about your website been clean again.
All the above can take months to achieve. During this time you will loose business, revenue and online status. Apart from the fact that you will definitely drop from the first 3 pages in Google and other search engine. So why not make sure from the beginning that your site is protected, secure and clean. This and or other security plugins will help you maintain a safe and secure website.
Oh one more comment, no website is ever going to be 100% protected. However having a security plugin install as part of your arsenal will definitely make it challenging for hackers to penetrate and hack your website.

Total Security Pluing Version 3.4.8 Changelog
- IMPROVED – Compatibility with WordPress 4.7.4
What You Need:
WordPress Total Security Plugin Tutorials
- Total Security Plugin
- Vulnerability Test
- File System Check
- Settings
- Troubleshooting
WordPress Total Security Plugin Steps
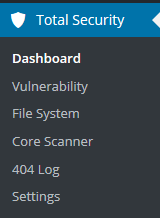
Step 1 ) The following image Total Security allows you to set up and check the following menu.
- Dashboard
- Vulnerability
- File System
- Core Scanner
- 404 Log
- Settings

Step 2 ) The following image illustrates the legend for all the security checks. The colors are very easy to follow. You must try and make sure all the results read either a Green or Blue. All other colors should be investigated as soon as possible except for Red which should be dealt immediately.

Step 3 ) The following image Bookmarklets and Useful Information allows you to set up the following options. When you click on the following you will see a window that explains what you have to do.
- Password hash>>> = opens up a windows that lets you know what you have to do.
- Phpinfo() = displays your php version.
- Debug = displays information about your website URL, plugins and much more.
- Database Info = displays information about your database content.
- There is a question mark which takes you to the following URL passwordMaker

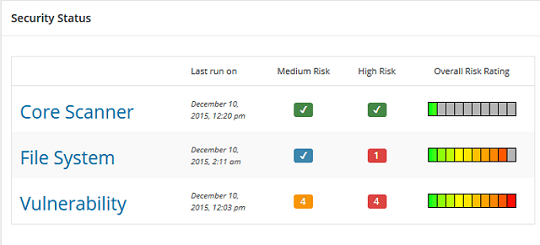
Step 4 ) The following image Security Status shows you the results after you have performed the following scans. When you install the plugin for the first time you will not see any scan results. The scan results only when you have performed one or any of the following scans.
- Core Scanner
- File System
- Vulnerability
Note: Anything in red must be dealt with immediately.

Step 5 ) If you have any Red vulnerabilites on your website they will show next to the plugin admin menu, as illustrated in the following image. This only occurs after you execute the scan and don’t fix or forget to fix the issue.
![]()
Click on the following URL Vulnerability Test to continue with the settings.
I will be updating this post from time to time. So keep coming back for more.
Enjoy