Last Updated: December 16, 2015
WordPress Total Security Settings tutorial will show you how to configure the settings part of the plugin and much more.
Latest News: I have added another link to the menu.
In this post I will show you how to set up and enable the settings area of the plugin. Two of the settings also control the Vulnerability Tab and File System Tab options from the admin menu.
Note: Some settings require for that feature to be enabled in the server.
WordPress Total Security Plugin Tutorials
WordPress Total Security Settings Steps
Step 1 ) The following image Total Security : File System shows you that you have not yet executed a test yet. This means that this is the first time you run this step in the plugin.

Step 2 ) The following image Secure Hidden Login allows you to hide the following files wp-admin.php and wp-login.php from public viewing.
You have the following fields you can populate with a custom entry.
- Secret key = you can enter any secret name you want. Something that only you will know and a name that will make it hard for hackers to discover. For example 12Miss34Gone
- URL to redirect unauthorized attempts = this field can be left empty “blank” or you can type a custom URL pointing to a custom page, you want those intruders to land with probably a warning message.
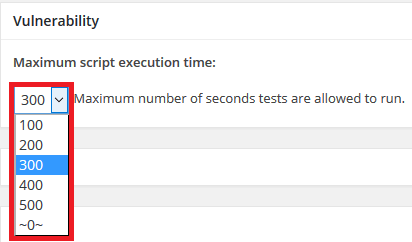
Step 3 ) The following image Vulnerability Max Execution Script allows you to select the maximum execution time you allow a script to run.
Note: This setting can only be applied if your server allows you for the max execution time to be changed.
Maximum Script Execution Time
- 100
- 200
- 300 (Plugin Default Setting)
- 400
- 500
- 0

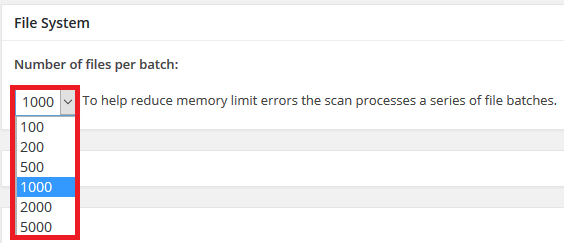
Step 4 ) The following image File System Files Per Batch allows you to select the maximum number of files per batch when checking for errors in the files. The smaller the number per batch the less memory it will use when checking the files.
Note: This setting can only be applied if your server allows you for the max execution time to be changed.
Maximum Files To Check Per Batch
- 100
- 200
- 500
- 1000 (Plugin Default Setting)
- 2000
- 5000

Step 5 ) The following setting 404 Log allows you to set up the debug log viewer option.
Log Viewer (debug.log)
- Enable the admin bar log viewer
You must add the following to your wp-config.php file found in the root of your WordPress installation.
define( 'WP_DEBUG', true );
define( 'WP_DEBUG_LOG', true );
define( 'WP_DEBUG_DISPLAY', false );
@ini_set( 'display_errors',0 );
Step 6 ) The final step to complete the settings and plugin configuration.
Final Step Set up
- The following button Restore Defaults allows you to restore all your settings to default set up
- Once you have finished with your settings and configuration click on Save All Options button
Click on the following URL Troubleshooting to continue.
I will be updating this post from time to time. So keep coming back for more.
Enjoy