WordPress Gutenberg Editor post talks about the different options to use and how to manage the new editor and more.
Last Updated: March 30, 2025
Latest News: Updated the information.
The following tutorial shows you how to set up and manage Gutenberg Editor. This is going to be the new WordPress editor for the future. There is a lot of differences between the Classic Editor and this editor. My intentions with this tutorial is to help you understand the functionality of Gutenberg. Once you become accustom to the new editor you should be able to do much more work in your posts and pages faster without needing too much CSS, HTML knowledge. The whole idea with this new editor is to work with blocks. Each block manages one part or section of the content in a post or page. For example: You can add one block of text, a block of images, a video block etc. I think you get the idea behind the using of blocks concept.
In this tutorial I will introduce the new editor and the different sections it covers. Then I will add a list of tutorials covering each section of the editor in depth.
Note: Click the link below to learn about the changes in version 20.5.0. https://github.com/WordPress/gutenberg/releases/latest
What you need:
WordPress Gutenberg Editor Tutorials:
- Gutenberg Editor
- Top Left Editor Options
- Top Right Editor Options
- Adding Blocks
- View Post
- Post Settings
WordPress Gutenberg Editor
Step 1 ) The following image shows you Gutenberg editor in action. You can see different sections that allow you to manage different areas in the editor. This is very similar to some degree to the Classic Editor. You should not have too many problems to become accustom to the new editors structure.

Gutenberg Top Left Side Editor Options
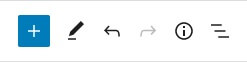
Step 2 ) The following image shows you the top left hand side options for the editor. Here you have the option to add the following.
Gutenberg Top Left Side Editor Options
- Add Block
- Modes
- Undo
- Redo
- Details
- Outline
Gutenberg Top Right Side Editor Options
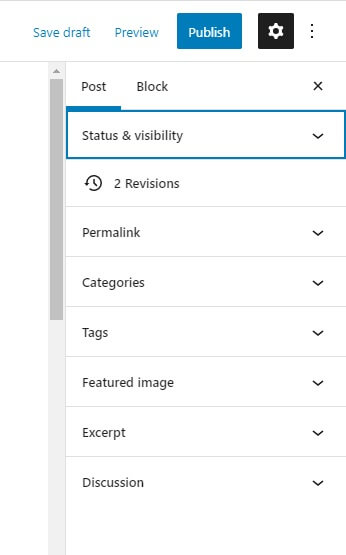
Step 3 ) The following image shows you the top right hand side options in a post or page. Here you have the option to add and manage the following options.
Gutenberg Top Right Side Editor Options
- Save Draft
- Preview
- Publish
- Settings
- More Settings
- Post
- Block
- Status & Visibility
- 2 Revisions = Note: Revisions will show up if you save your post or page more than once.
- Permalink
- Categories
- Tags
- Featured Image
- Excerpt
- Discussion
Editing Content Block Options
Step 4 ) The following image shows you content not yet converted to a block. It shows you the classic TinyMCE editing content tools.
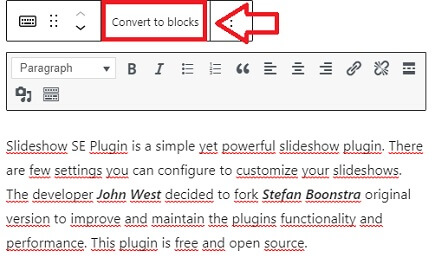
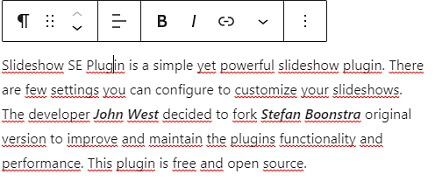
Step 4-a ) The following image shows you the content converted to blocks. It shows you basic editing tools to edit the content.
Editing Content Tools
- Change block type or style
- Drag
- Move up or down
- Change text alignment
- Bold
- Italic
- Link
- More
- Options
==============================
That is how simple it is to manage and work with the new Gutenberg Editor. Of course, at first you will need to spend a bit of time getting to know the new editor.
If you have any questions please let me know. I will be updating this tutorial from time to time.
Enjoy.