WordPress Gutenberg Top Left Editor Options post talks about the different blocks you can add to a post or page.
Last Updated: July 14, 2023
Latest News: Updated the information.
The following tutorial shows you how to manage Gutenberg top left editor options. It also shows you all the different block groups available for you to use. Each block group has a list of other blocks. This makes it very simple to add just about anything you want to a post using blocks. There is a large number of blocks for you to choose from. I am sure that you will find all the blocks needed for your posts.
What you need:
WordPress Gutenberg Editor Tutorials:
- Gutenberg Editor
- Top Left Editor Options
- Top Right Editor Options
- Adding Blocks
- View Post
- Post Settings
WordPress Gutenberg Top Left Editor Options
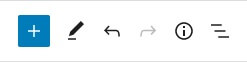
Step 1 ) The following image shows you the top left hand side options for the editor. Here you have the option to add the following.
Gutenberg Top Left Editor Options
- Add Block
- Modes
- Undo
- Redo
- Details
- Outline
Group Of Blocks
Step 2 ) The following shows you a list of groups of blocks available in Gutenberg editor. Each group of blocks contains a list of blocks for that group. This allows you to easily select the correct block you wish to add in your post.
Group Of Blocks
- Text
- Media
- Design
- Widgets
- Embeds
Text Blocks
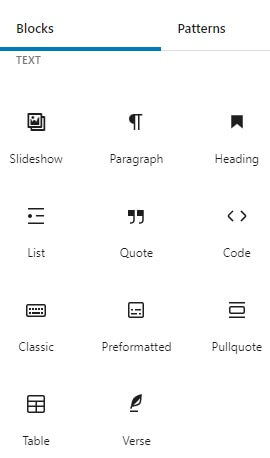
Step 3 ) The following image Text shows you a list of different blocks in the Text Blocks group area.
Text Blocks
- Slideshow
- Paragraph
- Heading
- List
- Quote
- Code
- Classic
- Preformatted
- Pullquote
- Table
- Verse
Media Blocks
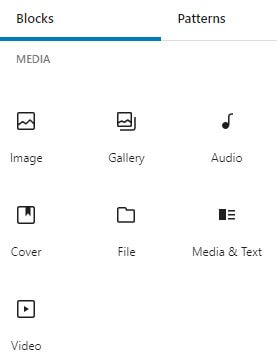
Step 4 ) The following image Media shows you a list of different blocks in the Media Blocks group area.
Media Blocks
- Image
- Gallery
- Audio
- Cover
- File
- Media & Text
- Video
Design Blocks
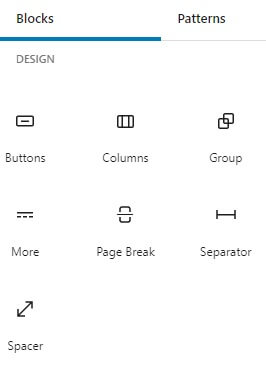
Step 5 ) The following image Design shows you a list of different blocks in the Design Blocks group area.
Design Blocks
- Button
- Columns
- Group
- More
- Page break
- Separator
- Spacer
Widgets Blocks
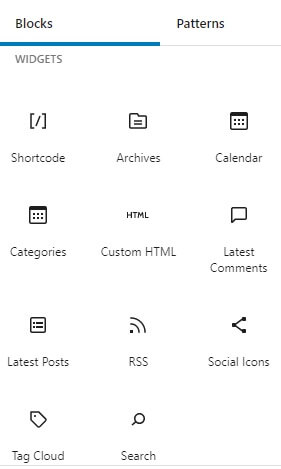
Step 6 ) The following image Widgets shows you a list of different blocks in the Widgets Blocks group area.
Widgets Blocks List
- Shortcode
- Archives
- Calendar
- Categories
- Custom HTML
- Latest Comments
- Latest Post
- RSS
- Social Icons
- Tag Cloud
- Search
Embeds Blocks
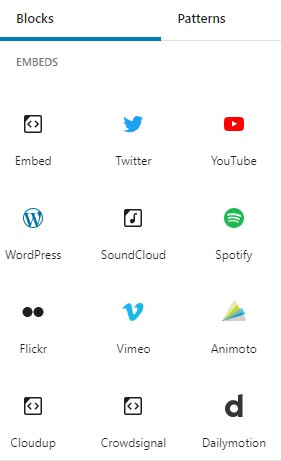
Step 7 ) The following image shows you a list of different blocks in the Embeds Blocks group area. As you can see there is a huge number of third-party social media content blocks like (YouTube, Twitter, Facebook etc.) you can add. This makes it very easy and simple to add social media videos and more to your site
Gutenberg Embeds Blocks
- YouTube
- Vimeo
- Soundcloud
- Spotify
- Flickr
- Animoto
- Cloudup
- CollegeHumor
- Dailymotion
- Funny or Die
- Hulu
- Imgur
- Issuu
- Kickstarter
- Meetup.com
- Mixcloud
- Photobucket
- Polldaddy
- ReverbNation
- Screencast
- Scribd
- Slideshare
- SmugMug
- Speaker
- TED
- Tumblr
- VideoPress
- WordPress
- WordPress.tv
Modes
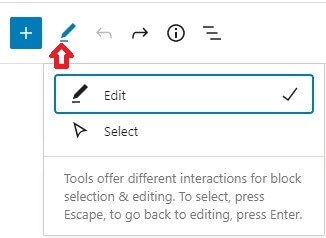
Step 8 ) The following image Modes allows you to select from the following options. In this example you can see Edit option selected. There is a difference between Edit and Select mode. Choose which mode works best for you.
Modes Options
- Edit
- Select
Details Information
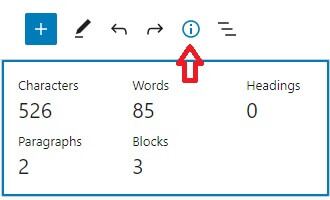
Step 9 ) The following image Details shows you the content structure information of a post. From the information below, you can see how handy this information will become once you start using Gutenberg. The information can be important for future references.
Details Information
- Characters = 526
- Words = 85
- Headings = 0
- Paragraphs = 2
- Blocks = 3
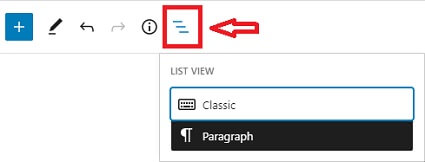
Outline
Step 10 ) The following image Outline allows you to select from the following options. In this example you can see Classic block selected and paragraph below. As you start adding blocks in a post this list will show those blocks added. This allows you to easily select the block you want to work on. This option becomes handy when you have a large number of blocks to manage.
Outline List View
- Classic
- Paragraph
==============================
That is how simple it is to manage and add blocks to your posts and pages using the top left editor options.
If you have any questions please let me know. I will be updating this tutorial from time to time.
Enjoy.