MailChimp Plugin For WordPress tutorial will show you how to add subscription option to your website using this very simple but powerful plugin.
Last Updated: June 13, 2024
Latest News: Updated the changelog in the document.
Everyone knows that attracting customers and more visitors to your website requires a few more additions to your websites like a subscription form. For example many will use subscription forms, newsletters, publicity, advertisements and more to attract customers and visitors to their website. A service that many know in the Internet market is MailChimp.
MailChimp is a well known service that allows you to manage all your subscriptions from one central point. It also allows you to create different forms for different occasions. Create different lists based on the services that you might be offering plus more.
This very powerful plugin will make your subscription to MailChimp go smoothly without having to know too much about coding and JavaScript. Everything is done automatically by configuring a few settings in the plugin.

MailChimp For WordPress Version 4.9.13 Changelog
- Fix issue with Composer classmap throwing a fatal error when an older version of Composer is already loaded.
================================
What You Need:
- A MailChimp Account
- MailChimp For WordPress plugin.
MailChimp Plugin For WordPress Tutorials
- Plugin For WordPress
- Form Settings
- Advanced Settings
- Troubleshooting
MailChimp Plugin For WordPress Steps
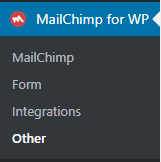
Step 1 ) Navigate to MailChimp for WP to view the menu. See images below.
This plugin menu is small and easy to set up.
The Admin Menu:
- MailChimp
- Forms
- Integrations
- Other

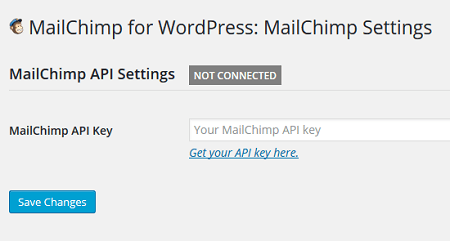
Step 2 ) Once you click on MailChimp link in the admin menu as illustrated in the image above you will need to set up your MailChimp API. Click on Save Changes button once you are finished. If you have any list added to your MailChimp account they will be displayed after your save your settings.
Also remember to click on Renew MailChimp List button if you have made changes to your list in your MailChimp account.
Note: You must make sure your API is set up correctly or else you will see error messages on your screen.

Step 3 ) In the latest version there is a Usage Tracking checkbox you can enable if you wish to allow the developer track how the plugin is performing on your website.
Step 4 ) Once you have established a connection between your website and MailChimp, if you have any list added to MailChimp they will show up in the plugin.
Click on the following URL Form Settings to learn more.
I will be updating this post from time to time. So keep coming back for more.
Enjoy.