MailChimp Plugin For WordPress Form Settings tutorial will show you how to set up your subscription form including customize the layout.
Last Updated: November 9, 2017
Latest News: I have updated the tutorial to reflect the latest changes in the latest version of the plugin.
When it comes to subscription forms one always tries to add some kind of style. A style that appeals to the potential subscribers. It is also important that it matches your theme. This plugin has many different styles for you to choose from. If those styles don’t suit you and you would like to add your own custom style then you have to purchase the MailChimp For WordPress Pro Version. The pro version allows you to customize the layout as you please. This would come in handy as you would be able to design the layout to blend in with your theme.
MailChimp Plugin For WordPress Tutorials
- MailChimp Plugin For WordPress
- Form Settings
- Advanced Settings
- Troubleshooting
MailChimp Plugin For WordPress Form Settings Steps
Step 1 ) Navigate to MailChimp for WP -> Form to set up your forms. See image below. Once you click on Form in the sidebar menu, you need to enter a title for your form and select one or more MailChimp lists.

Step 2 ) The following image Edit Form allows you to set up and configure the following options.
Note: You can edit the form title, click on Get shortcode and Preview this form buttons.
Form Menu Tabs
- Fields
- Messages
- Settings
- Appearance

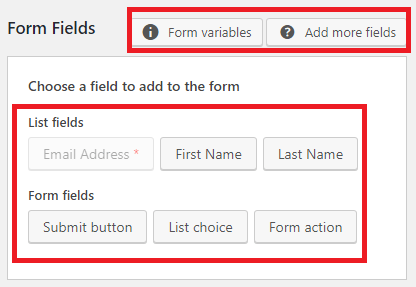
Step 3 ) Navigate to MailChimp for WP -> Form -> Fields to set up the following options.
You have two buttons you can click on Form variables and Add more fields.
List Fields
- Email Address
- First Name
- Last Name
Form Fields
- Submit button
- List choice
- Form action
The form will display the form code while you edit the form. It will look something similar to the following code.
<p>
<p>
<label>First Name:</label>
<input required=”required” placeholder=”Your first name” name=”FNAME” type=”text”>
</p>
<p>
<label>Last Name:</label>
<input required=”required” placeholder=”Your last name” name=”LNAME” type=”text”>
</p>
<p>
<label for=”mc4wp_email”>Email address: </label>
<input type=”email” id=”mc4wp_email” name=”EMAIL” placeholder=”Your email address” required />
</p>
<p>
<input type=”submit” value=”Sign up” />
</p>
Step 4 ) The following image allows you to click on Save Changes button and select the shortcode.

Click on the following URL Advanced Settings to continue with the settings.
I will be updating this post from time to time. So keep coming back for more.
Enjoy.