MailChimp Plugin For WordPress Advanced Settings tutorial will show you how to set up your subscription form including customize the layout.
Last Updated: November 9, 2017
In this post you will learn how to add custom messages and configure the plugin settings.
In regards to styling, when it comes to subscription forms one always tries to add some kind of style. A style that appeals to the potential subscribers is always beneficial and positive for the website. It is important that the style matches your theme. This plugin has many different styles for you to choose from. If those styles don’t suit you and you would like to add your own custom style then you have to purchase the MailChimp For WordPress Pro Version. The pro version allows you to customize the layout as you please. This would come in handy as you would be able to design the layout to blend in with your theme.
MailChimp Plugin For WordPress Tutorials
- MailChimp Plugin For WordPress
- Form Settings
- Settings Messages
- Troubleshooting
MailChimp Plugin For WordPress Advanced Settings Steps
Step 1 ) Navigate to MailChimp for WP -> Form -> Messages to set up all the messages in your form.
- Successfully subscribed
- Invalid email address
- Required field missing
- Already subscribed
- General error
- Unsubscribed
- Not subscribed
- No list selected
- Click on Save Changes button when you finish.
Note: Each field above allows you to enter any custom message you want.
Step 2 ) Navigate to MailChimp for WP -> Form -> Settings to set up and configure the following options.
Form Settings
MailChimp specific settings
- Lists this form subscribes to
- Use double opt-in? Yes / No
- Update existing subscribers? Yes / No
Form behaviour
- Hide form after a successful sign-up? Yes / No
- Redirect to URL after successful sign-ups
- Click on Save Changes button when you finish.
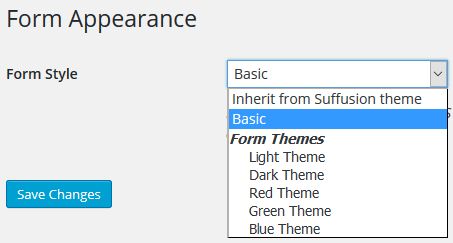
Step 3 ) Navigate to MailChimp for WP -> Form -> Appearance to set up the Form Style by selecting a theme.
Themes to choose from:
- Inherit from your theme = In this example Suffusion theme is available
- Basic
- Light Theme
- Dark Theme
- Red Theme
- Green Theme
- Blue Theme
- Make sure you click on Save Changes button when you finish.

Click on the following URL Troubleshooting to continue with the settings.
I will be updating this post from time to time. So keep coming back for more.
Enjoy.