How To Reset AIOS Plugin shows you how to remove all entries in the plugin using the reset settings and more.
Last Updated: September 3, 2025
Latest News: Updated the documentation.
AIOS plugin is very powerful and requires some testing and a bit of reading to make sure you don’t run into issues when enabling some of the security options. It has many options available to help protect your site from intruders and more. The plugin has plenty of documentation to help you further understand each option. However many of you might run into issues while setting up AIOS plugin. These instructions will help you reset the plugin and start from scratch.
These instructions are for those who have been blocked out from their site and have tried many different options to get back into their site as an administrators with no success. After you complete these steps you should be able to log back into your site as an administrator, enable the plugin and start configuring the settings from scratch.
What you need:
- All In One WP Security And Firewall
- Access your site via FTP using a program like filezilla or cPanel file manager.
How To Reset AIOS Plugin
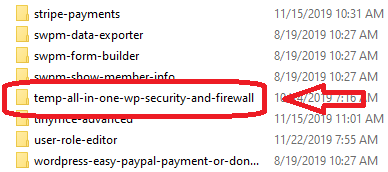
Step 1 ) Use cPanel file manager (or FTP) and temporarily rename this plugin’s folder.
Rename the plugins folder name from all-in-one-wp-security-and-firewall to tmp-all-in-one-wp-security-and-firewall, as illustrated in the following image. This process automatically disables the plugin in your site. (Note: If you still can’t log into your site, make sure you have cleared the plugins entries from the .htaccess file pointed out in Step 6 ) below.)
Step 2 ) Log into your site using the standard login URL – ie, yoursite.com/wp-login.php. Then rename the folder back to its original name all-in-one-wp-security-and-firewall.
Note: Make sure the name is correct, or else the plugin will not activate in your site.
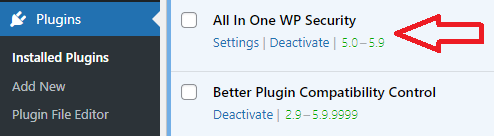
Step 3 ) Go to Plugins -> Installed Plugins and make sure All In One WP Security plugin is activated again as illustrated in the following image.
Step 3-a ) Then click on No button in the message displayed when AIOWPS plugin is reactivated as illustrated in the image below. This will make sure that no settings are included in the plugin. Now you can reset the plugins settings.

Step 4 ) Then go to AIOS -> Settings -> General settings as illustrated in the following image.

Step 5 ) Click on Reset settings button as illustrated in the image below. This will clear all the settings from AIOS plugin in your site.

Step 6 ) The above steps removes all the code and including the following tags added by AIOWPS plugin in your .htaccess file.
Tags Added To .htaccess File
- # BEGIN All In One WP Security
- # END All In One WP Security
Note: The plugin now has the following two options Delete database tables: and Delete settings:. This allows you to completely delete the plugin’s database tables and the settings as well when you uninstall the plugin. Go to WP Security -> Settings -> Delete Plugin Settings tab to enable these features.
Step 7 ) If the above steps don’t help you and you are still having issues with the plugin, click on the following link Remove All In One WP Security Database Tables to remove the plugin completely from your site and server.
Note: These steps will remove the plugins tables from your WordPress database. It will remove the plugin from your site and also remove the plugins settings. So make sure this is exactly what you want to do. I recommend that you create a database backup before you begin just to be on the safe side.
======================================
The above steps should help you remove all aios entries from your settings.
If you have any questions please let me know. I will be updating this post from time to time. So keep coming back for the latest.
Enjoy.
All In One Security (AIOS) Plugin Tutorial List
Hi Manuel Ballesta Ruiz
At first take my sincere respect. I have gone through your article.I think if you write about some good theme for WordPress it will very helpful for me.
Moreover i like your full article and it is very helpful for me.
Looking forward to hear from you soon.
Thanks sincerely
Abdullah
Thank you for your comment.
Thanks for the fix, appreciate your help.