ClassiPress WordPress Theme Admin Settings post will show you how to setup and manage the dashboard admin settings and more.
Last Updated: November 4, 2020
Latest Update: Updated the documentation.
In this post you will learn how to set up ClassiPress dashboard admin settings. You will also learn about security, email, pricing, system info and more. There are also some tutorials found under ClassiPress -> Dashboard tab.
ClassiPress WordPress Theme Admin Settings
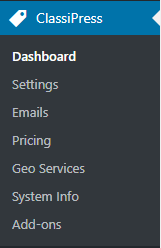
Step 1 ) The following image ClassiPress admin menu displays different tabs that allow you to manage, enable and activate different options in the theme. The following list of tabs will help you get started.
ClassiPress Admin Menu
- Dashboard
- Settings
- Emails
- Pricing
- Geo Service
- System Info
- Add-ons

Dashboard
Step 2 ) Go to ClassiPress -> Dashboard to check up on the following information. This information helps you keep track of what is happening in your site and much more. It is a good idea to check the dashboard every time you log into your site.
Dashboard
- Overview
- Last 30 Days
- News
- Market Place
- Forums
- Tutorials
Settings
Step 3 ) Go to ClassiPress -> Settings to set up the following options.
Settings
- General
- Categories
- Listings
- Structured Data
- Security
- Advertising
- Advanced
- Reports
General Settings
Step 3-a ) The following Settings -> General tab allows you to set up the following options.
Appearance
- Design
Social
- Feedburner URL
- Analytics Code
Search
- Refine Price Slider
Extra Feature
- View Stats
- Open Graph
Messages
- New Ad
- Membership
- Terms
- Click on Save Changes button when you are finished with the settings.
Categories Settings
Step 3-b ) The following Settings -> Categories tab allows you to set up the following options.
Categories Menu
- Show Count = Display the number of ads next to the category name
- Hide Empty = Do not show a category if it does not have any ads assigned to it
- Background Color = Show a custom background for a category. Edit the Categories to set their backgrounds and icons.
- Background Image = Show a custom background Image for a category
- Category Icon = Show a custom Icon for a category
- Category Depth = The number of levels deep the category should display
- Number of Sub-Categories = The number of sub-categories each parent category should display
Note: You might like to check the following URL Ad Categories for more information about displaying ad categories in menus.
=================================
Categories Page
- Show Count = Display the number of ads next to the category name
- Hide Empty = Do not show a category if it does not have any ads assigned to it
Background Color = Show a custom background for a category. Edit the Categories to set their backgrounds and icons. - Background Image = Show a custom background Image for a category
- Category Icon = Show a custom Icon for a category
- Category Depth = The number of levels deep the category should display
- Number of Sub-Categories = The number of sub-categories each parent category should display
- Number of Columns = The number of columns on the directory-style layout that should display
=================================
Search Categories
- Depth
- Hierarchy = Indent sub-categories within the drop-down
- Show Count = Display the ad total next to each category in the drop-down
- Hide Empty = Hide empty categories within the drop-down
- Click on Save Changes button when you are finished with the settings.
Listings Settings
Step 3-c ) The following Settings -> Listings tab allows you to set up the following options.
General
- Editing = Allow users to edit and republish their ads
- Relisting = Allow users to relist and pay for their expired ads
- Listing Period = This is the number of days an ad will be listed for.
- Parent Posting = Allow users to post in top-level categories
Ad Page
- Inquiry Form
- Allow HTML
- View Counter
- Gravatar
- Redirect Ads
Moderate
- Ads
- Edited Ads
- Prune Ads
Ad Images
- Require Images
- Max Images
- Max Size
- Min Width
- Min Height
- Click on Save Changes button when you are finished with the settings.
Structured Data
Step 3-d ) The following image Settings -> Structured Data tab allows you to set up the following options.
Setup Data Schema
- Listing Schema
- Thing
- — Offer
- — Product
- — Organization
- —— Local Business
- No schema
- Click on Save Changes button when you are finished with the settings.
Security Settings
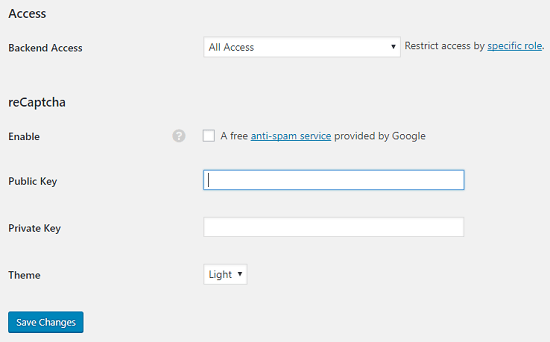
Step 3-e ) The following image Settings -> Security tab allows you to set up the following options.
Access
- Backend Access
reCaptcha
- Enable
- Public Key
- Theme
- Click on Save Changes button when you are finished with the settings.

Advertising Settings
Step 3-f ) The following Settings -> Advertising tab allows you to set up the following options.
Header Ad (468×60)
- Enable
- Code
- Image
- Destination
Content Ad (336×280)
- Enable
- Code
- Image
- Destination
- Click on Save Changes button when you are finished with the settings.
Advanced Settings
Step 3-g ) The following Settings -> Advanced tab allows you to set up the following options.
Maintenance
- Prune Ads
- Reset Stats
User
- Set Password
- Disable Toolbar
- Disable Embeds
- Disable Login Page = Note: This is the setting you are asked to enable the first time you activate ClassiPress theme.
Developer
- Enable Debug Mode
- Hide Version
- Cron Schedule
Custom URLs
- Permalinks
- Click on Save Changes button when you are finished with the settings.
Reports Settings
Step 3-h ) The following Settings -> Reports tab allows you to set up the following options.
Reports
- Registered Users Only
- Notification Email
- Report Post Values
- Click on Save Changes button when you are finished with the settings.
System Info
Step 4 ) Go to ClassiPress -> System Info to set up the following options.
System Info
- System Info
- Cron Jobs
- Advanced
- Search Index
System Info
Step 4-a ) The following System Info -> System Info tab displays information about the theme settings, your site specification and more. This can help you troubleshoot some of the issues you might run into.
System Info
- Theme Info
- Required Pages
- Default Widgets
- WordPress Info
- Server Info
- Image Support
- Other Checks
- Active Plugins
- You can click on Download Report button if you want to keep a report of your system information locally in your computer.
Cron Jobs
Step 4-b ) The following System Info -> Cron Jobs tab lists information about all the cron jobs running in your site.
You can click on Download Report button if you need to keep a report of the cron jobs running in your site.
Advanced
Step 4-c ) The following System Info -> Advanced tab allows you to manage the following options.
System Info Advanced
- Theme Cache
Uninstall Theme
- Database Tables
- Config Options
Search Index
Step 4-d ) The following System Info -> Search Index tab allows you to manage the following options.
System Info Search index
- Status
- Search Index
Addons
Step 5 ) The Addons tab provides you with a huge list of addons for different functionalities for your site. I am sure you will find an addon that suits your needs.
That is how simple it is to setup and manage ClassiPress admin dashboard settings.
If you have any questions or suggestions please leave a comment.
There will be more tutorials coming soon. So make sure you keep coming back for the latest.
Enjoy.
ClassiPress Theme Tutorial List: