Fast Secure Contact Form Advanced covers the Advanced settings of the plugin plus confirmation email settings and more.
Last Updated: January 12, 2019
Latest News: I fixed a broken link.
Fast Secure Contact Form Advanced Setup
Step 1 ) Go to Settings -> FS Contact Form -> Advanced tab allows you to control how and when the confirmation e-mails is sent to the person submitting a form on your website. If you enable Confirmation Email Settings, it will allow the form to send a confirmation email message to the user who submitted the form. This is important if you wish to add a customize message for this particular form. All the settings in this tab are in relation to way you want your message to be sent and what to send. See images below.

Step 2 ) Redirect Settings is self explanatory. Simply enter the URL of where you want your clients to be sent after they submit the form.

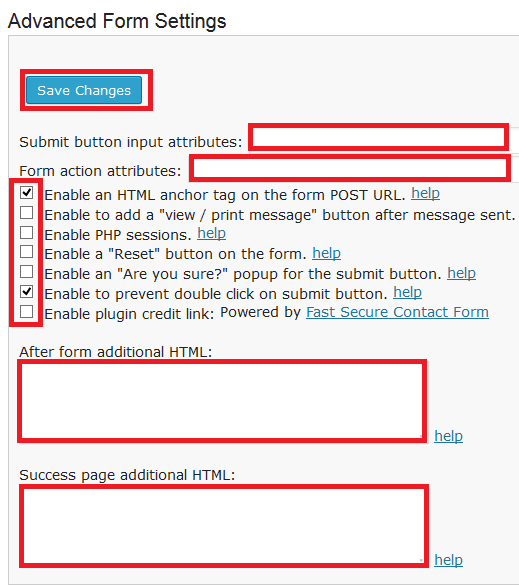
Step 3 ) The following image Advanced Form Settings allows you to select from the following options.
Important: Each option that you choose from below has a Help link next to the option at the end. Click on the help link to learn more about the option.
- Click on Save Changes button
- Submit button input attributes
- Form action attributes
- Enable an HTML anchor tag on the form POST URL
- Enable to add a “view / print message” button after message sent
- Enable PHP sessions
- Enable a “Reset” button on the form
- Enable an “Are you sure?” popup for the submit button
- Enable to prevent double click on submit button (Added in version 4.0.26)
- Enable plugin credit link: Powered by Fast Secure Contact Form
- After form additional HTML
- Success page additional HTML (Added in version 4.0.23)(Fixed in version 4.0.26)
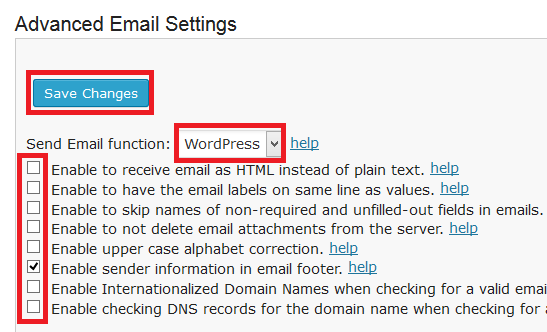
Advanced Email Settings
Step 4 ) The following image Advanced Email Settings allows you to select from the following options.
Important: Each option that you choose from below has a Help link next to the option at the end. Click on the help link to learn more about the option.
- Click on Save Changes button
- Send Email function = Note: Attachments are only supported when using the “WordPress” mail function.
- Enable to receive email as HTML instead of plain text
- Enable to have the email labels on same line as values
- Enable to skip names of non-required and unfilled-out fields in emails(Fixed in version 4.0.26)
- Enable to not delete email attachments from the server
- Enable upper case alphabet correction
- Enable sender information in email footer = You might like to read the following tutorial who’s online map if you are planning on adding this plugin.
- Enable Internationalized Domain Names when checking for a valid email address (Added in version 4.0.32)
- Enable checking DNS records for the domain name when checking for a valid email address (Fixed in version 4.0.23)
Silent Remote Sending Settings
Step 5 ) Silent Remote Sending Settings is more for advance usage. Read this option carefully and if you are not sure just leave it off.
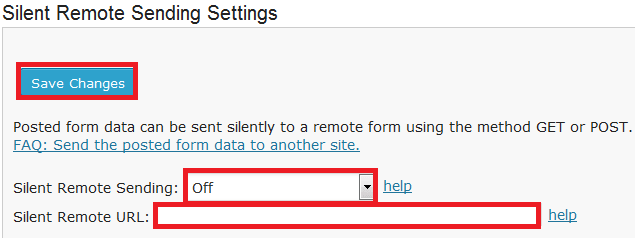
Step 6 ) The following image lets you set up the following options.
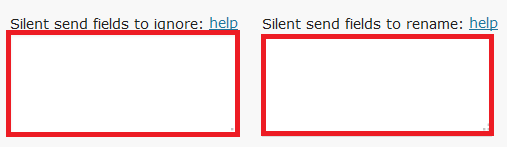
- Silent Conditional Field (optional) (This was added in version 4.0.24)
- Silent Conditional Value (optional) (This was added in version 4.0.24)
- Disable email sending (use only when required while you have enabled silent remote sending)

Step 7 ) Data Export Settings allows you to export your settings just like a backup but you can then import these settings to another plugin and or another website.

Click on the following link Scheduling to complete the next tutorial.
I hope you are enjoying this tutorial. If you have any questions so far please let me know. Leave a comment if you need some more features added or would like to know about a particular point above.
Enjoy.
Fast Secure Contact Form Plugin List:
Can you explain “After form additional HTML”? I try to add a simple text like “Verify your data and press SEND” before SEND button. How I do?
Hi Nicola, thank you for your question.
In regards to adding some simple HTML, you would carry out the following in your example type
Verify your data and press SEND
. Notice how I am using HTML tags. That is what you have to do if you want to add extra messages.
I hope this helps you.
Kind regards
Hi, I try to add this code
Verify your data and press SEND
in Advanced Form and Email Settings->After form additional HTML
but doesn’t appear anything between captcha and send button
You can see my form at
http://www.famiglieadottive.it/modulo-di-iscrizione/
Can you explain, step by step. how I add some simple text before send button?
Thanks.
Hi Nicola after doing some more testing I found out that you can add HTML to a field but I am not able to add HTML in the Advanced Tab under Email Settings->After form additional HTML.
So in your case if you add the HTML message to the following field “Accetti l’iscrizione?*”….in the HTML after field: settings it will appear after that field.
Let me know if this helps you.
Regards
How I do to add a simple text before SEND button? Like “Verify your data and press SEND”… Can I use “After form additional HTML” to add this simple text?
Thanks
Hi Nicola I have explained this question in your previous message.
Thank you kindly
Hi Thanks for this lovely plugin as i have a problem i check my setting as i did not tick on are you sure option in advance tab but it shows the popup i don’t want that popup kindly help me get out of this (latest version).
Thanks
Manish Sharma
Hi Manish Sharma, thank you for your question. What other settings have you enabled in the Advanced tab?
Can you please let me know how i can redirect to a new page with an external url. i am using the form to capture the arrival and departure dates for accommodation booking.
Hi Patson, thank you for your question. Have you enabled Enable redirect after the message sends in Step 2 ) above?
Hi, I am trying to create a form that collects data and posts them to PayPal for processing. Since processing takes place in PayPal, I try to pass hidden info to validate the account, and also redirect to PayPal with the necessary info, with POST method. Is this possible? Can you please explain? Thanks, Paul
Hi Paul, have you tried the following
http://www.fastsecurecontactform.com/send-form-data-elsewhere. This feature can be tricky because you are passing the data to PayPal.Very helpful. Am wondering if you have any suggestions on this problem. I am trying to make the ‘submit’ button line up with input rows. In other words, instead of being below the labels and input, I’d like the submit button to follow them on the same vertical row. Can see the example at my link. Let me know if you have any tips or suggestions.
Hi G Ball, I did reply to your support thread in WordPress forum. Did that help you in any way?
Is there a way to get all the submitted data in form of a CSV file or in any other format?
Hi, are you talking about importing data via a CSV file? Or exporting the data to a CSV file?