AIOS Brute Force Settings helps you to protect the login URL in your site from brute force attacks.
Last Updated: March 11, 2024
Latest News: Updated the document.
Everybody knows how important it is to add very good security to your website login. Enabling one of the brute force login features in the plugin will increase your security and peace of mind.
What is a brute-force attack? A brute force attack consists of an attacker trying many passwords or passphrases with the hope of eventually guessing correctly your password. Having a complex unique login name for your website login page will definitely make it very hard for hackers to crack. If you have not enable this feature, I highly recommend that you do so as soon as possible.
Note: You might like to read more about brute force attacks from the following URL wiki Brute-force_attack.
What you need:
Recommended Test:
AIOS Brute Force
Important: The Brute Force section will help you with your security and protection, however in some situations the following feature Enable Brute Force Attack Prevention: might cause other issues. If that is the case enable Enable Rename Login Page Feature: instead. We do our best to cater for all possible scenarios and the many plugins that exist in wordpress.org repository. I also recommend the following plugin https://wordpress.org/plugins/peters-login-redirect/ to be used with Enable Rename Login Page Feature: for situations like the one mentioned in the following forum post.
Step 1 ) Go to WP Security -> Brute Force admin sidebar menu as illustrated in the image below.

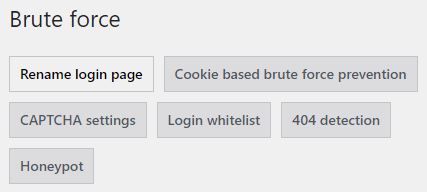
Step 2 ) The following image Brute Force allows you to to set up the following options.
Brute Force Features
- Rename login page
- Cookie based brute forced prevention
- CAPTCHA settings
- Login whitelist
- 404 detection
- Honeypot
Rename login page
Step 3 ) Go to WP Security -> Brute Force -> Rename login page to set up the following options.
Rename Login Page Hooks
- This hook added to your functions.php file, allows you to redirect to a 404 page error URL instead of a 403 WordPress error message. Click here to learn more.
- This hook added to your functions.php file, allows you to redirect to a page of your choice. Click here to learn more.
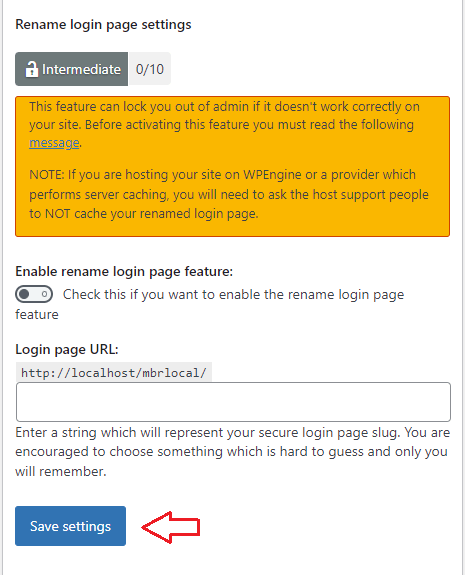
Rename login page settings
- Enable rename login page feature:
- Login page URL:
- Click on Save settings button when you finish setting up this feature.
This will add another 10 points score towards your security meter. (Intermediate Security Level)
Note: If you are using a cache plugin, you need to exclude the login page from being cached.
Troubleshooting
Step 3-a ) If you add a character that is not allowed by the plugin security you will see the following message at the top of the page.
Attention!
You must use alpha numeric characters for your login page slug.
Step 3-b ) If you have WordPress plain permalink structure enabled in your site you will see a ? added to the URL. It will look like this yoursite.com/?your secret name. By selecting another permalink or a custom structure permalink your URL will change to yoursite.com/your secret name without the ? added.
FAQ
Q1 How do I configure the rename login page url to redirect to WooCommerce accounts page?
Solution 1: Read the following support thread. It shows you the function you can add in your theme functions.php file. This will redirect to the WooCommerce accounts page.
Q2 Why when enabling the rename login page feature, AIOWPS plugins changes the language strings translation for the wordpress standard login page?
Solution 1: When you use the rename login page feature, the “login page” output strings are not coming from the standard wp-login.php file but instead come from a file inside the aiowps plugin. That file is called wp-security-rename-login-feature.php which resides in the “other-includes” directory of this plugin. Hence the reason for the translations being required.
===============================
Cookie based brute force prevention
Step 4 ) Go to WP Security -> Brute Force -> Cookie based brute force prevention as illustrated in the images below to set up the following options.
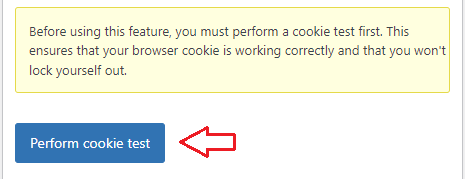
Cookie test A ) Before you begin setting up this feature, click on Perform cookie test button as illustrated in the image below.
Important: Before using this feature you are required to perform a cookie test first. This is to make sure that your browser cookie is working correctly and that you won’t lock yourself out.
Step 4-a ) Start setting up the following options once the cookie test is successful.
Note: If you are using cache in your site you can exclude the cookie from being cached. Find the cookie name by looking in your DB and finding the option_name called “aio_wp_security_configs”. Inside there look for the “aiowps_cookie_brute_test” and get the cookie name.
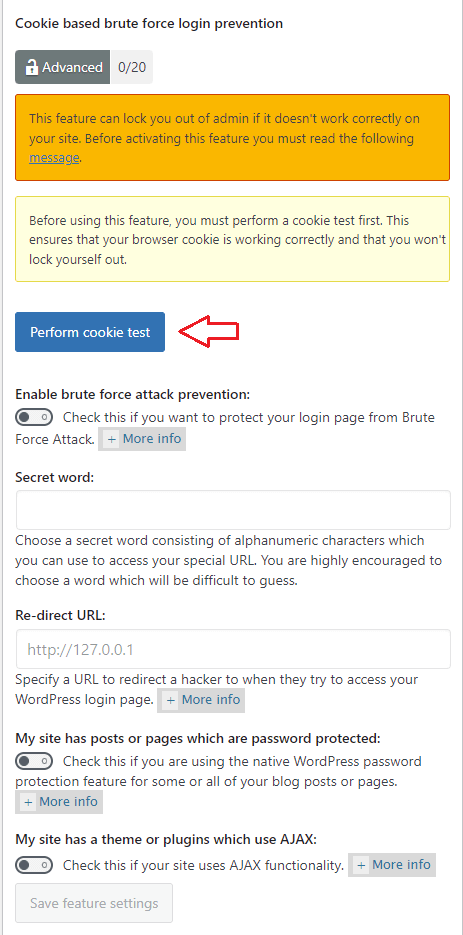
Cookie based brute force prevention options
- Enable brute force attack prevention:
- Secret word:
- Re-direct URL: = Note: You can add a custom URL in this field. This is a good idea if you wish to share some personal message to those trying to hack your site.
- My site has posts or pages which are password protected:
- My site has a theme or plugins which use AJAX:
- Click on Save feature settings button once you have completed your set up. Note: If you don’t see the Save feature settings button active, refer to Cookie test A above.
This will add another 20 points score towards your security meter. (Advanced Security Level)
Note: The following link all-in-one-wp-security-plugin-cookie-based-brute-force-login-attack-prevention-feature has a YouTube video clip showing you how to set up this feature.
Troubleshooting
Q1 Every time I try to log into my site I get redirected. I receive the following error message.
You don’t have permission to access /wp-login.php on this server. Additionally, a 403 Forbidden error was encountered while trying to use an ErrorDocument to handle the request.
Solution: This usually happens if you enabled Login Whitelist feature under Brute Force. The IP address of the computer or laptop trying to access the site is not included in the list. You can either disable Login Whitelist or add the IP address to the list.
Remember: The IP address must be a static IP address.
==============
Q2 Is there any way to retrieve the changed login page from the db or wordpress files?
Answer 1 = If you’re referring to the rename login page, it is stored in WordPress options table database. (Solution provided by wpsolutions in the forum)
==============
Q2 What are the main differences between Rename Login Page VS Cookie Based Brute Force Prevention?
Answer One: Underneath they are very different. One uses cookie, the other one doesn’t. They can’t both be enabled at the same time because they will conflict. I would recommend that you try the “rename login page” option first. (Answer provided by mra13)
Answer Two: The cookie based feature does its defending at the .htaccess level (eg,apache) and the rename login feature stops people at the php level. (Answer provided by wpsolutions)
===============================
Login Form / Registration Form / Comment Captcha
Step 5 ) For login captcha and other captcha forms, click on the following URL Captcha Settings to learn more.
Step 5-a ) For information about login captcha and other captcha forms for WooCommerce plugin, click on the following URL AIOWPS And WooCommerce Captcha Settings to learn more.
===============================
Login whitelist
Step 6 ) Go to WP Security -> Brute Force -> Login whitelist to set up the following options.
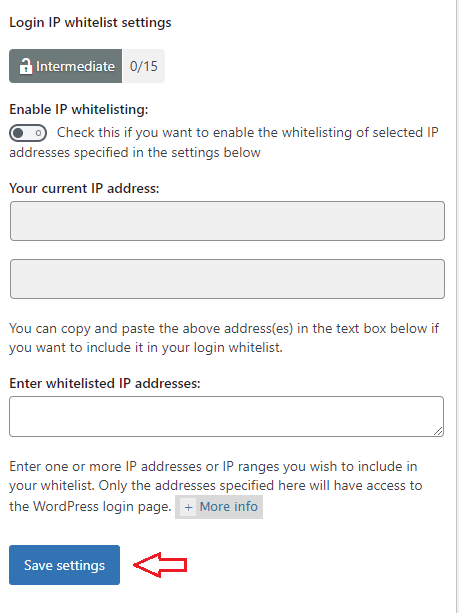
Login IP whitelist settings option
- Enable IP whitelisting:
- Your current IP address:
- Enter whitelisted IP addresses:
- Click on Save settings button once you have completed your set up.
This will add another 15 points score towards your security meter. (Intermediate Security Level)
Whitelist IPv4 Example Addresses
Note: Each IP address must be on a new line. To specify an IPv4 range use a wildcard “*” character. Acceptable ways to use wildcards is shown in the examples below:
- Example 1: 195.47.89.*
- Example 2: 195.47.*.*
- Example 3: 195.*.*.*
Whitelist IPv6 Address Examples
Note: Ranges/wildcards are currently not supported for ipv6
- Example 4: 4102:0:3ea6:79fd:b:46f8:230f:bb05
- Example 5: 2205:0:1ca2:810d::
Troubleshooting
Q1 I am getting a 403 error message with login whitelist enabled. How do I fix this issue?
Solution: Add the following entry define AIOS_DISABLE_LOGIN_WHITELIST to true in wp-config.php.
===============================
404 detection options
Step 7 ) Click on WP Security -> Firewall -> 404 detection options to activate the following security settings.
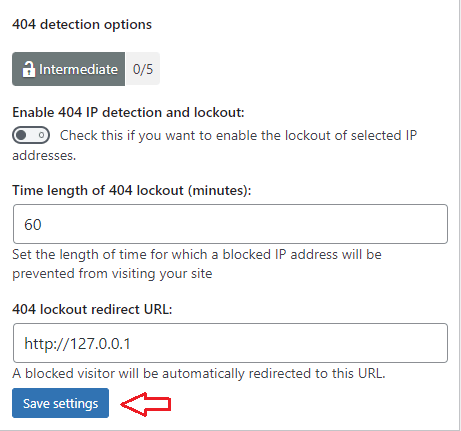
404 detection options settings
- Enable IP Lockout For 404 Events
- Time Length of 404 Lockout (min)
- 404 Lockout Redirect URL
- Click on Save Settings button when you finish completing your settings.
If you enable this option, it will add another 5 points score towards your security meter. (Intermediate Security Level)
===============================
Honeypot
Step 7 ) Go to WP Security -> Brute Force -> Honeypot to set up the following option.
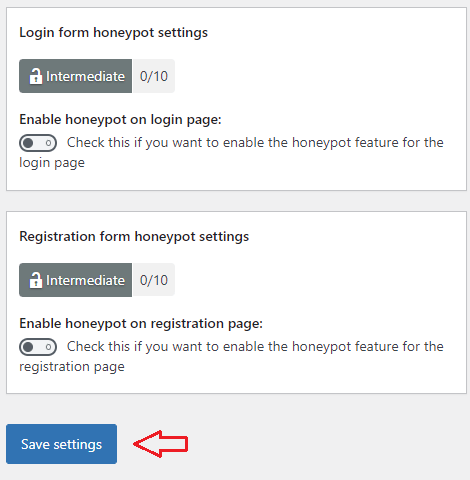
Login Form Honeypot Settings
- Enable honeypot on login page:
- Enable honeypot on registration page:
- Click on Save settings button once you have completed your set up.
This will add another 20 points score towards your security meter if both options are enabled. (Intermediate Security Level)
================================
Lost your password link
AIOWPS plugin does a great job at also protecting the Lost your password? link. If you are using one of the Brute Force features to rename the login URL, you must use the URL with the secret word to reset your password. If you don’t you will see an error message displayed on the screen. Also, the email sent to your inbox will also have the correct reset link as long as the person resetting the password is an administrator with administrative privileges.
That is how simple it is to set up the Brute Force features in the plugin.
If you have any questions please let me know.
Enjoy.
All In One Security (AIOS) Plugin Tutorial List