WordPress Media Cleaner Plugin Scanned Options post shows you how to clean, remove and backup all the media files in your site and more.
Last Updated: December 20, 2024
Latest News: Updated the changelog.

In this post you will learn how to manage your media library by removing any redundant media file found. You will learn how to first create a backup before you delete any media files you no longer need. This is something that many keep forgetting to do and sometimes end up deleting media files that are still used in your site.
When you update a post or page content, sometimes you replace the image. Every time you replace the image, the old image stays in your media library. Over time this can become a huge burden on your site. You might end up with hundreds or thousands of images that are no longer used in your site. This means that every time you create a backup, you are also backing up media files that are redundant and no longer used. Because of this your backups become large in size. That is why monitoring your media files is necessary. To help you with this, Media Cleaner plugin becomes a handy plugin to have.
Media Cleaner 6.8.4 Changelog
- Add: Support for Spectra.
- Add: Support for Tutor LMS.
- Add: Support for Foo Gallery.
Note: The following instructions are based on version 6.0.6.
What you need:
Media Cleaner Tutorials:
- Admin Settings
- Scanned Options
WordPress Media Cleaner Plugin Scanned Options
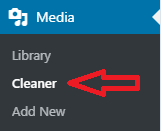
Step 1 ) After you have configured the plugin, go to Media -> Cleaner as illustrated in the image below to begin cleaning your media files.
Reset Media Cleaner Tables
Step 2 ) Before you begin your scan, in some cases you might see the following message. If you do, you need to click on the Reset button, to recreate the database tables required for Media Cleaner plugin to work.
Note: The database is not ready for Media Cleaner. The scan will not work. Click on the Reset button, it re-creates the tables required by Media Cleaner. If this message still appear, contact the support.
Step 3 ) The following image shows you an important note. This is an extremely important step to take before you start deleting images. The developer made this an Important note for you to read before going ahead.

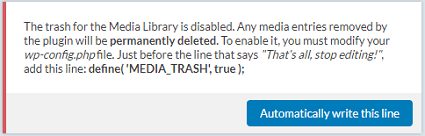
Step 4 ) The note in the following image is also important and talks about the trash. It is important to add this code in your wp-config.php file so that you can move the media files to the trash and also allow you to recover the media files in case you made a mistake. If you don’t like editing the php file, click on the Automatically write this line button.
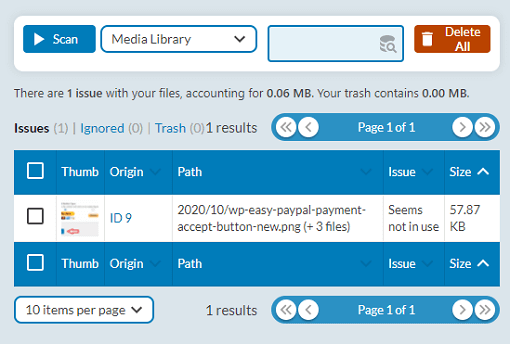
Step 5 ) The following image displays one media file found with discrepancies by the scan. There are actually many more media files found, but I just wanted to display one so that you know what can be done with each media library file found.
- Click on Scan button, to begin your media library scan.
- Click on Delete button, to delete the medias found.
- Click on Ignore button, to ignore the media selected.
- Click on Unselect All if more than one media has been selected.
- Click on Reset button, to reset the current status. = See Step 2 ) above.
- Click on Delete All button, to delete all the media selected.
- The Issues, displays how many issues was found once the scan is completed.
- The Ignored link shows you how many media files you have chosen to ignore.
- The Trash link displays all the media files deleted.
Step 5-a ) The following is a list of information about each media file found.
Scanned Media Files Information
- Thumb = This provides an image of the media library found.
- Type = This lets you know what type of media library it is.
- Origin = This lets you know the ID and origin of the media file found. You can click on the ID number and it will display more information about the media file.
- Path = This tells you the media file path. It comes in handy to know exactly where it is located.
- Issue = This describe what the scan detected about the media file discovered.
- Size = This tells you the size of the media file.
- Select the number of items to display per page.
- Scroll between pages using the arrows.
==========================
That is how simple it is to manage, delete and backup your media library files in your site.
I will be updating this post from time to time. So keep coming back for more.
Enjoy.