WordPress eStore Plugin Settings Part One Plugin tutorial shows you how to setup a shopping cart. This plugin has many features to help you setup a shopping cart.
Last Updated: September 17, 2021
Latest News: Updated the documentation.
The following tutorial shows you how to manage and set up the general settings.
The following is a quick usage guide to get you started. Please make sure you follow these steps carefully.
1. WP eStore has a lot of setting options but don’t get intimidated by it. Most of the default settings are good to get you started (keep things simple at first). Remember to watch the video tutorials from our documentation.
2. First add products to the database through the ‘Add/Edit Products’ interface. Products can be modified through the ‘Manage Products’ interface.
3. To add an ‘Add to Cart’ button simply add the shortcode [wp_eStore_add_to_cart id=PRODUCT-ID] on your landing page of a product. Replace PRODUCT-ID with the actual product id (example: [wp_eStore_add_to_cart id=1] ). Product IDs for all your products can be found in the ‘Manage Products’ section
4. To add the shopping cart to a post or page (example: a checkout page) simply add the shortcode [wp_eStore_cart] to the post or page. You can also use the shortcode in a text widget to add the shopping cart to the sidebar.
Click on the following URL to checkout the shortcodes and function reference page for a full list of usable shortcodes.
If you like the plugin, you can give a thumbs up by clicking on a share button in the following URL.
What You Need:
- WordPress eStore (Note: This is an affiliated link = I get a small commission if you make a purchase.)
WordPress eStore Plugin Settings Part One
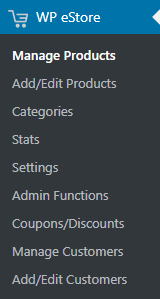
Step 1 ) The following image displays the admin menu. The menu allows you to click, check and set up the following admin areas.
WP eStore Admin Menu
- Manage Products
- Add/Edit Products
- Categories
- Stats
- Settings
- Admin Funcitons
- Coupons/Discounts
- Manage Customers
- Add/Edit Customers
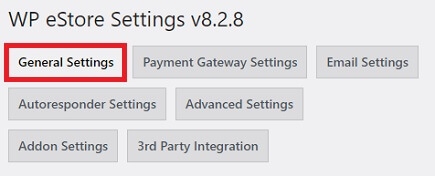
General Settings
Step 2 ) Go to WP eStore -> Settings -> General Settings tab as illustrated in the image below to begin making changes to the general settings tab.
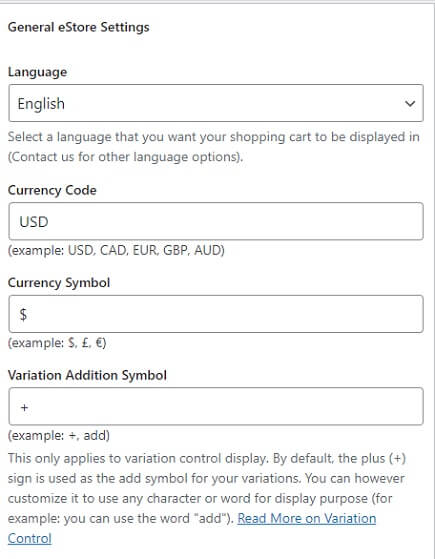
General eStore Settings
Step 3 ) The following image General eStore Settings allows you to set up the following options.
General eStore Settings Options Part 1
- Language.
- Currency Code.
- Currency Symbol.
- Variation Addition Symbol.
Step 3-a ) The following image allows you to set up the following options.
General eStore Settings Options Part 2
- Terms and Conditions Page URL.
- Show Terms and Conditions Checkbox.
- For Shopping Cart (Add to Cart Type Buttons)
- For Buy Now and Subscription Type Buttons
- For Free Download Squeeze Forms
- Enable Lightbox effects on Images.
- Enable Smart Thumbnail Option.
- Products Per Page Limit.

Step 3-b ) The following image allows you to set up the following options.
General eStore Settings Options Part 3
- Enable Smart Thumbnail Option.
- Products Per Page Limit.

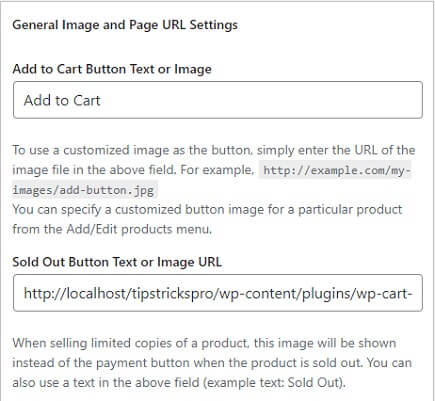
General Image and Page URL Settings
Step 4 ) The following image General Image and Page URL Settings allows you to set up the following options.
General Image and Page URL Settings Options Part 1
- Add to Cart Button Text or Image.
- Sold Out Button Text or Image URL.
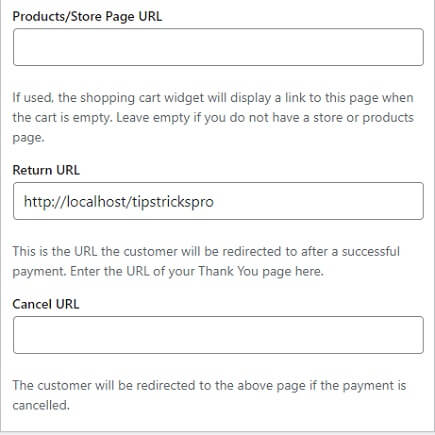
Step 4-a ) The following image allows you to set up the following options.
General Image and Page URL Settings Options Part 2
- Products/Store Page URL
- Return URL
- Cancel URL
Shopping Cart Specific Settings
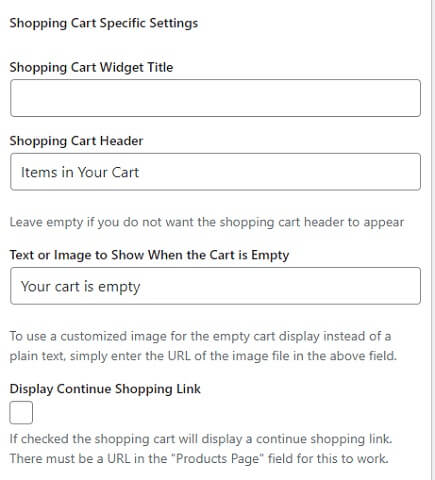
Step 5 ) The following image Shopping Cart Specific Settings allows you to set up the following.
Shopping Cart Specific Settings Options Part 1
- Shopping Cart Widget Title
- Shopping Cart Header
- Text or Image to Show When the Cart is Empty
- Display Continue Shopping Link
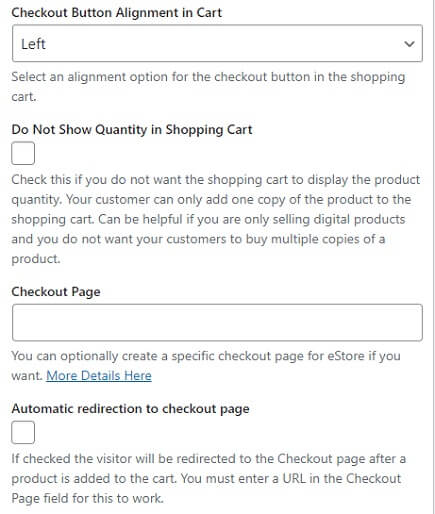
Step 5-a ) The following image allows you to set up the following options.
Shopping Cart Specific Settings Options Part 2
- Checkout Button Alignment in Cart
- Do Not Show Quantity in Shopping Cart
- Checkout Page
- Automatic redirection to checkout page
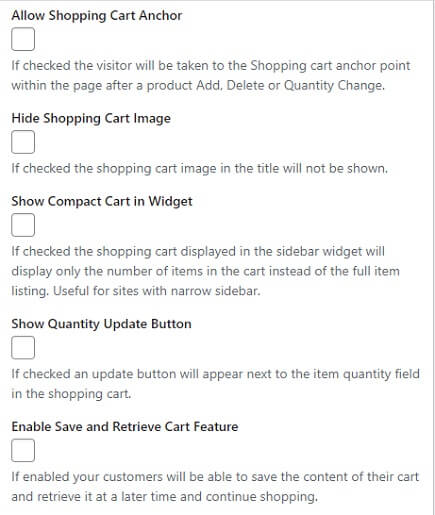
Step 5-b ) The following image allows you to set up the following options.
Shopping Cart Specific Settings Options Part 3
- Allow Shopping Cart Anchor
- Hide Shopping Cart Anchor
- show Compact Cart in Widget
- Show Quantity Update Button
- Enable Save And Retrieve Cart Feature
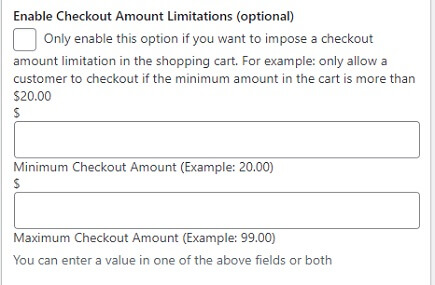
Step 5-c ) The following image allows you to set up the following options.
Shopping Cart Specific Settings Options Part 4
- Enable Checkout Amount Limitations (optional)
==================================
Click on the following link Settings Part Two to continue with the set up.
I will be updating this post from time to time. So keep coming back for more.
Enjoy.
WordPress eStore Plugin Tutorial List: