WordPress eStore Plugin Addon Settings tutorial shows you how to manage and set up other plugins and services.
The following tutorial shows you how to control and mange other plugins and services. Please make sure you configure each feature correctly before saving the settings.
What You Need:
- WordPress eStore (Note: This is an affiliated link = I get a small commission if you make a purchase.)
Remember: Check all your options before you save them. Run the sandbox settings for further testing before you publish your online store. This plugin has many features to setup.
WordPress eStore Plugin Addon Settings
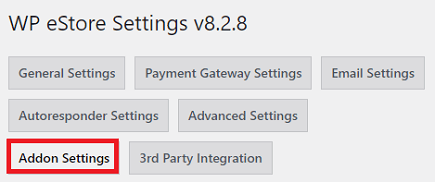
Step 1 ) Go to WP eStore -> Settings -> Addon Settings tab as illustrated in the following image to setup the following options.
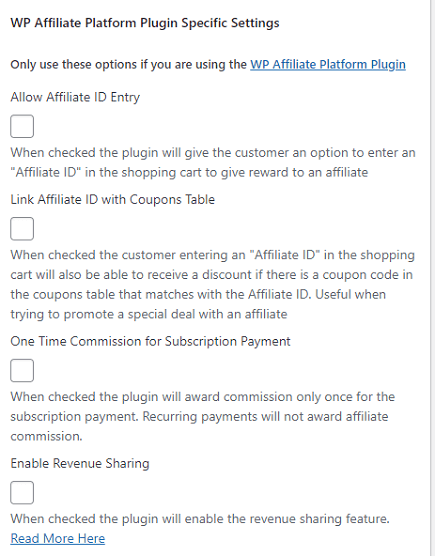
WP Affiliate Platform Plugin Specific Settings
Step 2 ) The following image WP Affiliate Platform Plugin Specific Settings allows you to setup the following options.
Important: Only use these options if you are using the WP Affiliate Platform Plugin. You might like to read the following tutorial https://mbrsolution.com/wordpress/wp-affiliate-platform-plugin.php to learn more.
WP Affiliate Platform Plugin Specific Settings Options Part 1
- Allow Affiliate ID Entry
- Link Affiliate ID with Coupons Table
- One Time Commission for Subscription Payment
- Enable Revenue Sharing
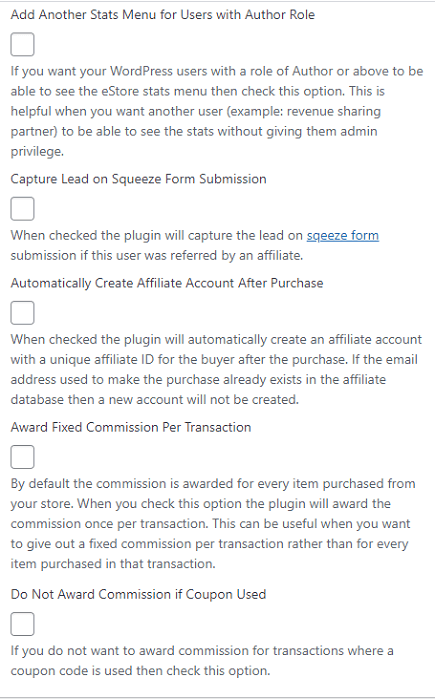
Step 2-a ) The following image allows you to setup the following options.
WP Affiliate Platform Plugin Specific Settings Options Part 2
- Add Another Stats Menu for Users with Author Role
- Capture Lead on Squeeze Form Submission
- Automatically Create Affiliate Account After Purchase
- Award Fixed Commission Per Transaction
- Do Not Award Commission if Coupon Used
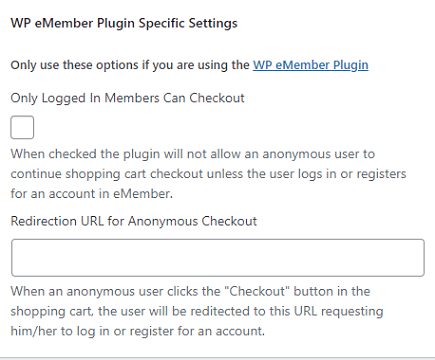
WP eMember Plugin Specific Settings
Step 3 ) The following image WP eMember Plugin Specific Settings allows you to setup the following.
Important: Only use these options if you are using the WP eMember Plugin. You might like to read the following tutorial WP eMember Membership Plugin to learn more.
WP eMember Plugin Specific Settings Options
- Only Logged In Members Can Checkout
- Redirection URL for Anonymous Checkout
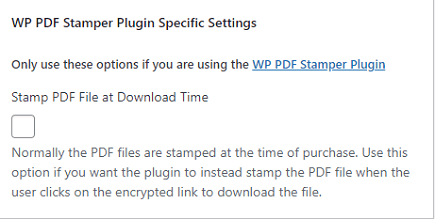
WP PDF Stamper Plugin Specific Settings
Step 4 ) The following image WP PDF Stamper Plugin Specific Settings allows you to setup the following option.
Important: Only use this option if you are using the WP PDF Stamper Plugin. You might like to read the following tutorial https://mbrsolution.com/wordpress/wp-pdf-stamper.php to learn more.
WP PDF Stamper Plugin Specific Settings Option
- Stamp PDF File at Download Time
WP eStore Download Manager Related
Step 5 ) The following image WP eStore Download Manager Related allows you to setup the following options.
WP eStore Download Manager Related Options
- Automatic URL Conversion Preference
- Download Method
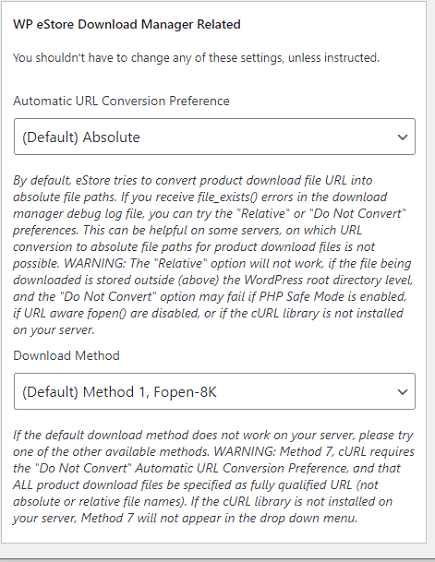
Step 5-a ) The following image allows you to select from the following.
- (Default) Absolute
- Relative
- Do Not Convert

Step 5-b ) The following image allows you to select from the following.
- (Default) Method 1, Fopen-8K
- Method 2, Fopen-1M (New Default Alpha)
- Method 3, Fpassthru (Depreciated)
- Method 4, Readfile-1M-SessionWriteClose
- Method 5, Fopen-8K-SessonWriteClose
- Method 6, Fopen-1M-Closed-NoZip
- Method 7, cURL
- Method 8, Mod X-Sendfile

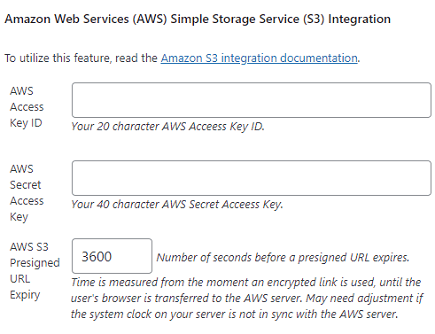
Amazon Web Services (AWS) Simple Storage Service (S3) Integration
Step 6 ) The following image Amazon Web Services (AWS) Simple Storage Service (S3) Integration allows you to setup the following.
Important: You need to first set up an Amazon Web Services (AWS) Simple Storage Service (S3) account.
- AWS Access Key ID
- AWS Secret Access Key
- AWS S3 Presigned URL Expiry
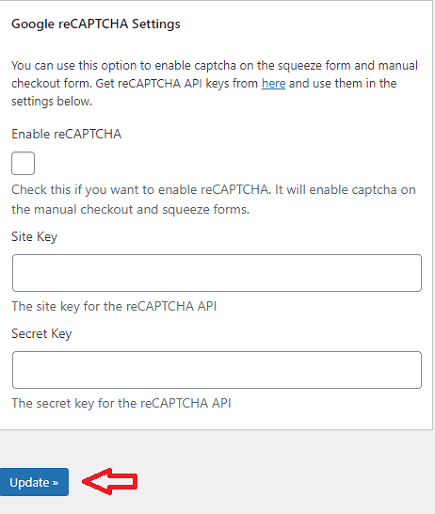
reCAPTCHA Settings
Step 7 ) The following image reCAPTCHA Settings allows you to setup the following.
Important: You need to get reCAPTCHA API keys if you want to use reCAPTCHA.
- Use reCAPTCHA
- Public Key
- Private Key
- Click on Update button when you finish with the settings.
==================================
Click on the following link Third Party Integration Admin Functions to continue with the set up.
I will be updating this post from time to time. So keep coming back for more. If you have any questions please let me know.
Enjoy.
WordPress eStore Plugin Tutorial List: