WordPress eMember Free Membership Level Setup shows you how to add and create a Free Membership Level sign up in your website.
Last Updated: October 17, 2019
Latest News: Updated a link.
In this post you will learn how to create a Free Membership Level and how to troubleshoot issues you might run into. It is important that you follow these steps correctly or else you will see an error message displayed in your website when you try to view the registration form.
WordPress eMember Free Membership Level Setup
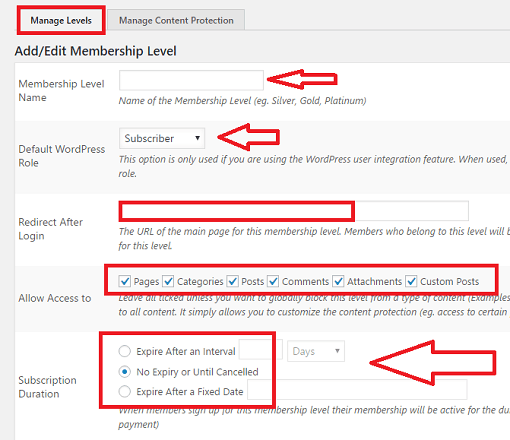
Step 1 ) First go to WP eMember -> Membership Level -> Manage Levels and create a Free Membership Level if you have not already done so. See image below.
Click on Add Level and start creating your Free Membership level. When you create a new level you can configure the following features.
- Membership Level Name
- Default WordPress Role
- Redirect After Login
- Allow Access to
- Subscription Duration
- Click on Add New Membership Level button once you have completed your set up.

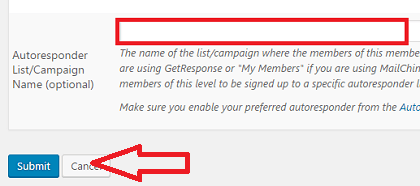
Step 1-a ) The following image allows you to set up an Autoresponder List/Campaign Name(Optional). This is optional, so you don’t have to add any list if you are not setting up any integration with MailChimp or other similar subscription services. Once you have set up your free membership level click on Submit button.

Step 1-b ) Once you have created the Free membership level you should see the following information displayed.
Membership Level Information
- Level ID
- Level Name
- Role
- Redirect After Login
- Access To
- Subscription Valid For
- Actions
Note: Your ID number might be different.

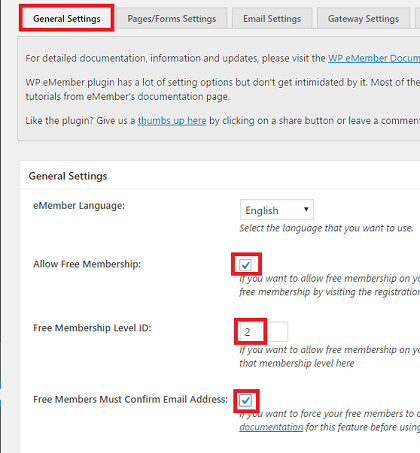
Step 2 ) Then go to WP eMember -> Settings -> General Settings to enable and add the following settings. See image below.
- eMember Language (Optional)
- Allow Free Membership
- Free Membership Level ID = add here the free membership level ID you received when you created the account above in Step 1 ). For this example an ID of value 2 was added to the free membership level.
- Free Membership Must Confirm Email Address = I always think this feature should be enabled but it is up to you.

Pages Setup
Step 3 ) Once you have completed the above then go to WP eMember -> Settings -> Pages/Forms Settings to add the pages if you have not already done so. The following three pages are mandatory. These pages are created automatically by the plugin when you first install the plugin.
Mandatory Pages
- Login Page (Mandatory): = The following is the shortcode you will add to this page [wp_eMember_login ].
- Registration Page (Mandatory): = The following is the shortcode you will add to this page [wp_eMember_registration ].
- Membership Payment/Join Page (Mandatory): = In this page you will include all your membership sign ups whether they are Free or Paid. There are many different shortcodes that can be included in this page.
There are many more pages you can include if you want. The following is a list of pages you can add which are optional.
Optional Pages
- After Login Page (Optional):
- After Logout Page (Optional):
- After Registration Page (Optional):
- Member Profile Edit Page (Optional): The following is the shortcode you will add to this page [wp_eMember_edit_profile ].
- Support Page (Optional):
- Bookmarks Listing Page (Optional): The following is the shortcode you will add to this page [wp_eMember_user_bookmarks ].
- Password Reset Page (Optional): The following is the shortcode you will add to this page [wp_eMember_password_reset ]
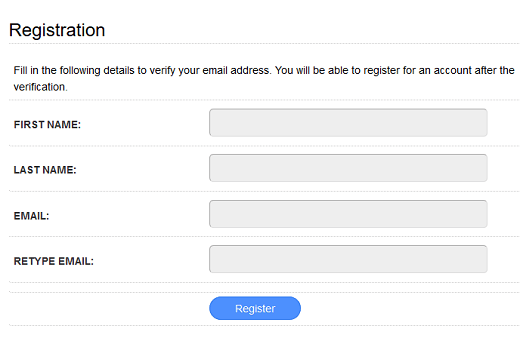
Step 4 ) If everything goes well you should see the following registration form with out any error messages. This is just a very simple form. If you want to add extra fields go to WP eMember -> Settings -> Pages/Forms Settings -> Registration Form Fields.
For this example I just wanted to show you what the basic standard form looks like.
Note: The pages need to be added to your menu via your theme settings or WordPress Appearance -> Menus.

Troubleshooting the Free Membership Form
What if the form does not show or you receive an error message? Check to make sure you have enabled the Free membership option, make sure you typed the correct free membership level ID and you have typed the correct shortcode in each corresponding pages as mentioned above.
Click on the following URL Troubleshooting to continue.
I hope my information above helps you. More instructions coming soon.
If you have any questions please let me know. I will be updating this tutorial from time to time.
Enjoy.
eMember Plugin Tutorial List:
Thanks so much for this tutorial. You helped me sort out what was going wrong with our eMember setup.
Thank you for your comment Karen. I am glad my tutorial helped you. I also would like to thank you for your donation. That made my day :)
Kind regards