Test Your WordPress Site Locally tutorial shows you how to test a live WordPress site locally using Xampp. This tutorial is using BackWPup backup plugin.
Last Updated: May 21, 2018
Latest News: I have updated the documentation.
There are times that you might want to work on your live WordPress site locally in a laptop or desktop. In this tutorial I am going to show you how to do that using Xampp. This tutorial will shows you how simple it is to test your site locally by following these steps.
Note: These steps can be applied to any backup plugin as long as the backup is a full backup which includes all the files, folders and the database.
Test Your WordPress Site Locally
Step 1 ) Start Xampp locally in your laptop and click on Start Apache and MySQL as illustrated in the following image.

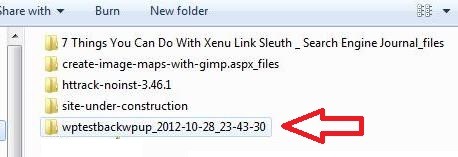
Step 2 ) The following image shows you the BackWPup backup folder locally. This is the folder that is going to be copied over to the local server “Xampp”.
Note: Remember to unzip the folder content when you copy the folder over to Xampp.
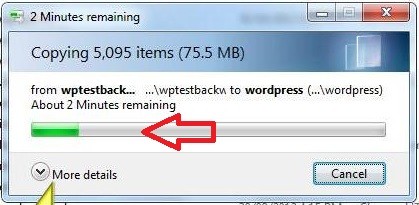
Step 3 ) The following image shows you the files being copied over to the Xampp server.
Start phpMyAdmin
Step 4 ) Click on phpMyAdmin as illustrated in the following image to import the database from the BackWPup folder.

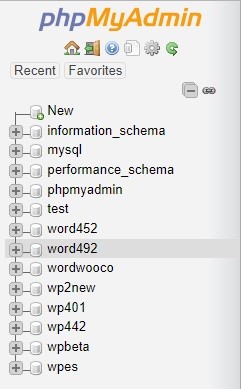
Step 5 ) The following image shows you a list of databases available in the local server. Make sure you select the correct database to edit.
Note: In your case your database list will be different.
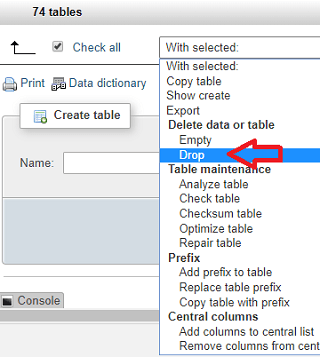
Step 6 ) Click on Structure tab, then click on Check All link to select all tables in the database as illustrated in the image below.
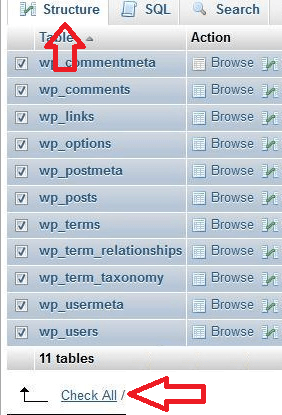
Step 7 ) Click on Drop from the drop down list as illustrated in the image below. This will drop all tables selected from the database.
Step 8 ) The following image shows you the message displayed asking you Do you want to execute the following query?. Click on Yes to drop all the tables.
![]()
Click on the following URL Import Database to continue with importing the database locally.
If you have any question please let me know. I will be updating this tutorial from time to time so come back for the latest.
I hope this tutorial helps you.
Enjoy.
Xampp Tutorial List:
Thank you soooo much for posting this tutorial! I was struggling for so long to set up my website on a local test environment and I finally succeeded after following your tutorial! I did it on my WAMP server and works in a very similar way. Thank you so much!!!
You are most welcome Barbara Ulitsky. I am glad I my tutorial was able to help you.
Kind regards
Just wanted to say thanks for the tutorial on this page and the tutorial on how to backup and restore using BackWPup. Much appreciated. One additional thing I had to overcome was that the database I restored to had a different name, username and password. I had to update these in the wp-config.php files as well.
Hello Scott, thank you for your comment. Thank you for pointing out your action in relations to the different name and password in the database. This is something that some users often overlook and that is why at the end of the tutorial I added an extra comment, there might be other settings that might need checking and possible changed. I am happy that my tutorials were able to help you.
Kind regards
Your tutorials are clear and easy to follow, definitely 5 stars, … until I reached the end ;)
After following the tutorial for backing up (https://mbrsolution.com/wordpress/backwpup-wordpress-backup-plugin.php) I then followed these instructions for testing locally. I did not have any problems until I got to step 19, where, I ran into a couple of issues.
The first was HTTP 500 error
So, I set define(‘WP_DEBUG’, true) in wp-config.
Then I could see an error message: Warning: mysql_connect(): Access denied for user ‘lightnm0_wor1’@’localhost’ (using password: YES)
That was weird because I don’t remember creating that user name.
So (after researching a bit) I queried the DB for the mysql user name which turned out to be “root” w/o password. Then I changed wp-config to reflect this.
This resolved the first issue, but then I found two things
1) The site content was displayed, but it was unformatted, as if missing the CSS file
2) unable to log in – apache seems to be in an infinite loop of port IDs.
I am hoping, there is some simple fix – it seems so close, yet so far away.
Thanks,
-Eric
Hello Eric thank your for your comment. In regards to your two questions?
Can you please check to make sure that your live site is running without a problems? Then create a new backup and download it locally and follow my instructions again but with the new backup.
Having no css or missing a css file means that your original backup might have an issue which in the future could cause problems. Let me know how you go.
Also let me point out that sometimes and not related to your issue, if you run different PHP and or MySQL versions can also cause problems.
Kind regards
Good news!
The problem turned out to be the result of setting the siteurl incorrectly in the DB. I re-installed my previous local site. When it was working correctly, I started checking everything to see if I could notice any difference from the backup. Then I observed this the siteurl set to “localhost” only.
The WP documentation on setting this parameter is less than helpful:
‘The “Home” setting is the address you want people to type in their browser to reach your WordPress blog.
The “Site URL” setting is the address where your WordPress core files reside.’
I am still not clear on how exactly to set these, but my guess is that siteurl can be set to localhost because the XAMPP config file is pointing to folder where wp is stored.
The problem (incorrectly set siteurl) is consistent with the symptoms: the content, pulled from the DB, was all intact, but the none of the other files could be found.
Anyway, the good news is that I am back on track and it looks like the BackWPup backup has been verified.
I have two suggestions for improvement:
1) Instruction #15 caused me to set up incorrectly. I am not sure why it worked for you.
2) I think you need to include a step to verify that you have the correct username and password for mysql
Finding my way around these two issues cost me a week!
But to be fair, I never would have gotten to square-one without this tutorial.
So: Thanks! … really appreciate the help.
-Eric
Hello Eric I am happy you manage to solve your issue. Sorry for not adding the extra step which caused you to spend 1 week sorting your issue. I have now added a new step 16 that includes adding a new database and user name to wp-config.php file.
Kind regards
This is very helpful tutorial, but some steps are incorrect on my windows 7 version of XAMPP. So I want to make four suggestions.
First: In step 8, the limit was set to 2M by default so I had to increase the number. It took me a long time to find out where the parameter was set, so you might save other people some time by telling them that the “upload_max_filesize” parameter in the xampp\php\php.ini file is where to set the new value.
Second: In steps 13 and 15, I found it was necessary to set both siteurl and home without the trailing “wordpress” directory. I think this setting depends on how the DocumentRoot and Directory parameters are set in apache.
Third: In step 16, the setting of DB_USER and DB_PASSWORD are determined by the settings in the “user” table of the “mysql” database. It would be helpful for others to know that.
Lastly, (and this not very important) the instructions randomly use “I” and “you” interchangeably. This is a little confusing and would be much easier to read if you stick with either first person (I) or second person (you).
Thanks again. This tutorial is very helpful and backWPup should provide a link to here! (after you make the corrections I suggested ;)
Hello Eric and thank you for your reviews and suggestions. I have made many modifications to better explain the process. Let me know if you feel I left out something.
Once again thank you for your review.
Kind regards
With all due respect, your change did not sufficiently address the problem. As far as I can tell, you added this warning “(Remember your path will be different)”. What you need to say is “Please note: your path will be different – and in some cases it may consist of ‘localhost’ only).
The problem with your reminder is that the casual ready will think you are only reminding them that folder portion of the path will be different, when, in fact, there might be no folder at all.
But a warning is not the most helpful approach here. It would be better to provide instructions on how to determine exactly which path to use. (my theory is that it depends on how apache is set up, as I mentioned above).
It is important to explain this carefully because it is very difficult to debug if set wrong.
Hello Eric thank you for pointing that out, I see your point. I have edited my comment to help those who don’t know anything about Apache and about creating directories to install WordPress if needed.
Thank you
Another suggestion is in step 8 you can mention: “(Please review first tutorial if this is not set to 128M)”
If they missed this step or skipped the first tutorial, they will know where to go for the answer.
Thank you I will add your suggestion.
Kind regards