Test Your WordPress Site Locally Import Database tutorial will show you how to import your database locally using Xampp, phpMyAdmin and more.
Last Updated: May 21, 2018
Latest News: I have updated the information below.
Make sure you have carried out Step 1 from the list below before you continue with this tutorial.
Importing table Steps Tutorials:
- Step 1 test-your-wordpress-site-locally
- Step 2 Import Database
Note: These steps can be applied to any backup plugin as long as the backup is a full backup which includes all the files, folders and the database.
Test Your WordPress Site Locally Import Database
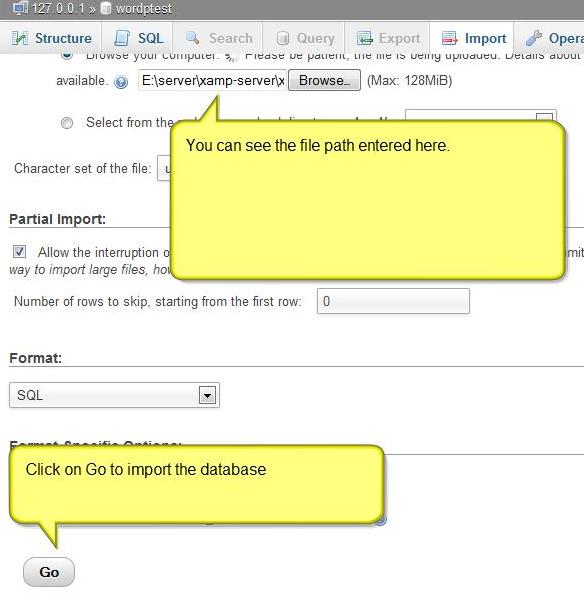
Step 1 ) Click on Import as illustrated in the image below and then click on Browse to search for the database you want to import. Notice that I am allowed to import 128M file size into the database.
Note: Please check the first tutorial install-xampp-locally-for-wordpress and read Step 3 ) to learn more about making changes to Apache in xampp.

Note: If you have a large database to import, chances are you will receive a time out error message. If that is the case then adjust the following settings.
Xampp File to Adjust
\phpmyadmin\libraries\config.default.php
Locate the following entry in the file above and change the entry from $cfg[‘ExecTimeLimit’] = 300; to $cfg[‘ExecTimeLimit’] = 0; and make sure you restart xampp server. Now there is no execution time limit.
If you are importing the database into your online server “Not Xampp” and you do not have Access To a Server:
Option 1: Continue uploading the same gzip, sql, zip, or bzip2 file then the data import process will pick up where it left off.
Option 2: Split the SQL File. If you are not uploading the SQL file directly but have it compressed using gzip, zip, or bzip2 then uncompressed the file first. Once the file is in raw SQL format you can then open file using notepad in Windows. I prefer NotePad++ (you can use any utility that allows you to open files in raw format), and view the content. You can then choose to split the file into however many pieces you like by cutting sections of the file out but make sure that you do it on a table by table basis so the SQL statements are not split in half.
==============================
Step 2 ) The following image shows you the database selected to upload to the database. Click on Go to import the database. See image below.
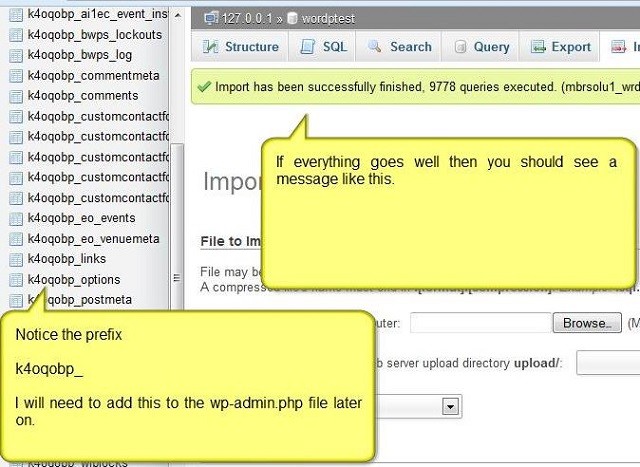
Step 3 ) If everything goes well, you should see a message like the one illustrated in the image below. Notice the database prefix ‘k4oqobp_‘. The prefix has to be added to the wp-config.php file. If you don’t change the prefix in the wp-config.php file then you will receive an error message.
Note: In your case your database prefix will be different.
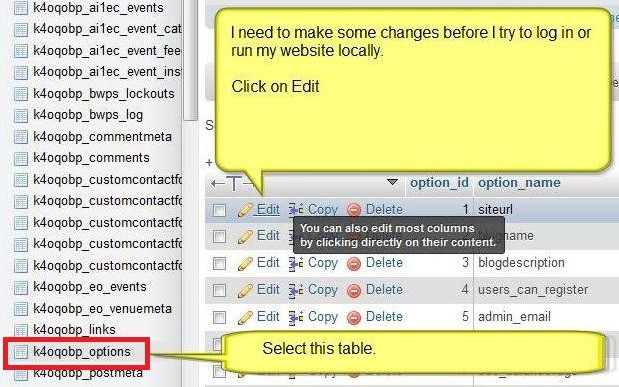
Step 4 ) There are some more changes that need to be modified in the database before you can log into your local site. In this example I clicked on the following table k40q0bp_options to edit as illustrated in the following image.
Note: In your case the table prefix name will be different.
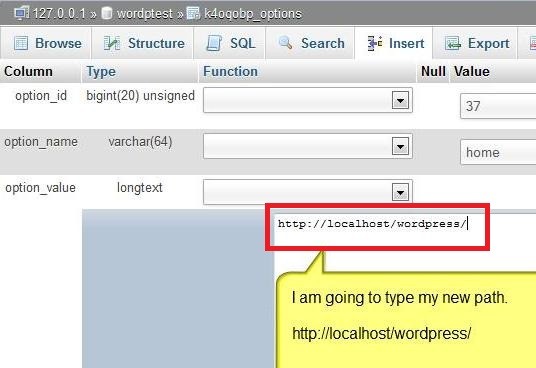
Step 5 ) The following image shows you the new path, http://localhost/wordpress/.
Note: Your local URL address might be different. Please check the following URL install-xampp-locally-for-wordpress and read Step 6 to learn more.
Note: http://localhost/ is the root of Xampp server.
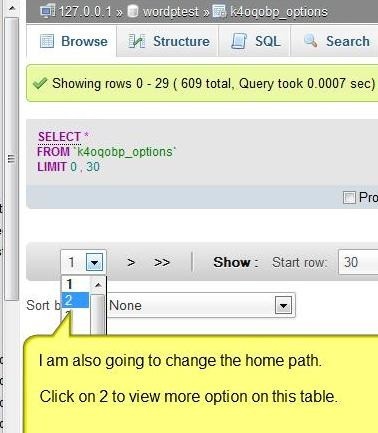
Step 6 ) The home path also needs to be changed. Click on number 2 from the drop down list to view more options in the table. See image below.
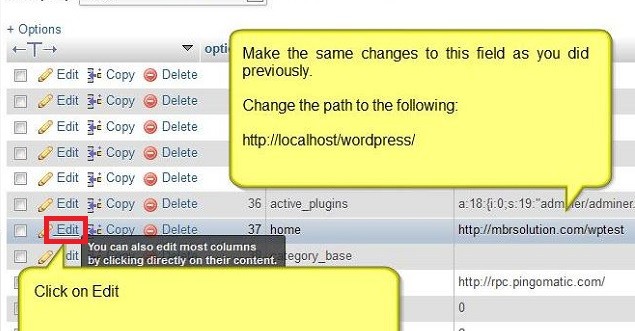
Step 7 ) The following image shows you the following URL http://localhost/wordpress/ entered. This is the same URL entered in Step 5 ) above.
Click on the following URL Edit WP Config File to continue with the set up.
If you have any question please let me know. I will be updating this tutorial from time to time so come back for the latest.
I hope this tutorial helps you.
Enjoy.
Xampp Tutorial List:
Shouldn’t you change the database prefix in wp-config.php instead of wp-admin.php like you said above?
Hi Artus, thank you for spotting that typo error. Yes you are correct you add the database prefix in wp-config.php file.
Kind regards