Install Xampp Locally For WordPress shows you how to set up Xampp locally and edit a few entries in the php.ini file to install WordPress without any issues.
Last Updated: April 7, 2022
Latest News: Updated the documentation.
Before you begin to install Xampp there are some adjustments you need to configure to help WordPress run smoother and without any issues. These are very simple adjustments to make and will prevent you from receiving time out error messages, upload errors and other errors that you might have run into from time to time when installing WordPress locally or in a live server.
This tutorial will show you how to change the following files.
Apache php.ini File:
- post_max_size
- upload_max_filesize
- max_excecution_time
MySQL my.ini File:
- max_allowed_packet
Note: There are other settings that you might need to change and or prefer to change, that is up to you. However the following changes should be more than enough to get you started.
Install Xampp Locally For WordPress
Step 1 ) Install Xampp and follow the on screen instructions to set it up. This should be straight forward. The following image shows you all the different folders and files created during the installation.
In this tutorial xampp is installed and set up in the following folder webserver inside of E: drive. You can even install xampp inside a memory stick.
Note: Avoid installing Xampp in C: drive or even in another none bootable partition in your computer or laptop. It is recommended to install Xampp in an external hard disk or memory stick.
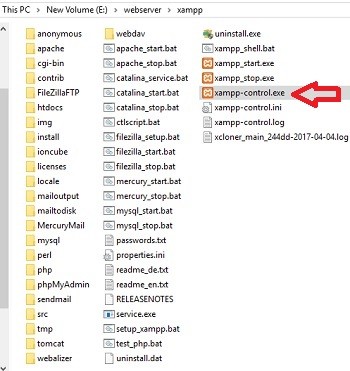
Step 2 ) Once you complete the installation double click on xampp-control.exe file as illustrated above in Step 1 ) to start Xampp server. Then click on Apache -> Config -> PHP (php.ini) as illustrated in the following image. This will allow you to make the adjustments necessary.
To avoid an error popping up when shutting down Xampp control panel, right click on xampp-control.exe file and make sure you select to run this program as an administrator.
Troubleshooting: If you are having problems starting XAMPP Control Panel, try the following URl FAQ Link for Windows.
Note: If you make the changes while Xampp is running, make sure you restart Apache and MySQL for the changes to work. This is like rebooting an online server.

Upload Max Filesize
Step 3 ) The following image shows you the line that needs to be edited in the php.ini file. The following line upload_max_filesize was increased to 128M. This size allows you to upload files that are smaller than 128 megabytes in size.
Note: You can increase or decrease the limit. It is up to you.

Memory Limit
Step 4 ) The following image shows you the line that needs to be edited in the php.ini file. The following line memory_limit was increased to 128M. This size gives WordPress 128 megabytes of memory to play with.
Note: You can increase the limit if you like. Nowadays most people have 4 to 8 gigabytes or memory installed in their computer or laptop.

Max Execution Time
Step 5 ) The following image shows you the line that needs to be edited in the php.ini file. The following line max_excution_time was increased to 900. This allows WordPress 900 seconds to execute files.
Note: You can increase the execution time if you need too.

MySQL my.ini File
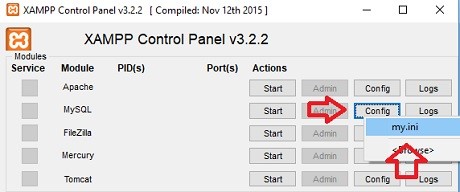
Step 6 ) Go to MySQL -> Config -> my.ini as illustrated in the following image. This will allow you to make the adjustments necessary to increase the value in max_allowed_packet.
The following is one of the warnings you my see if the value is too low when running a file scan detection using All In One WP Security plugin.
warning: mysqli_query(): MySQL server has gone away in yoursite.com\wp-includes\wp-db.php on line 1942
Note: This might also occur with other similar plugins.
Max Allowed Packet
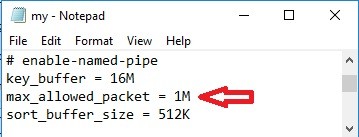
Step 7 ) The following image shows you the line that needs to be edited in the my.ini file. You need to increase the following value max_allowed_packet = 1M to something higher.
Step 8 ) For this tutorial WordPress is installed in its own folder. The folders name is wordpress as illustrated in the image below. To learn more about giving WordPress it’s own directory please check the following URL moving wordpress to it’s own directory.
Note: All web developing is carried out in the following directory htdocs.
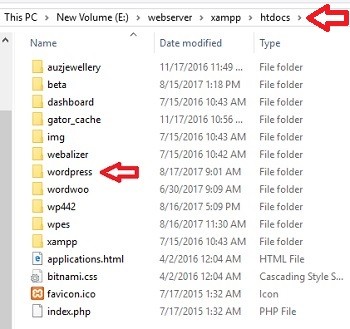
Note: You can name your folder what ever you want. You need to remember the folders name because you will require this information later on.
============================
This tutorial has instructed you on how to setup Xampp in your computer or laptop running Windows.
Click on the following URL Create MySQL Database Locally Using Xampp to continue with the local set up.
If you have any question please let me know. I will be updating this tutorial from time to time so come back for the latest.
I hope this tutorial helps you.
Enjoy.
Xampp Tutorial List: