Install WordPress Locally Security Setup tutorial shows you how to enable some basic but effective Xampp security settings.
Last Updated: August 17, 2017
Latest News: I have made some changes to the wording.
Attention: The new Control Panel 3.2.2 does not have the security link any more. What this means that the following instructions don’t apply anymore. If you are still running the old Control Panel 3.2.1 version then the following instructions are still okay to implement.
Before the tutorial is completed it a good idea to set up some security. Xampp is a great platform but does not set up any security in place when you install it locally. With so many viruses and people trying to hack into computers, laptops through any system, security is a must.
Install WordPress Locally Security Setup
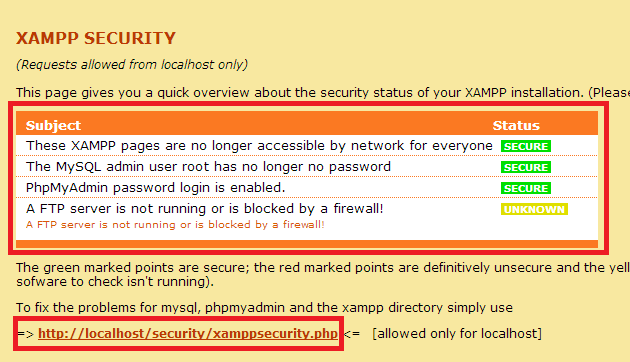
Step 1 ) Type localhost/security/ on your browser address bar.

Step 2 ) Click on the link http://localhost/security/xamppsecurity.php to secure your installation as illustrated in the image below. You can also see in this tutorial that my installation is already secured. This is because I secured the installation after the set up was complete and I thought of sharing this with you.

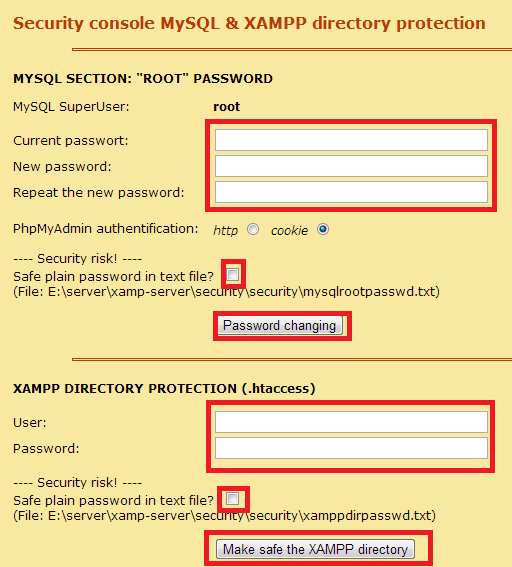
Step 3 ) The following image shows you what fields need to be completed in order to secure your installation. Make sure that you select the following option Save plain password in text file? just in case you forget your password.
In this example the text file is saved in the following path.
E:\server\xamp-server\security\security\mysqlrootpasswd.txt (Your path will be different)

That is how easy it is to install WordPress locally using Xampp.
Click on the following link Test Your WordPress Site Locally (Optional if you need to test your live website locally using BackWPup plugin).
I hope this tutorial has helped you.
Enjoy.
Xampp Tutorial List: