How To Create CataBlog Gallery Basic Tutorial shows you how to create a gallery and assigned some images to the gallery and much more.
Last Updated: February 13, 2018
Revision Update: I have updated the content of this post.
In this post you will learn how simple it is to create galleries and assigned images to each gallery. This helps you group your images into galleries and then display them using a shortcode. Images can be grouped into any type of gallery. The following list is an example of different types of galleries you might want to set up in your site depending.
Galleries Samples
- Weddings
- Baptism
- Birthday Parties
- Year
- Toys
- Houses
- Buildings
How To Create CataBlog Gallery Basic Tutorial
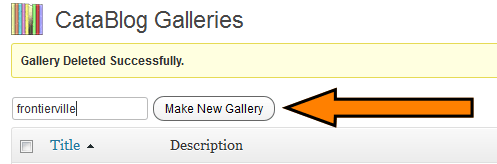
Step 1 ) The following image CataBlog Galleries allows you to create different galleries for your site. This also allows you to group your images into different galleries. To start creating your galleries go to CataBlog -> Galleries.
Steps To Creating A Galleries
- Once you typed in the gallery name the following button Make New Gallery becomes active. Click on this button and your new gallery will be created.
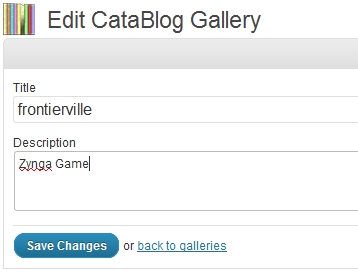
Step 2 ) Once the gallery has been created it will appear in the list. Click on Edit link if you want to edit the title name and type in some description.
Editing A Gallery
- Title
- Description
- Click on Save Changes button or click on back to galleries link.
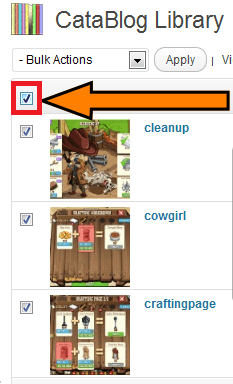
Step 3 ) Once you have finished creating your gallery, you can start assigning images to each galleries. To start adding images to the gallery go to CataBlog -> Library and select the images you want to add to the gallery. The following image shows you 3 images I have selected to assigned to the gallery.
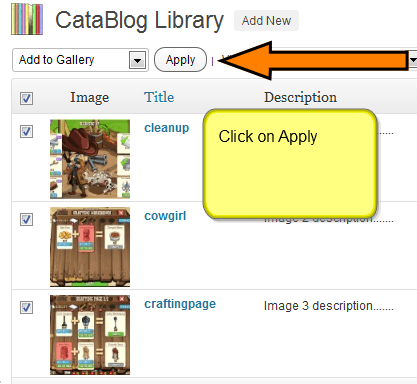
Step 3-a ) Once you have selected all the images you want to assigned to the gallery, select Add to Gallery from the drop down menu and click on Apply button. See image below.
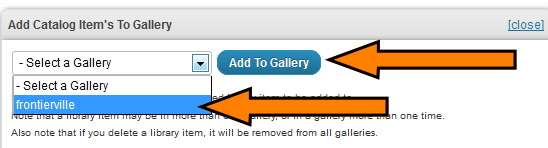
Step 3-b ) After clicking on Apply button above, you will see the following image Add Catalog Item’s To Gallery displayed. This window allows you to select the gallery from the drop down menu and click on Add To Gallery button. In this example I selected the gallery frontierville.
Step 3-c ) The following image shows you the gallery shortcode. This shortcode can be added in a post or page and it will display the images you assigned to the the gallery you just created.
- [ catablog_gallery id=”57″ ] (Remember the shortcode id in your site will be different)
Note: The following URL Using Basic CataBlog Shortcodes Tutorial provides more information about shortcodes.

That is how simple it is to create galleries and display images that belong to a gallery. I hope the above helps you understand how catablogs gallery system works.
Click on Create CataBlog Categories Basic Tutorial to continue with the basic settings.
If you have any questions or suggestions please let me know.
Enjoy.
CataBlog tutorials list: