WP ClassiPress Theme Header Navigation Menu post shows you how to set up the main menu in your site and more.
Last Updated: January 12, 2019
Latest News: Fixed a broken link.
In this post you will learn how to set up and manage the header navigation menu in ClassiPress. You will learn how to edit the menu via the customizer and via the menu in WordPress admin.
Note: This tutorial is based on the default theme settings when you first install ClassiPress 4.1.0.
ClassiPress Theme Menu List:
- Menu Setup
- Topbar Navigation
- Footer Menu
- Header Navigation Menu
WP ClassiPress Theme Header Navigation Menu
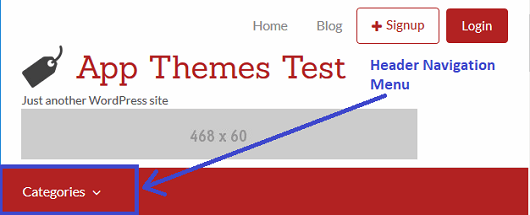
Step 1 ) The following image shows you the Primary menu (Header navigation) location in the front page of the site. In this example you see 1 page added to the footer menu.
ClassiPress Header Navigation Front Page
- Categories
Customize Primary Menu (Header navigation)
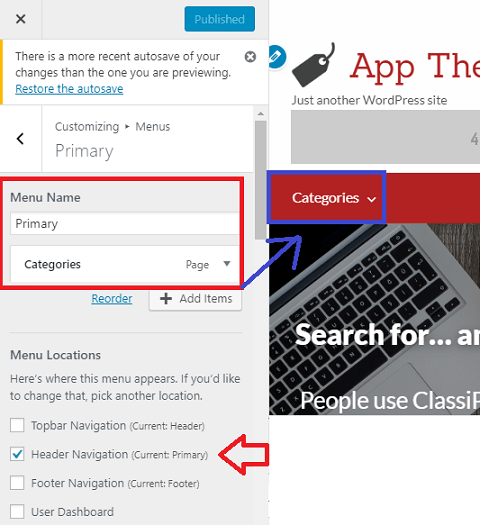
Step 2 ) The following image shows you the Primary menu (Header navigation) displayed in the customize admin area. Go to Appearance -> Customize to view this setting.
Customize Primary Menu
- Categories
Menu Locations
- Header Navigation (Current: Primary)
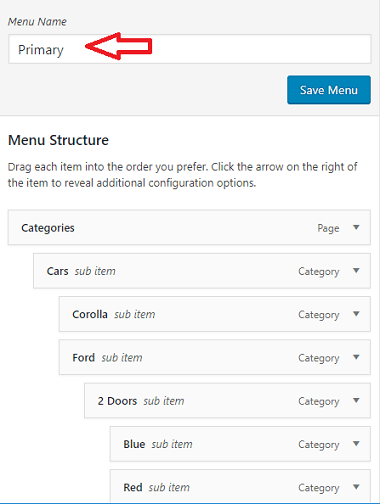
Step 3 ) The following image shows you the Primary menu admin settings. This is located in Appearance -> Menus. You can see the 2 menus added as mentioned in Step 2 ) above.
Menu Name
- Primary
Menu Structure
- Categories = For this tutorial I have added sub items and there is a reason why. I am going to write a tutorial about how to display and manage ads categories in ClassiPress.
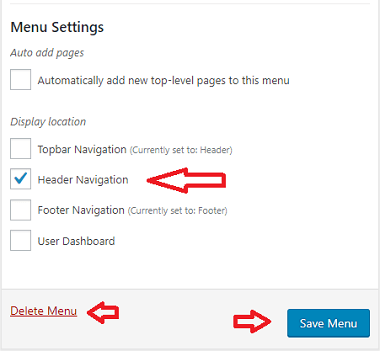
Step 3-a ) The following image shows you the Primary menu admin settings display location.
Menu Settings
- Auto add pages
- Display location = Header Navigation
- If you wish to delete this menu, click on Delete Menu link.
- Remember click on Save Menu button once you have completed setting up your menu.
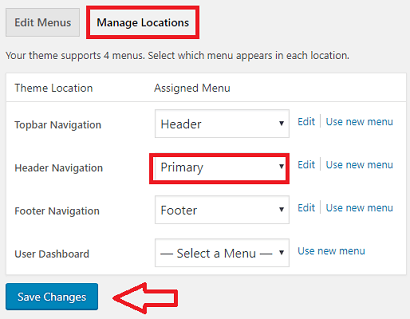
Manage Locations
Step 4 ) The following image Manage Locations shows you the different locations you can select for each menu.
Theme Location
- Topbar Navigation
- Header Navigation = Primary menu is assigned to this location.
- Footer Navigation
- User Dashboard
- Click on Save Changes button when you finish with the settings.
Assigned Menu
Step 5 ) The following image Assigned Menu shows you a list of different menus you can select for each theme location.
Assigned Menu
- Dashboard
- Footer
- Header
- Primary = This menu has been assigned to Header Navigation.
- Secondary

==============================
That is how simple it is to set up your Header Navigation menu.
You might like to check the following URL How To Create A WordPress Menu to learn more about creating and managing menus in WordPress.
If you have any questions or suggestions please leave a comment.
There will be more tutorials coming soon. So make sure you keep coming back for the latest.
Enjoy.
ClassiPress Theme Tutorial List: