WordPress HireBee Theme Footer Area post shows you how to customize and edit the footer area in your site and more.
Last Updated: May 3, 2019
Latest Update: I made some changes to the documentation.
In this post you will learn how to manage the footer area of your site. HireBee has a field in the customizer area that allows you to edit the copyright notice in a simple way. You can even add HTML code to the copyright field.
WordPress HireBee Theme Footer Area
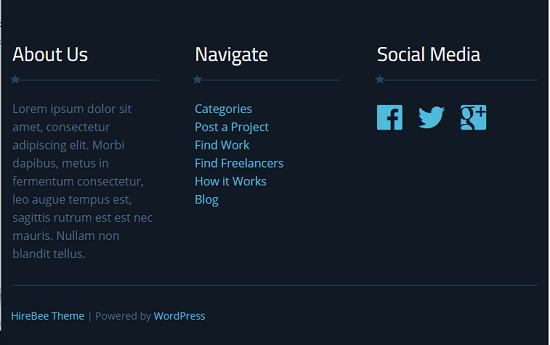
Step 1 ) The following image shows you the Footer Area in the homepage. The theme allows you to add up to three widgets to the footer area. You can add any type of widget to your site. In this example I added the following widgets. You can also manage the copyright notice and add a menu.
Footer Widgets
- Text: About Us
- Navigation Menu: Navigate
- HireBee – Social Connet
Note: To learn more about editing the widgets click on the following URL WordPress HireBee Theme Widgets Settings.
Copyright notice
- HireBee Theme | Powered by WordPress
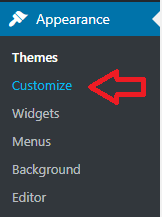
Step 2 ) Click on Appearance -> Customize as illustrated in the following image to start customizing the footer area.
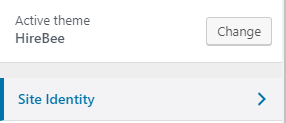
Step 3 ) Click on Site Identity as illustrated in the following image. This will display the footer options you can enable, change or remove.
Step 4 ) The following image allows you to control the footer copyright notice in your site.
Display Footer Area Options
- Footer Copyright = This allows you to edit the copyright notice in the footer area.
Note: The Footer Copyright field is empty by default even though it displays a footer notice.

Step 4-a ) The following image shows you the Footer Area in the site. When you install hirebee it adds the following copyright notice in the footer area.
Footer Area Default Copyright Notice
- HireBee Theme | Powered by WordPress

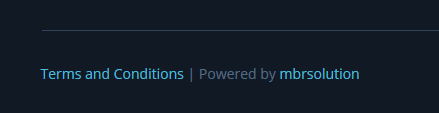
Step 4-b ) To customize this field simply type in your new message. Make sure you click on Publish button once you finish editing the footer. In this example I added the following entry to the field. Notice how I used some HTML code.
<div class=”footer-credits”><a href=”https://mbrsolution.com/terms-condition.php” target=”_blank” rel=”nofollow”>Terms and Conditions</a> | Powered by <a href=”https://mbrsolution.com” target=”_blank” rel=”nofollow”>mbrsolution</a> </div>
Step 4-c ) The image below shows you the new edited Footer Copyright message.
That is how simple it is to customize the footer area in hirebee.
If you have any questions or suggestions please leave a comment.
There will be more tutorials coming soon. So make sure you keep coming back for the latest.
Enjoy.
HireBee Theme Tutorial List: