Clipper WordPress Theme Footer Area post shows you how to customize and edit the footer area in your site and more.
Last Updated: July 16, 2019
Latest News: I updated the information below.
In this post you will learn how to manage the footer area of your site. Clipper theme has the option to edit the menu and widgets added to the footer area through the customizer. This allows you to easily manage the footer area without needing to use any code.
Clipper WordPress Theme Footer Area
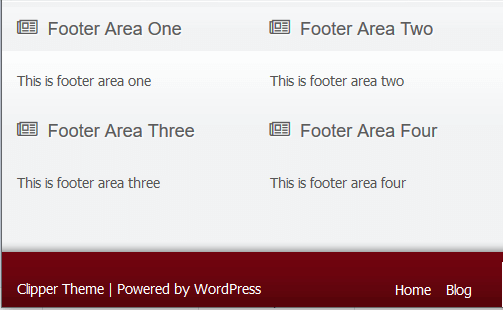
Step 1 ) The following image Footer Area allows you to manage the following.
Footer Widgets
- Footer Area One
- Footer Area Two
- Footer Area Three
- Footer Area Four
Menu
- Footer Menu = click on the following URL WP Clipper Theme Footer Menu to learn more.
Copyright notice
- Clipper Theme | Powered by WordPress = Currently there is no setting available in the customizer. You need to edit the copy right notice using a child theme functions.php file. This will probably change in the future.

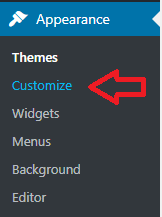
Step 2 ) Click on Appearance -> Customize as illustrated in the following image to start customizing the footer area.

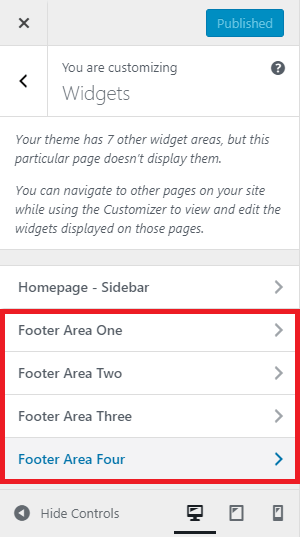
Step 3 ) Go to Appearance -> Customize -> Widgets, as illustrated in the image below and click on each footer area to start adding and managing the widgets you want to add in each area in the footer. Remember you have 4 different areas to choose from.
Footer Area Widgets Settings
- Footer Area One
- Footer Area Two
- Footer Area Three
- Footer Area Four

That is how simple it is to customize the footer area in Clipper theme.
If you have any questions or suggestions please leave a comment.
There will be more tutorials coming soon. So make sure you keep coming back for the latest.
Enjoy.
Clipper Theme Tutorials List: