ClassiPress Theme Homepage Widget Settings shows you a list of different widgets added by ClassiPress by default for you to manage.
Last Updated: March 15, 2019
Latest News: I fixed a spelling error.
In this post you will learn about the widgets added by default by ClassiPress theme when you first install and activate the theme. You will also learn how to manage and edit the widgets fields and more. Each widget controls a different area in your homepage. This will help you if you decide to remove the current default widgets and add different widgets of your choosing to the homepage.
ClassiPress Theme Homepage Widget Settings
Step 1 ) To view and manage the widgets area go to Appearance -> Widgets in admin.
Note: It is very important to understand how each widget works, what area of the website it controls and how to edit the widget.
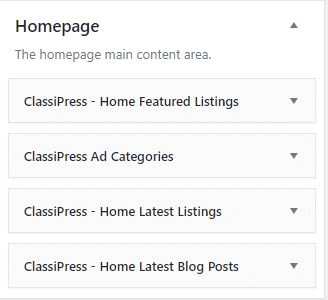
Step 2 ) The following image Homepage widget shows you a list of widgets controlled by ClassiPress. These widgets are added after you install and activate the theme.
Homepage Widgets
- ClassiPress – Home Featured Listings
- ClassiPress – Home Ad Categories
- ClassiPress – Home Latest Listings
- ClassiPress – Home Latest Blog Posts
ClassiPress – Home Featured Listings
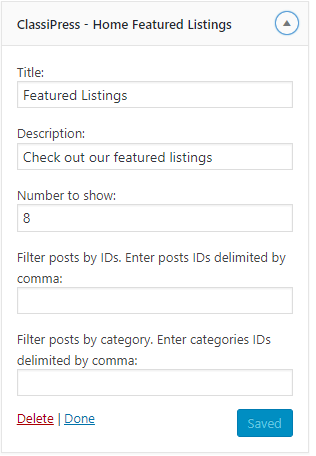
Step 3 ) The following image ClassiPress – Home Featured Listings allows you to edit the following fields in the widget.
ClassiPress – Home Featured Listings Widget Settings
- Title:
- Description:
- Number to show:
- Filter posts by IDs. Enter posts IDs delimited by comma:
- Filter posts by category. Enter categories IDs delimited by comma:
- Click on Delete link if you choose not to publish this widget.
- Click on Done link when you are finish with the settings.
ClassiPress – Home Ad Categories
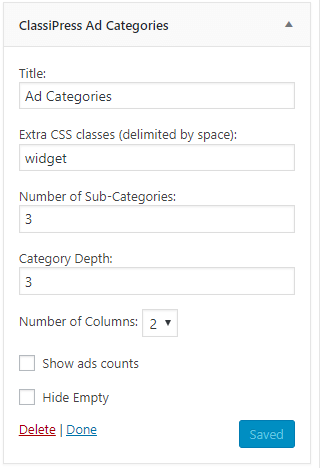
Step 4 ) The following image ClassiPress – Home Ad Categories allows you to edit the following fields in the widget.
ClassiPress – Home Ad Categories Widget Settings
- Title:
- Extra CSS classes (delimited by space):
- Number of Sub-Categories:
- Category Depth:
- Number of Columns:
- Show ads counts
- Hide Empty
- Click on Delete link if you choose not to publish this widget.
- Click on Done link when you are finish with the settings.
ClassiPress – Home Latest Listings
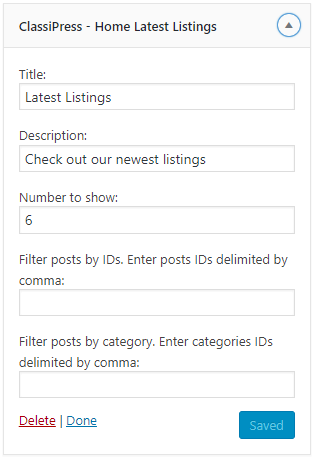
Step 5 ) The following image ClassiPress – Home Latest Listings allows you to edit the following fields in the widget.
ClassiPress – Home Latest Listings Widget Settings
- Title:
- Description:
- Number to show:
- Filter posts by IDs. Enter posts IDs delimited by comma:
- Filter posts by category. Enter categories IDs delimited by comma:
- Click on Delete link if you choose not to publish this widget.
- Click on Done link when you are finish with the settings.
ClassiPress – Home Latest Blog Posts
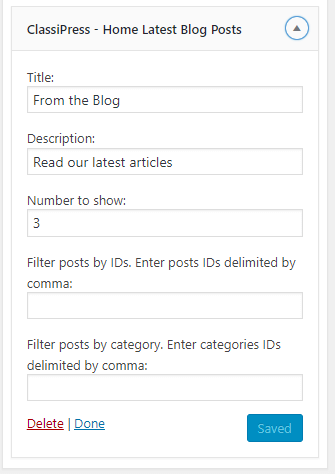
Step 6 ) The following image ClassiPress – Home Latest Blog Posts allows you to edit the following fields in the widget.
ClassiPress – Home Latest Blog Posts Widget Settings
- Title:
- Description:
- Number to show:
- Filter posts by IDs. Enter posts IDs delimited by comma:
- Filter posts by category. Enter categories IDs delimited by comma:
- Click on Delete link if you choose not to publish this widget.
- Click on Done link when you are finish with the settings.
That is how simple it is to manage ClassiPress theme homepage widgets.
If you have any questions or suggestions please leave a comment.
There will be more tutorials coming soon. So make sure you keep coming back for the latest.
Enjoy.
ClassiPress Theme Tutorial List: