CCleaner Options Settings Tutorial post shows you how to set up and configure the following settings, cookies, include, exclude and much more.
Last Updated: March 29, 2022
Latest News: Updated the documentation.
Ccleaner Options Settings allows you to manage Ccleaner. In this area you can choose how you want the program to run, what files to exclude from cleaning, what folders to include when cleaning and much more.
For example: You can exclude certain folders and files from getting clean because these mean something to you. You can also schedule jobs to run at a certain time.
Once again if you don’t really know what to do in this area, then leave the default settings as they are. They do a great job.
Download Ccleaner Files
- To download the installed version click on the following link ccleaner.
- To download the portable version click on the following link portable.
CCleaner Tutorials:
- Custom Clean Settings
- Tools Settings
- Options Settings
CCleaner Options Settings
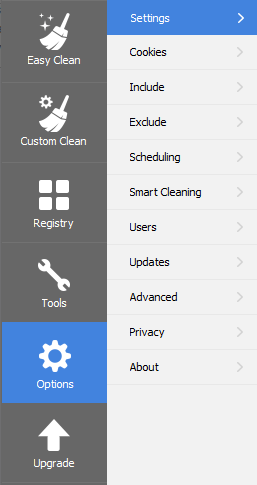
Step 1 ) The following image displays the Options menu. This menu allows you to configure and manage how you want CCleaner to operate each time you run a session.
Options Menu
- Settings
- Cookies
- Include
- Exclude
- Scheduling
- Smart Cleaning
- Users
- Updates
- Advanced
- Privacy
- About
Settings
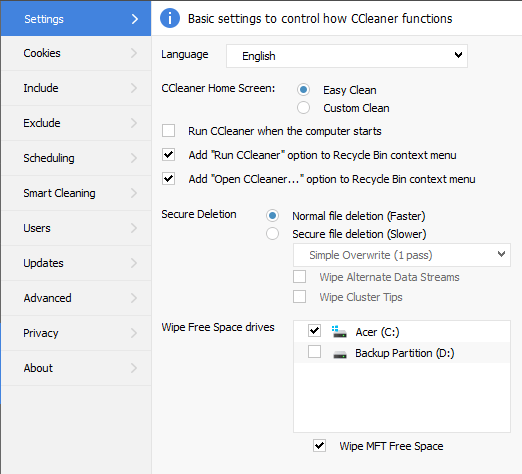
Step 2 ) Start CCleaner and click on Options -> Settings tab as illustrated in the image below to set up the following options.
Settings Settings
- Language
- CCleaner Home Screen: = You can select Easy Clean or Custom Clean
- Run CClenaer when the computer starts
- Add “Run CCleaner” option to recycle Bin context menu
- Add “Open CCleaner…” option to Recycle Bin context menu
- Automatically check for updates to CCleaner
- Secure Deletion = Normal file deletion (Faster) or Secure file deletion (Slower)
- Wipe Free Space drives
- Wipe MFT Free Space
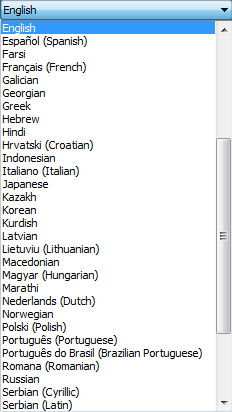
Step 2-a ) The following image illustrates the languages CCleaner has been translated into.
Cookies
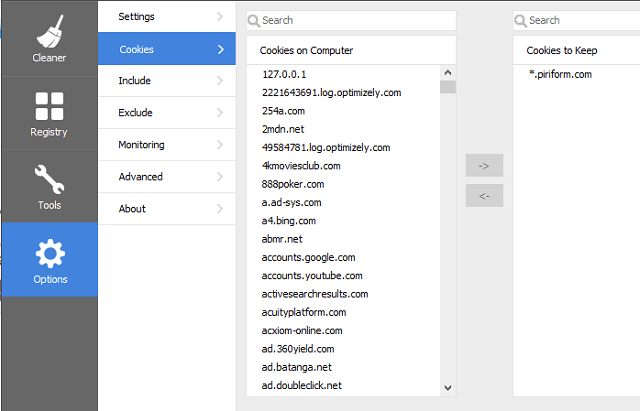
Step 3 ) Click on Options -> Cookies tab as illustrated in the image below to select which cookies to keep and which cookies to delete in your computer.
Include
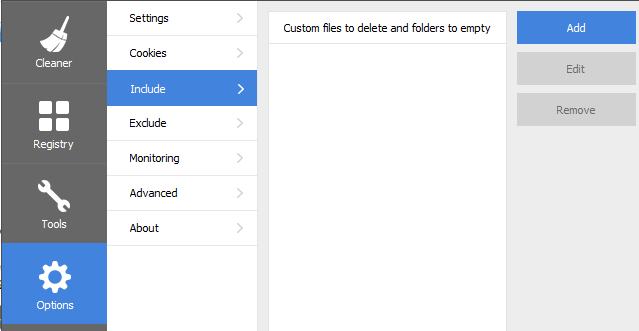
Step 4 ) Click on Options -> Include tab as illustrated in the image below to select any additional files and folders you want CCleaner to remove “delete”. (Important: This is for advanced users only)
Include Settings
- Add files or folders to delete
- Edit files or folders to delete
- Remove files or folders from the list to include
Exclude
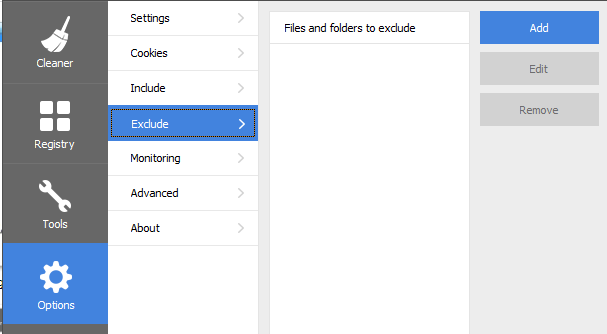
Step 5 ) Click on Options -> Exclude tab as illustrated in the image below to select any additional files, folders and registry entries you want CCleaner to exclude from removing “deleting”. (Important: This is for advanced users only)
Exclude Settings
- Add files or folders to exclude
- Edit files or folders to exclude
- Remove files or folders from the list to exclude
Smart Cleaning
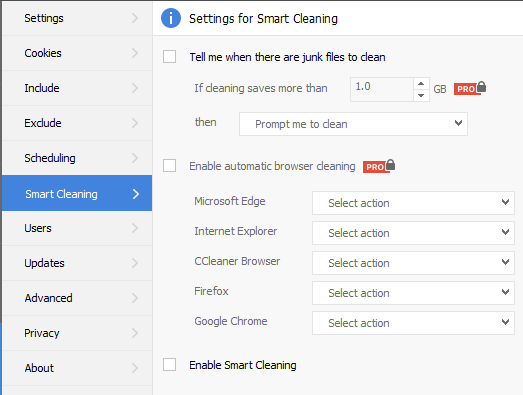
Step 6 ) Click on Options -> Smart Cleaning tab as illustrated in the image below to enable the following options.
Smart Cleaning Settings
- Tell me when there are junk files to clean
- If cleaning saves more than (Pro version)
- then…..(Pro version)
- Enable automatic browser cleaning (Pro version)
- Microsoft Edge
- Internet Explorer
- CCleaner Browser
- Firefox
- Google Chrome
- Enable active monitoring
Note: Your browser list might be different.
Users
Step 7 ) Click on Options -> Users tab to select from the following options.
Users Settings
- Current User Only
- All Users (Pro version)
- Selected Users (Pro version)
Updates
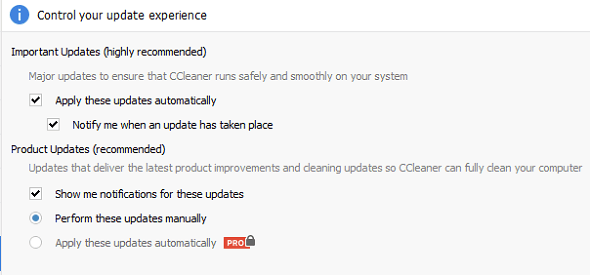
Step 8 ) Click on Options -> Updates tab as illustrated in the image below to select from the following options.
Important Updates (highly recommended)
- Apply these updates automatically
- Notify me when an update has taken place
Product Updates (recommended)
- Sow me notifications for these updates
- Perform these updates manually
- Apply these updates automatically (Pro version)
Advanced
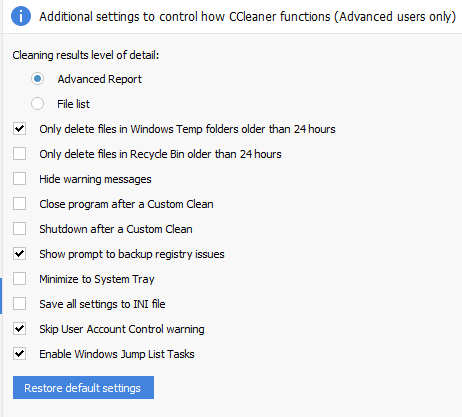
Step 9 ) Click on Options -> Advanced tab as illustrated in the image below to select from the following options.
Advanced Settings
- Cleaning results level of details: = You can select Advanced Report or File list
- Only delete files in Windows Temp folders older than 24 hours
- Only delete files in Recycle Bin older than 24 hours
- Hide warning messages
- Close program after cleaning
- Shutdown after cleaning
- Show prompt to backup registry issues
- Minimize to System Tray
- Save all settings to INI file
- Skip User Account Control warning
- Enable Windows Jump List Tasks
- Click on Restore default settings button
Privacy
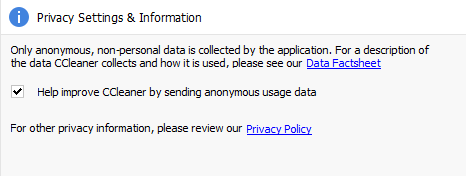
Step 10 ) Click on Options -> Privacy tab as illustrated in the image below to select the following option.
Privacy Settings
- Help improve CCleaner by sending anonymous usage data
About / License Key
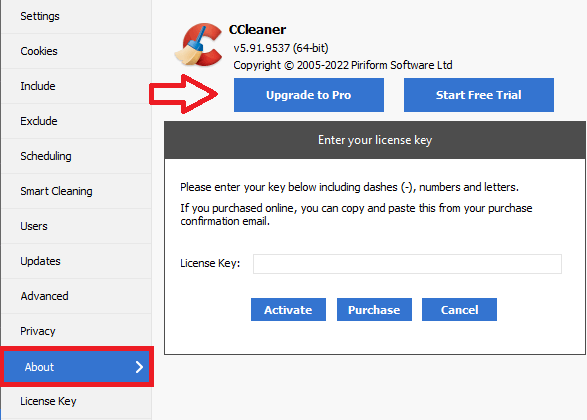
Step 11 ) Click on Options -> About tab as illustrated in the image below to view your current version. If you have a license key, click on Upgrade to Pro button and enter your license key or click on Purchase button to purchase a license.
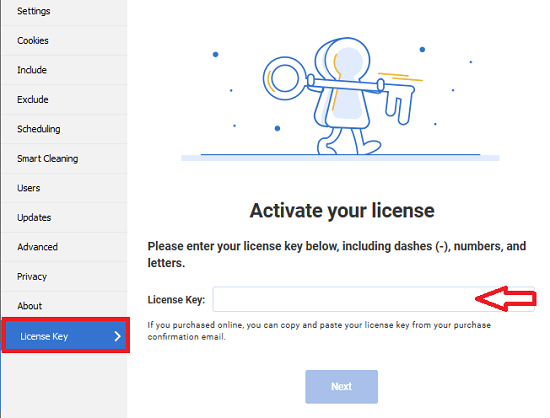
Step 11-a ) Alternative you can also click on License Key tab as illustrated in the image below to enter your license key. Make sure you click on Next button to complete your registration.
======================
I will be updating this post from time to time, so keep coming back for the latest changes.
If you have any questions please let me know.
Enjoy.
CCleaner Tutorial List:
I can’t seem to find a place to enter License.
Here it is:
Name: Nancy Brassert
License key: xxxx-xxxx-xxxx-xxxx
Expiry date: 2022-09-24
Hi Nancy, the license is entered when you click on Upgrade to Pro button located in About.
Regards.