CCleaner Tools Settings post shows you how to set up and configure the following tools options, uninstall, startup, file finder, system restore and much more.
Last Updated: November 28, 2019
Latest News: Updated the documentation.
Ccleaner Tools Settings allows you to manage browser plugins, addons, clean hard disk and much more. Most of you will probably not use these extra tools. However, I recommend that you check these tools and spend sometime understanding what they do. They can do a lot for you than what you think.
For example: Browser Plugins tab. Many times you might find that your browser is running sluggish or it crashes from time to time. Even after you clean the browser cache. This could be due to one of the plugins installed in your browser. You have the option to enable, disable or delete the plugin. If you are not sure about deleting the plugin, then disable the plugin. Once you are sure it does not affect the browser and computer’s performance, delete the plugin/s.
Another area that I also recommend for you to check is the startup option. Most of the time, when you install a program, software or utility, they sometime get added to your computer start up. That means that every time you start up your computer, it needs to make sure these programs also run at start up. This will slow down the booting process. Lucky for you, most of these programs don’t need to run at start up and you can disable them.
Note: Make sure you don’t disable any program that is needed at start up.
Download Ccleaner Files
- To download the installed version click on the following link ccleaner.
- To download the portable version click on the following link portable.
CCleaner Tutorials:
- Custom Clean Settings
- Tools Settings
- Options Settings
CCleaner Tools Settings
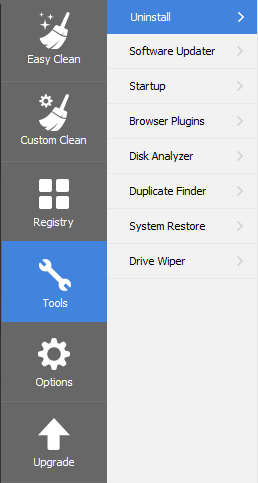
Step 1 ) The following image displays the Tools menu. This menu allows you to check the following options. Each option is unique and performs different tasks. Make sure you spend some time understanding what each option does before you go ahead and use it.
Tools Menu Settings
- Uninstall
- Software Updater
- Startup
- Browser Plugins
- Disk Analyzer
- Duplicate Finder
- System Restore
- Drive Wiper
Uninstall
Step 2 ) Start CCleaner and click on Tools -> Uninstall tab as illustrated in the image below. This window displays all your programs, tools, utilities software and more that is installed in your computer. You have the option to select the Programs you want to Remove. The following is a list of options you can carry out.
Uninstall Buttons Options
- Uninstall
- Repair
- Rename
- Delete
- Search
- Click on Save to text file… button.

Software Updater
Step 3 ) Click on Tools -> Software Updater tab. This window lets you know which programs needs updating and the programs that are already updated.
Software Updater Settings
- Programs to Update
- Up to date Programs
- Click on Update All button when you are ready to update the programs you have selected.
- Click on Refresh button to refresh the list and make sure all programs are accounted for.
Startup
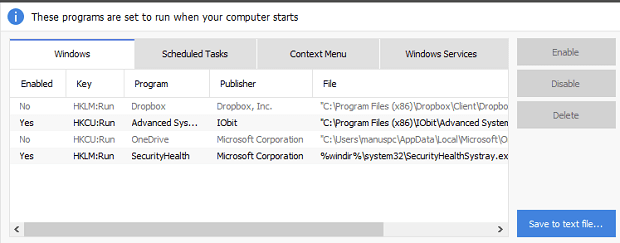
Step 4 ) Click on Tools -> Startup tab as illustrated in the image below. This window allows you to configure how you want your programs to run when Windows starts up. You can make changes to the following areas.
Startup Settings
- Windows
- Schedule Tasks
- Context Menu
- Windows Services
Startup Buttons Options
- Enable
- Disable
- Delete
- Click on Save to text file… button.
Note: Your list will be different.
Browser Plugins
Step 5 ) Click on Tools -> Browser Plugins tab. This window allows you to configure and remove plugins from the following browsers.
Browser Plugins
- Internet Explorer
- Firefox
- Google Chrome
Important: Your list might be different.
Disk Analyzer
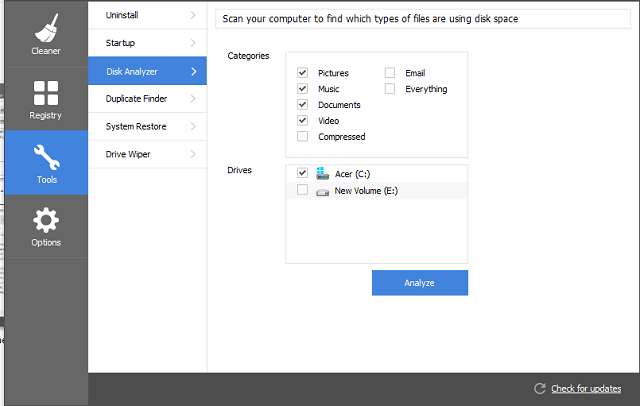
Step 6 ) Click on Tools -> Disk Analyzer tab as illustrated in the image below. This window allows you to search for files that take up a lot of space in your hard disk. You can select from the following options.
Categories
- Pictures
- Music
- Documents
- Video
- Compressed
- Everything
Drives
- Acer (C:)
- New Volume (E:)
Note: You might have different Drives displayed.
Duplicate Finder
Step 7 ) Click on Tools -> Duplicate Finder tab as illustrated in the image below. This window allows you to search for duplicate files found in your computer. You can select from the following options.
Match by
- Name
- Size
- Modified date
- Content
Ignore
- Zero byte files
- Read only files
- File size under = select what size you want in MB “Megabytes”
- File size over = select the files that have a size above MB “Megabytes”
- System files
- Hidden files
Include or Exclude drives or folders.
Here you will have your hard disk drive to select i.e C:, D:, E: drive etc. You can carry out the following options.
- Add
- Edit
- Remove
- Search
- Reset

System Restore
Step 8 ) Click on Tools -> System Restore tab as illustrated in the image below. This window allows you to manage your system restore points created during all your sessions. You can also Remove any system restore point created.
Information: You might not have any system restore points created because you might have disabled that options in Windows.

Drive Wiper
Step 9 ) Click on Tools -> Drive Wiper tab as illustrated in the image below. This window allows you carry out the following options listed below.
Warning: You have to be very careful here. You could easily remove or delete very important files and data from your hard disk. So please handle this area with care. Make sure you have a current backup of your files or your system.
Note: The following link recommendation-tools-for-windows provides a list of tools for Windows I recommend including backup programs.

Step 9-a ) The following image allows you to select from the following options.
Wipe Options
- Free Space Only
- Entire Drive (All data will be erased) (Be careful with this option.)

Step 9-b ) The following image allows you to select from the following options.
Security Options
- Simple Overwrite (1 pass)
- Advanced Overwrite (3 passes)
- Complex Overwrite (7 passes)
- Very Complex Overwrite (35 passes)
Remember: The more passes you choose the more it is going to take to complete the task. Plus it will make sure that the data you want to remove “delete” will not be recovered that easily and possibly never. The ultimate security option to prevent your data from being viewed or stolen.

Step 9-c ) The Drives area displays the number of drives discovered by this tool in your computer or laptop. When you select one of your drives, the Wipe button becomes active and allows you to click on it.
Warning: This is extremely dangerous if you perform the wrong action. So make sure you are %100 sure of what you are doing before you go ahead and click on the Wipe button.
Click on the following link CCleaner Options Settings to complete the third part.
I will be updating this post from time to time, so keep coming back for the latest changes.
If you have any questions please let me know.
Enjoy.
CCleaner Tutorial List: