Move SeaMonkey Profile to a Different Computer post explains in a simple guide how to move your profile from one computer to a different computer.
Last Updated: May 25, 2022
Latest News: Updated the documentation.
There are many times that you probably wanted to know how to move SeaMonkey profile from one computer to another computer even if it has a different operating system.
I will show you with a very simple process how to achieve this. Follow all the instructions here and you won’t go wrong.
What You Need:
- External USB stick with plenty of space. (Memory sticks are very cheap nowadays)
- Download and install SeaMonkey.
Move SeaMonkey Profile Different Computer Steps
SeaMonkey Profile Location:
Important: Create a backup before you begin.
Step 1 ) Make sure you close your SeaMonkey application before you begin.
Step 2 ) Locate where the profile folder is for Windows 7, 8.1, 10 and 11.
Note: The following link https://www.seamonkey-project.org/doc/profiles#location has more information.
Windows Profile Path:
- c:/Users/user-name/AppData/Roaming/Mozilla/SeaMonkey/Profiles
The following image Windows 7.1 shows you how to change the view hidden files and folder options. Click on Organize -> Folder and search options.

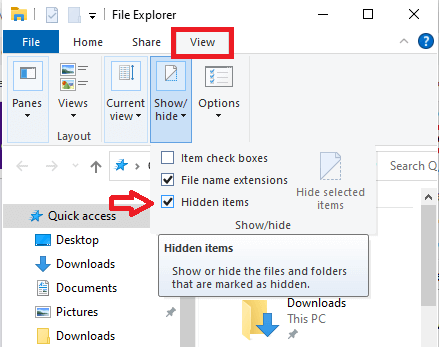
Step 3 ) The following image Windows 10 shows you how to change the view for hidden items in folders. Click on View -> Options -> Change folder and search options or check the following option Hidden items.
Step 3-a ) In the following image click on View tab and select Show hidden files, folders, and drives.
Note: This step is not needed in Windows 10 if you check Hidden items box mentioned in the previous step.

Step 4 ) Copy the profile folder to your external USB stick.
Step 5 ) Turn on your other computer and install SeaMonkey.
Step 6 ) Locate again the profile folder in the destination computer. This is the same path as mentioned above in Step 2 ). (This is where you will be copying the profile files from your USB stick)
Step 7 ) Start the Profile Manager. A window similar to the one shown will open.

Step 8 ) Click on Manage Profile button.

Step 9 ) Next click on Create Profile button. Then click on Next button.

Step 10 ) The following image allows you to set up the following options.
- Enter new profile name
- Choose folder (Remember from above this folder was copied from one computer to the new computer)
- Click on Finish button

If you followed all the steps above and everything went smoothly. When you open SeaMonkey in your new computer you should see all your email accounts added without a problem.
Troubleshooting
Q1 I have lost or misplaced my profile. How do I fix this?
Answer: The following documentation has information on how to recover the profile path.
http://kb.mozillazine.org/Profiles.ini_file
===========================
If you have any questions please let me know. I will be updating this from time to time. So keep coming back for the latest.
Enjoy
Recommended Links: