Setup SeaMonkey Email Client With Google App Password post will show you how to fix and repair your e-mail client when you receive an error message.
Last Updated: July 7, 2022
Latest News: Updated the documentation.
In this tutorial you will learn how to fix and repair the login error message you see when using SeaMonkey e-mail client to access Google Gmail account.
This might happen for various reasons and you might be wondering why, however Google security is second to none. So seeing this message is positive in many ways. It is letting you know that Google is not happy with your current client set up and needs to verify the settings before allowing you access to the Gmail account.
Setup SeaMonkey Email Client With Google App Password
Step 1 ) The following image shows you the Enter your password message. This message is letting you know that you need to add the password to allow SeaMonkey email client to have access to your Gmail account.
Step 1-a ) Enter your password and click on OK button. Make sure you also select Use Password Manager to remember this password.

Step 2 ) The following image illustrates an error message after entering your password. This can happen if you have enabled 2-step-verification in your Google account settings. Enabling 2-step-rerification in Google is very good for security. If you have not enabled this security feature in your account yet, I highly recommend that you do so as soon as possible. This type of security is very hard to break.

Step 3 ) Click on the following URL support.google.com/accounts/answer/185833 and follow the instructions to create and use an app password.
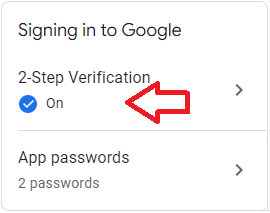
Note: Before you begin, make sure your 2-Step Verification is turned on in your Google account as illustrated in the image below.
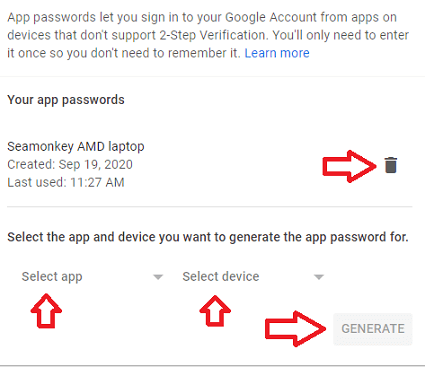
Once you are logged in you will see the information illustrated in the following image. Here you can check what app or device you currently have. You can also delete them by clicking on the recycling bin icon as illustrated in the image below. This is very important and it is something that you should do regularly just to keep up to date with all your apps, devices and third party clients.
- Select your app and select your device as illustrated in the image below. Click on Generate button to generate your 16 character key.
Note: Remember you will use many apps, computers, smartphones, laptops etc. These devices might require permission to access your Google Gmail account. And from time to time you will either sell your device or purchase a new device. Any old device can be safely removed from the list. Any new device, simply add it to the list.
Step 4 ) Once you select your app and your new device from the image above you will be given a 16 character password key displayed in yellow as illustrated in the image below.
You need to copy and paste the 16 character password into the SeaMonkey screen as illustrated in Step 1-a ) above. (Note: password is hidden for security reasons)
Once you have completed this step click on Done button as illustrated in the image below. You only need to do this once and you don’t have to memorize or write down this key.
That is all you need to do to get SeaMonkey to access your Gmail account again.

Note: This process is similar with any other e-mail client you might be using to access your Gmail account if you are using 2 step verification.
Outgoing OAuth2 Settings
Step 5 ) The following steps shows you how to set up your outgoing OAuth2 settings. If you don’t want to set up OAuth2, then select another option and complete the settings. However, I highly recommend setting up OAuth2 for security.
Seamonkey authentication steps:
- Click on Mail & Newsgroups.
- Click on your Gmail settings in SeaMonkey.
- Go to Accounts and click on View settings for this account.
- Click on Outgoing Server (SMTP) on the left hand side.
- Select gmail smtp to edit.
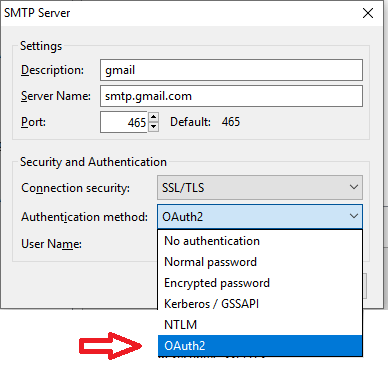
- Check to make sure your details are entered correctly as illustrated in the following image. Make sure you have selected in Authetication method: field the OAuth2 option. If you haven’t then you will have to set this up and then follow the on screen instructions.
Note: Google will send a notification to your mobile phone. Once you approve it, SeaMonkey will accept the new settings in the outgoing server. Then make sure you carry out a test and reply back to make sure it is working.
Recommended Links:
==========================
That is all you need to do to fix the above error message and have SeaMonkey and Gmail communicate with each other again. I hope this helps you solve your problem.
If you have any questions please let me know.
Enjoy.
More Google Tutorials: