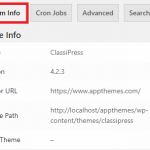
Jun 042013
 

Revision Update: I have changed some wording, removed and changed the avatar plugin and added a new avatar plugin which I am currently using. I have also added links to suffusion shortcode plugin. 

How To Add Suffusion Author Short Codes post teaches you to display suffusion author short codes in pages and or post. 

This is a great method for sharing with your visitors a bit about the author of a page or post.

Before we begin you need to install an avatar plugin if you want to display an authors photo. The plugin that I am currently using is WP User Avatar. There are many other plugins which I am sure you can use. However this plugin is currently being updated. The report by users is very good.

You will also need to install Suffusion Shortcodes just in case in the future you decide to change themes. 

Hint: Click on an image to view a larger size image.

Short Codes Tutorial:

1) After you have installed the avatar plugin go to Appearance >> Suffusion Options >> Back-end >> User Profiles. See image below.

Very Important: If you select any of the social networks below, you must enter the URL on your User profile.

Suffusion user profile settings


 2) Select additional social networks. See image below.

Select additional social networks

 3) Select whether or not to add an author’s heading, display a gravatar, set the size and alignment. See image below.

Author and gravatar settings suffusion

 4) Add some Author information content. See image below.

Add suffusion author information content short codes

 5) The end result showing the options above in a post. See image below.

Suffurion short codes view on a post

Hint: Remember to save all work.

Remember: Add the URL for the social network you selected on step 1) to the user profile or else it will display your post page and not your social network. 

There are many more short codes you can add. Here is the list suffusion short codes. The list will show you how to add the different shortcodes to your post or page. If you have any questions please let me know.

Come back for more tutorials.

Good luck :)

More suffusion tutorials:

Feb 242013
 

Revision Update: Added some more information and improved the wording.

CataBlog Add Columns Tutorial Part 6 shows you how to add columns to your CataBlog items on your website.

Hint: Always work with a child theme and not the parent theme.

Important information: Catablog works well with Suffusion theme. Has a problem with WP Socializer plugin version 2.4.4, lightbox won’t work.

Hint: Click on the images below to view a larger image.

1 ) I am going to use Twenty Eleven theme as an example. You can use your own theme. See image below.

 catablog-select-theme

2 ) You can use an ftp program or you can use Cpanel from your server to upload the files. First we need to create a folder and give it a name. I created a folder named twentyeleven-child and assigned 755 permissions.

To learn more about file permission please read the following link Changing File Permissions.

Option: If you zip your files on your computer and then upload them to your website from your admin panel then you don’t have to do it manually.

I just wanted to show you the manual method as well. See image below.

catablog-create-child-folder 

3 ) I created two files on my computer style.css and functions.php (optional).

3.1 ) style.css

In your style.css file add the following:

/**
* Theme Name: Twenty Eleven Child
* Theme URI: add a website here
* Description: add some information here
* Version: add a version here
* Author: add your name
* Author URI: add some information here
* Template: twentyeleven
* License: add a license here
*/

/* import layout */
@import url(“../twentyeleven-child/style.css”);  <—-this is what imports the style from the parent theme. It is important that you get the path correctly or else it will not work.

3.2 ) functions.php ….. For the function.php file you can read more about it at wordpress.org.

Important: You don’t need to add the functions.php file but it is good to have it ready just in case later on you decide to add some function to your website.

Dragged the two files into the child theme directory “folder” on the server and assigned to each file the following permissions 644. See image below.

catablog-upload-files 

4 ) You might have to refresh your browser to view the child theme you just created. Activate the child theme. See image below.

 catablog-activate-child-theme

5 ) Select the child theme to edit from Appearance >> Editor ….Select theme to edit: See image below.

Hint: This is where you will add any extra style to modify your website.

catablog-edit-style 

6 ) This is what your CataBlog gallery might look like on your website using the following shortcode.

[catablog_gallery id="57" limit="6"]

Make sure that you have opened your website on another browser tab or a browser window. See image below.

catablog-view 


7 ) Copy and paste the following code into your style.css file. We are going to add two columns.

// try a number below 50% if you don’t want to change padding, margin or borders.

html body .catablog-catalog .catablog-row {
  float: left;
  width: 47%;
}

Optionally this would have been done on your computer before uploading. But I wanted you to see that you can edit the file from your website admin panel and add what ever code you want to implement. See image below.

catablog-paste-code 


8 ) Navigate back to your browser and refresh to view the results. You can now see two columns. See image below.

catablog-columns-view 

I hope you enjoyed this little tutorial.

If you have any questions please let me know.

Enjoy ;)

More coming soon…………

Feb 192013
 

Custom Display CataBlog Items In Suffusion Theme tutorial will show you how to customise the display of your items in Suffusion Theme or child theme. 

Hint: Remember to always work with a child theme.

We are going to customise and remove the sidebars from your CataBlog items in Suffusion theme. 

Steps to take:

1 ) First you need to read the previous tutorial Integrate CataBlog into your theme tutorial. This will help you understand how to copy and paste the content. This time we will be copying and pasting the content from no-sidebar.php file from Suffusion into the single-catablog-items.php file and taxonomy-catablog-terms.php file.

2 ) Add the following code if you have a right sidebar above <?php get_footer(); ?>.

<?php

add_filter(‘suffusion_can_display_right_sidebars’, ‘kill_right_sidebars’); ?>

If you have a left sidebar then add the following code

<?php

add_filter(‘suffusion_can_display_left_sidebars’, ‘kill_left_sidebars’); ?>

3 ) Add the following style=”width: 1000px;” to <div id=”single-col”>. This will increase the content width to a full size page or post. 

Example: <div id=”single-col” style=”width: 1000px;”>

Now you have your CataBlog items displayed in full width without any sidebars.

I hope you enjoyed this simple tutorial.

Come back for more ;)