WP Photonic Plugin Google Photo Settings post shows you how to setup your Google photos authentication in the plugins settings and more.
Last Updated: February 6, 2024
Latest Update: Updated the documentation.
A lot of people nowadays have a Google account and most are using Google photos app in their computer/ laptop or mobile device. Photonic has a feature integrated that allows you to share your Google photos in your WordPress site very easily. All you have to do is follow these instructions carefully.
Note: If you are reading this tutorial is because you have a Google account set up if not, you must create an account first.
What You Need:
- Photonic
- Suffusion Theme (Optional = I added this theme because it is developed by Sayontan Sinha. Both plugin and theme work flawlessly together.)
WP Photonic Plugin Google Photo Settings
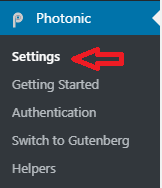
Step 1 ) Go to Photonic -> Settings as illustrated in the image below.
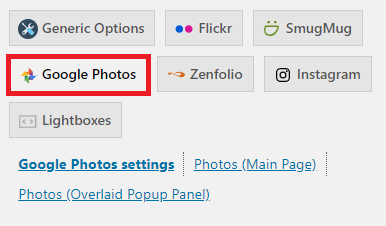
Step 2 ) Go to Google Photos -> Google Photos Settings as illustrated in the image below to start configuring Google photos.
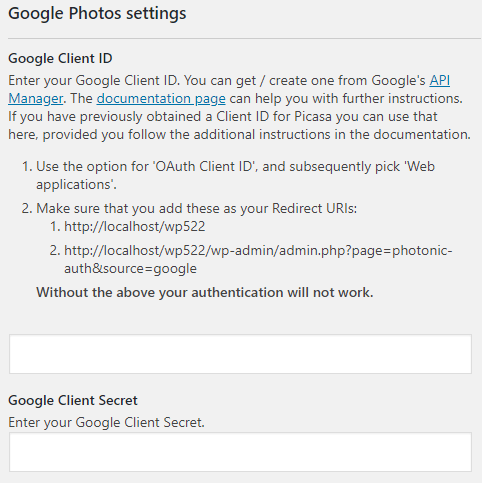
Google Client ID Authentication
Step 3 ) The following image Google Authentication allows you to set up the following options. These settings are extremely important. If you enter the wrong URI your connection will not work. The following link Create Google Client ID For Photonic can help you.
Google Client ID Authentication Entries
- Use the option for ‘OAuth Client ID’, and subsequently pick ‘Web applications’.
- Make sure that you add these as your redirect URIs: (Note: In your site these URIs will be different.)
- http://localhost/wp522
- http://localhost/wp522/wp-admin/admin.php?page=photonic-auth&source=google
Google Client Secret
- Enter your Google Client Secret
Note: Click on the following link google-photos to help you troubleshoot these settings if you run into any issues.
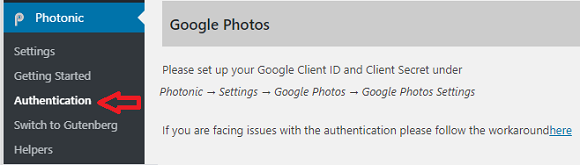
Step 3-a ) Go to Photonic -> Authentication -> Google Photos as illustrated in the image below and follow the instructions. These steps must be carried out after you have obtained your Client ID and Client Secret from your Google account.
Note: If you run into issues, click the following link google-photos/#auth-workaround for help.
Step 4 ) The following image allows you to set up the following options.
Google Photos Settings Part 2
- Refresh Toke (for Back-end / Server-side Authentication)
- Media to show

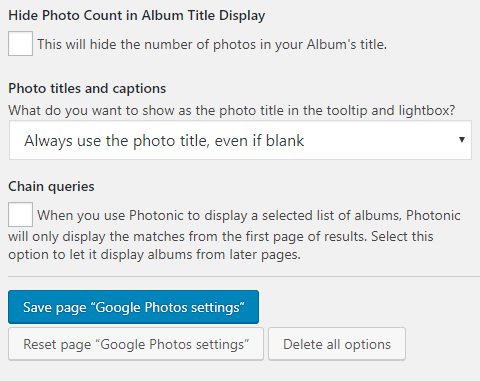
Step 5 ) The following image allows you to set up the following options.
Google Photos Settings Part 3
- Hide Photo Count in Album Title Display
- Photo titles and captions
- Chain queries
Google Photo Settings Buttons
- Click on Save page “Google Photos settings” button when you are ready to save your settings.
- Click on Reset page “Google Photos settings” button is you wish to reset your entries.
- Click on Delete all options button if you wish to delete all photonic options settings in the plugin.
=========================================
FAQ
Q1 Can I display more than 100 photos?
Answer: This is precisely why the “More” button exists. Google will not return more than 100 photos, no matter what you try. Other providers like Flickr or SmugMug have higher limits (500), while Instagram has less (25 or 30 – not sure). Check the following forum post to learn more.
==============
Q2 What is the limit for the API calls and quota in Google?
Answer: The quota limit for requests to the Library API is 10,000 requests per project per day. This includes all API requests, such as uploading, listing media, and applying filters, but not accessing media bytes from a base URL. Check the following link photos library guides api-limits-quotas to learn more.
==============
Q3 How does Photonic handle Googles quota?
Answer:
- Photonic calls the API once while rendering a gallery. When your page loads, if you have 5 galleries on the page, each makes one call. If you click on “More photos”, each click is an additional call. The one exception to this is if you are displaying a group of albums (instead of photos in a single album) and you have enabled query chaining enabled. Query chaining will continue making additional calls till Photonic has reached the end of your album listing.
- 75,000 base URL calls – Displaying each photo in a particular size is one base URL call. If an album on a page has 100 photos, that is 100 base URL calls. If a user clicks on a thumbnail and starts navigating through the lightbox, each view is an additional call. Check the following link support thread to learn more.
==============
Troubleshooting
Q1 I am using Photonic with Google Photos which connected properly. Album selection shows an initial list, and if I select 1, 3, or many albums they display properly. However, if the album desired is not in the initially loaded list, then the LOAD MORE button is used to shows additional albums. Any albums selected will not display.
Answer: Read the reply by the developer in the following forum post link.
=========================================
That is how simple it is to configure Google Photos settings in Photonic.
I will be updating this tutorial from time to time. So keep coming back for the latest update.
If you have any question please let me know.
Enjoy.
Photonic Plugin Tutorial List: