WP Photo Seller Album Settings tutorial will show you how to create or edit an album, enable certain features, sort albums by order and more.
Last Updated: September 8, 2021
Latest News: Updated the documentation.
WP Photo Seller plugin has an Album feature that can help with categorizing your photo galleries (if you have a lot of galleries). Under an Album you can add as many photo galleries you want to and display them in one Album like a category.
The following tutorials shows you to enable the album creation in the settings and how to create or edit albums.
What you need:
- WP Photo Seller (Note: This is an affiliated link = I get a small commission if you make a purchase.)
WP Photo Seller Album Settings
Step 1 ) Go to WP Photo Seller -> Album to create or edit an album.
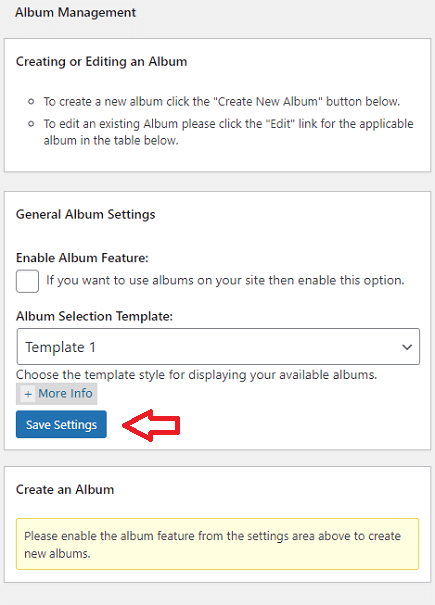
Note: You must Enable Album Feature: as illustrated in the following image if you want to create albums on your site.
General Album Settings
- Enable Album Feature:
- Album Selection Template:
- Click on Save Settings button once you have completed the settings.

Step 2 ) Once you enable and save the settings above, you will see Create New Album Button as illustrated in the following image.

Create/Edit Album
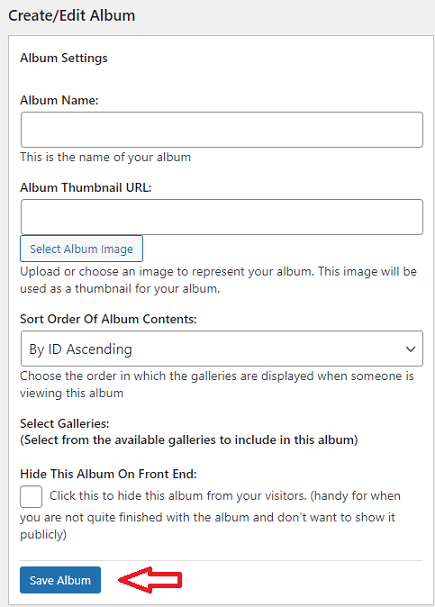
Step 3 ) The following image Create/Edit Album allows you to set up the following options.
Create/Edit Album Options
- Album Name:
- Album Thumbnail URL:
- Sort Order Of Album Contents:
- Select Galleries
- Hide This Album On Front End:
- Click on Save Album button once you complete your set up.

Sort Order Of Album Contents
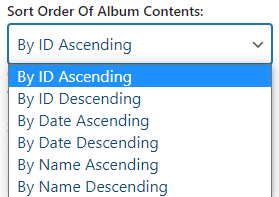
Step 4 ) The following image Sort Order Of Album Contents allows you to select from the following options.
Sort Order Of Album Contents Options
- By ID Ascending
- By ID Descending
- By Date Ascending
- By Date Descending
- By Name Ascending
- By Name Descending

==================================
Click on the following link Admin Functions to complete the tutorial.
I will be updating this post from time to time. So keep coming back for more.
Enjoy.
WP Photo Seller Tutorials