WP Express Checkout Plugin Coupons Settings tutorial shows you how to add discount coupons to your payments buttons in your site.
Last Updated: April 4, 2025
Latest News: Updated the documentation.
Having the ability to add discount coupons to your products is important nowadays. The following steps will show you how simple it is to create discount coupons for your products using WP Express Checkout plugin.
What You Need:
WP Express Checkout Plugin Coupons Settings
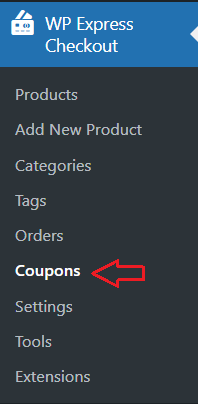
Step 1 ) Go to WP Express Checkout -> Coupons as illustrated in the following image to start adding discount coupons in your site.

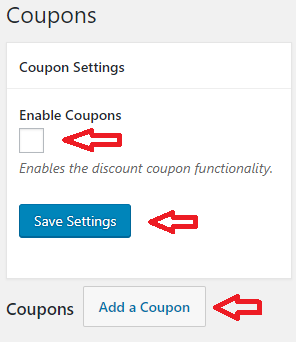
Step 2 ) The following image Coupons allows you to carry out the following options.
Enable Coupons
- Enable Coupons
- Click on Save Settings button once you have enabled the coupon feature.
- Click on Add a Coupon button to start creating your coupons in your site.

Add Coupon
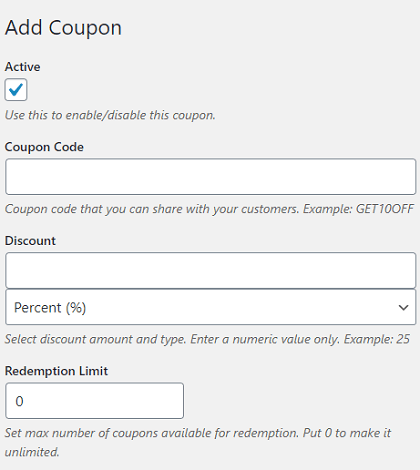
Step 3 ) The following image Add Coupon allows you to set up the following fields.
Add Coupon Part 1
- Active
- Coupon Code
- Discount
- Percent (%)
- Fixed amount
- Redemption Limit

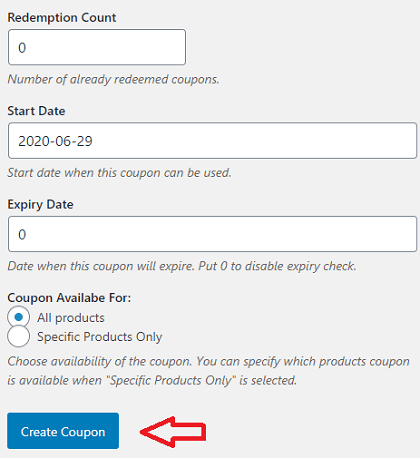
Step 3-a ) The following image allows you to set up the following fields.
Add Coupon Part 2
- Redemption Count
- Start Date
- Expiry Date
- Coupon Available For:
- All products
- Specific Products Only
- Click on Create Coupon button once you have completed configuring the coupon.

Added Coupons Information
Step 4 ) The following image displays information regarding the coupons you have created in your site.
Coupons Information
- ID = This field can be sorted
- Coupon Code = This field can be sorted
- Active = This field can be sorted
- Discount Value
- Redemption Count
- Redemption Limit
- Start Date
- Expiry Date

============================
That is all you need to do to create discount coupons for your site using WP Express Checkout plugin.
I will be updating this post from time to time. So keep coming back for more.
Enjoy.
WP Express Checkout Plugin Tutorial List: